Spring
简介
Spring的理念:使现有的技术更加容易使用,本身是一个大杂烩,整合了现有的技术框架。
- Spring是一个开源的免费框架
- Spring是一个轻量级的、非侵入式的框架
- 重要特性:IoC(控制反转)、AOP(面向切面编程)
- 支持事务的处理。支持整合框架
IoC容器基础
IoC理论
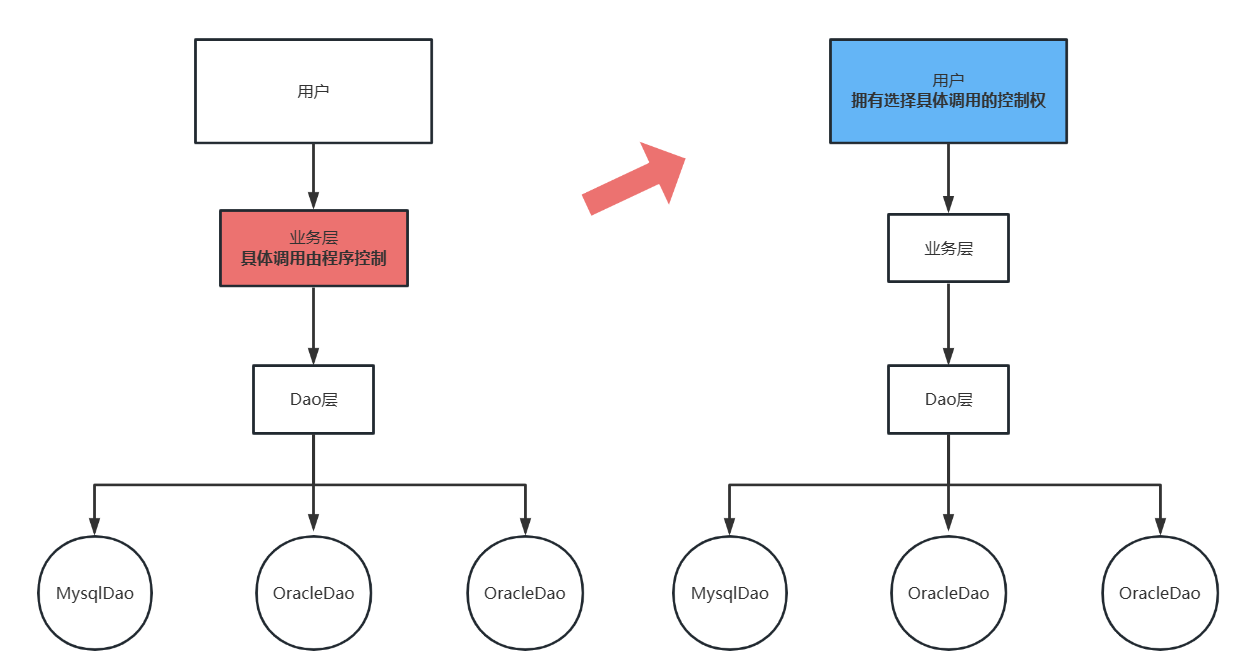
控制反转(IoC,Inversion of Control)是一种思想,由主动地编程转变为被动地接收。
在Spring中,实现控制反转的是IoC容器,其实现方法是依赖注入(DI,Dependency Injection)。
控制:对象创建(实例化、管理)的权力。
反转:控制权交给外部环境(IoC 容器),程序本身被动地接收对象。
依赖:bean对象的创建依赖于容器。
注入:bean对象中的所有属性,由容器来注入。
传统的方式使用面向对象编程,对象的创建与对象间的依赖关系完全硬编码在程序中,由程序自己控制:
public class UserServiceImpl implements UserService {
    // 传统的方式,程序创建的具体实现类的对象由代码本身决定
    private UserDao userDao = new UserDaoMysqlImpl();

    @Override
    public void getUser() {
        userDao.getUser();
    }
}利用set实现动态值的注入,将获取依赖对象的控制权从程序本身交给用户。大大降低了系统的耦合性,可以更加专注在业务的实现上。
public class UserServiceImpl implements UserService {
    private UserDao userDao;

    // 利用set实现 动态值的注入
    public void setUserDao(UserDao userDao) {
        this.userDao = userDao;
    }

    @Override
    public void getUser() {
        userDao.getUser();
    }
}
第一个Spring项目
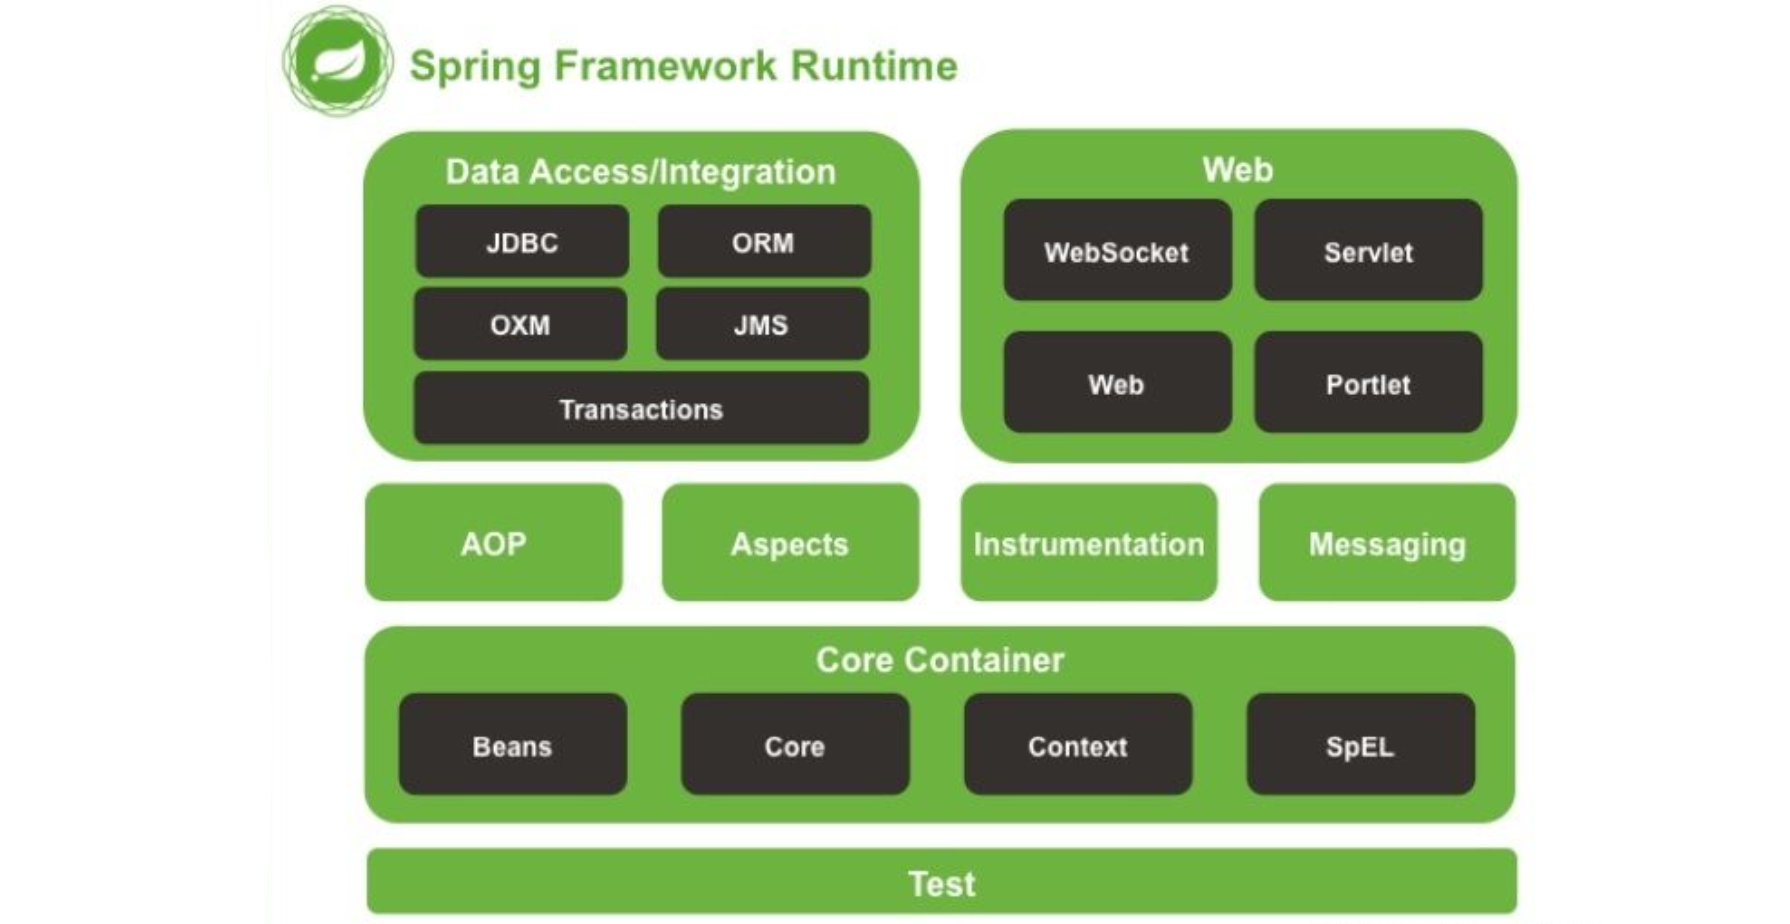
Spring框架包含了许多模块,其中核心模块是Core Container。Spring核心模块的Maven依赖:
<dependency>
    <groupId>org.springframework</groupId>
    <artifactId>spring-context</artifactId>
    <version>6.1.11</version>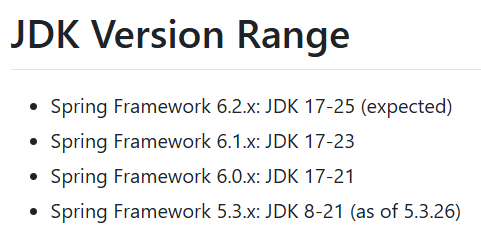
</dependency>由pring-framework Wiki · GitHub可知,Spring框架和JDK版本的对应关系:
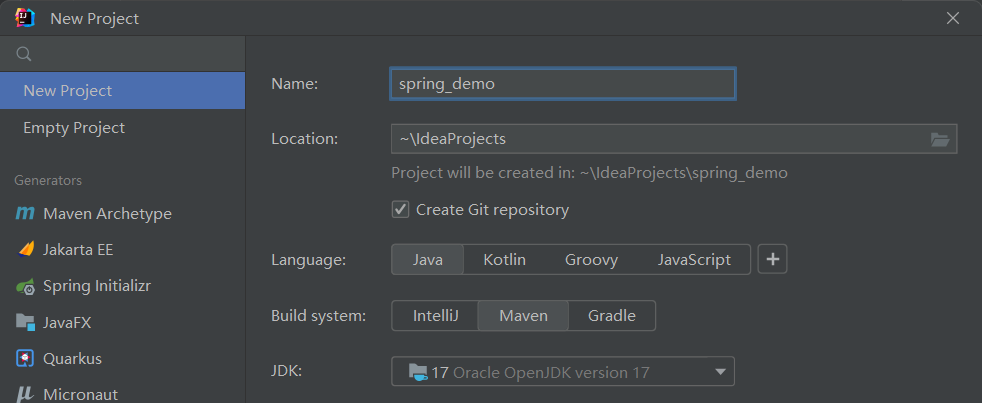
创建项目
添加Spring核心模块依赖
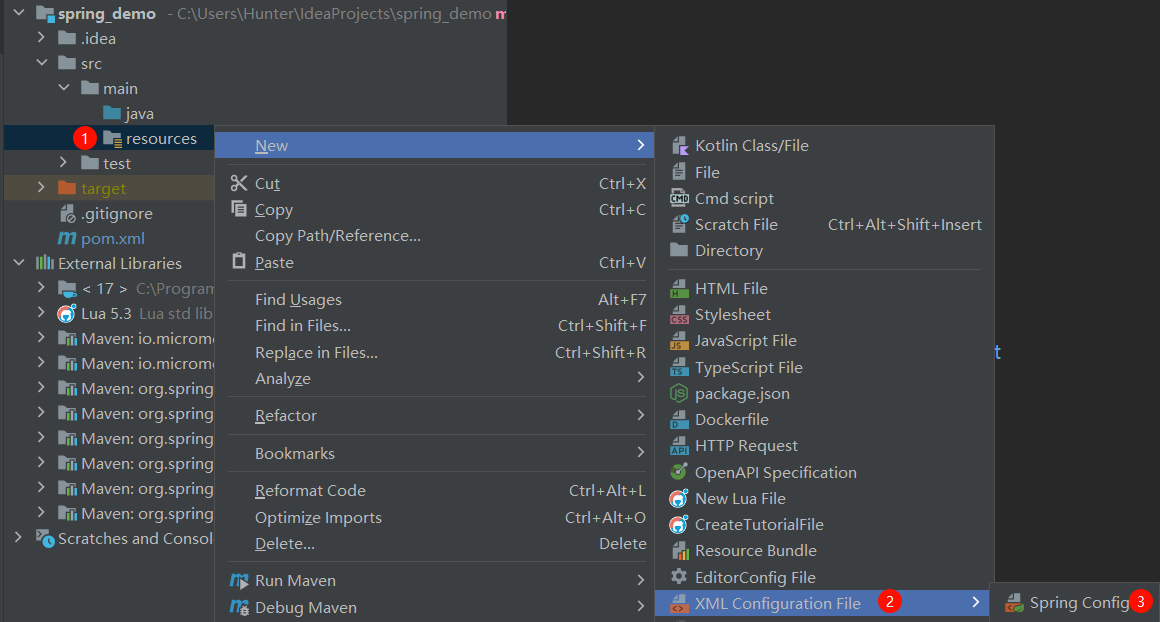
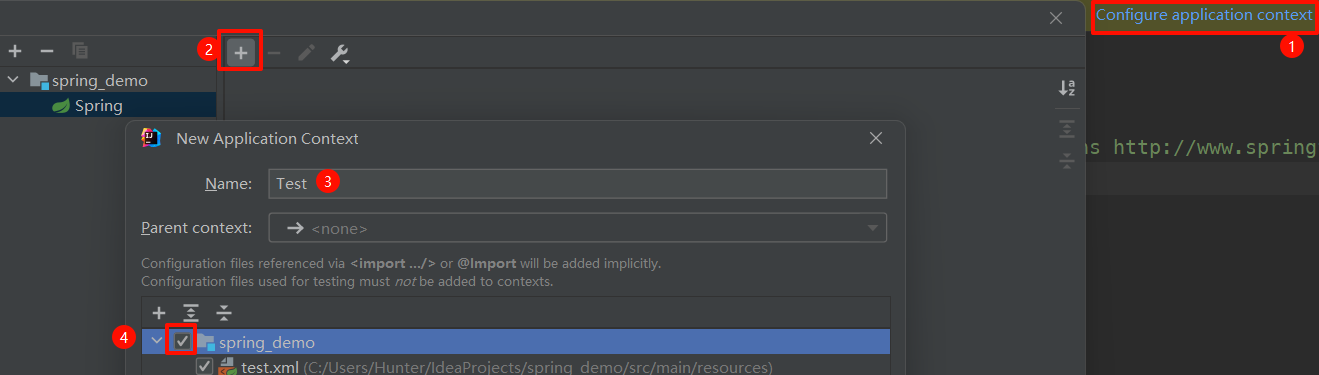
添加Spring配置文件,并配置为应用程序上下文。
创建一个Main类,并创建一个代表IoC容器的应用程序上下文,负责实例化、配置和组装Bean。
package com.hunter;

import org.springframework.context.ApplicationContext;
import org.springframework.context.support.ClassPathXmlApplicationContext;

/**
 * @author Hunter
 * @since 2024/7/24
 */
public class Main {
    public static void main(String[] args) {
        // ApplicationContext是应用程序上下文的顶层接口
        // 使用XML配置文件,就使用ClassPathXmlApplicationContext实现类
        ApplicationContext context = new ClassPathXmlApplicationContext("test.xml");
    }
}
定义一个Student类,让IoC容器帮忙管理Student对象。
package com.hunter.entity; /** * @author Hunter * @since 2024/7/24 */ public class Student { public void hello() { System.out.println("Hello World!"); } }<bean name="student" class="com.hunter.entity.Student"/>Student对象无需再创建,由IoC容器自动创建并提供,可以直接从上下文中获取到。
public static void main(String[] args) {
    // ApplicationContext是应用程序上下文的顶层接口
    // 使用XML配置文件,就使用ClassPathXmlApplicationContext实现类
    ApplicationContext context = new ClassPathXmlApplicationContext("test.xml");

    Student student = (Student) context.getBean("student");
    student.hello();
}

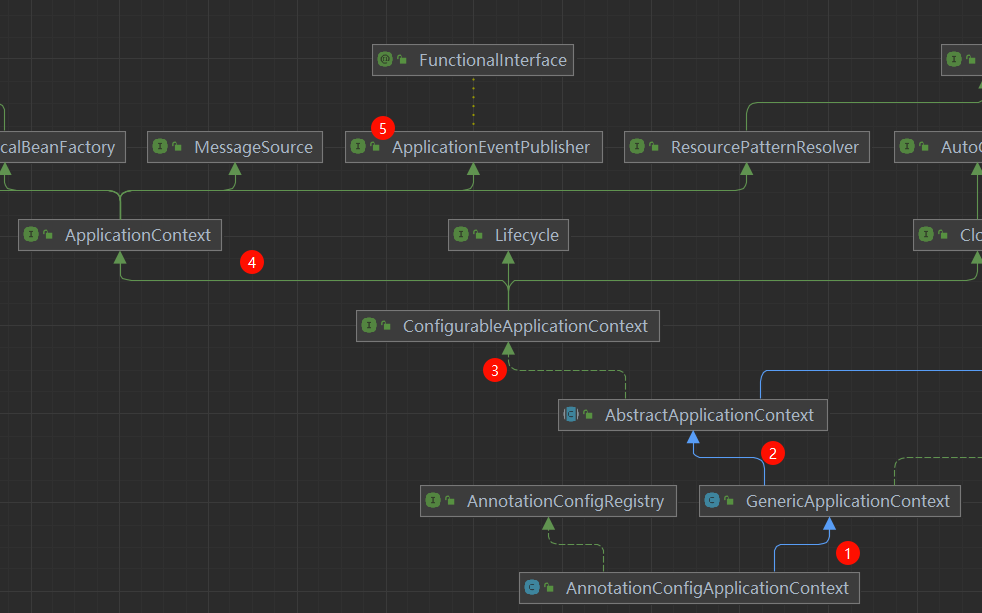
ApplicationContext 接口
ApplicationContext是Spring框架提供的核心接口,提供了丰富的功能,包括:
Bean管理
- 获取Bean实例:
getBean() - 检查Bean是否存在:
containsBean() - 获取Bean的类型和别名
- 获取Bean实例:
配置元数据访问
- 读取环境变量和配置属性
- 访问资源文件(如classpath:资源)
发布事件
- 发布应用事件:
publishEvent() - 监听应用事件
- 发布应用事件:
支持AOP
- 创建自动代理
- 切面织入
国际化支持
获取本地化消息:
getMessage()
Bean的注册与配置
Spring配置文件可以有很多个,并且这些配置文件可以通过<import resource="xxx" />标签相互导入:
<?xml version="1.0" encoding="UTF-8"?>
<beans ...>
    <import resource="test.xml"/>
</beans>
要配置一个Bean,需要在Spring配置文件中添加如下标签:
<bean class="com.hunter.entity.Student">
- class属性:填写完整类名
- name属性:为Bean指定一个名称,不同的Bean名称不能相同
- alias属性:别名
使用上述三个属性任意一个,ApplicationContext的getBean()方法都能拿到对应的Bean。
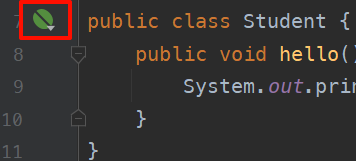
类的旁边出现Spring Bean的图标,表示Bean已经注册成功:
这样就能根据类向IoC容器索要Bean实例对象:
// ApplicationContext是应用程序上下文的顶层接口
// 使用XML配置文件,就使用ClassPathXmlApplicationContext实现类
ApplicationContext context = new ClassPathXmlApplicationContext("test.xml");

Student student = (Student) context.getBean("student");
student.hello();
Bean的作用域
默认情况下,通过IoC容器进行管理的Bean都是单例模式。Spring应用上下文配置文件中,Bean标签有相应的属性scope可以设置Bean的作用域:
在Bean默认的作用域singleton(单例)模式下,配置文件加载的时候,容器中管理的所有对象就已经完成了初始化。后续getBean的操作直接获取对象。
如果希望单例模式下的Bean不用一开始就加载,而是也在被获取时被加载,可以通过
lazy-init="true"属性开启懒加载。<bean class="com.hunter.entity.Student" lazy-init="true">由于单例模式下Bean的加载顺序由IoC自己决定,如果需要维护Bean的加载顺序,可以使用
depends-on属性设定前置加载的Bean。<bean class="com.hunter.entity.Student" depends-on="teacher">prototype(原型)模式下,只有在获取对象时才会被创建。
依赖注入 DI
IoC容器创建对象时,如果需要预先给定的属性注入到对象中,可以使用<property>标签实现
<!--  使用Spring来创建对象,在Spring中,这些对象称为bean
      id: 变量名
      class: 类
		name: 也是别名,可以同时取多个别名,可以用空格、逗号、分号分隔
      -->
<bean id="mysqlImpl" class="com.hunter.dao.UserDaoMysqlImpl"/>
<bean id="sqlServerImpl" class="com.hunter.dao.UserDaoSqlServerImpl"/>

<!--  property相当于给对象中的属性赋值
      ref: 引用Spring容器中创建好的对象
      value: 具体的值,基本数据类型
      -->
<bean id="userServiceImpl" class="com.hunter.service.UserServiceImpl">
    <property name="userDao" ref="mysqlImpl"/>
</bean>

<bean id="user" class="com.hunter.pojo.User" name="user2 u2,u3;u4">
    <property name="name" value="hunter"/>
</bean>
默认使用无参构造创建对象
<!-- 无参构造 -->
<bean id="user" class="com.hunter.pojo.User">
    <property name="name" value="hunter"/>
</bean>
使用有参构造创建对象
<!-- 有参构造函数,根据下标赋值 -->
<bean id="user" class="com.hunter.pojo.User">
    <constructor-arg index="0" value="hunter"/>
</bean>


<!-- 有参构造函数,根据参数名赋值 -->
<bean id="user" class="com.hunter.pojo.User">
    <constructor-arg name="name" value="hunter"/>
</bean>
使用构造器进行依赖注入
使用Set方式进行依赖注入
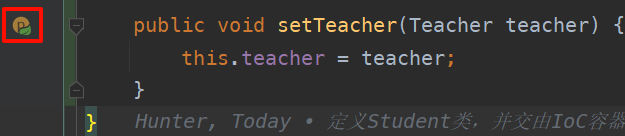
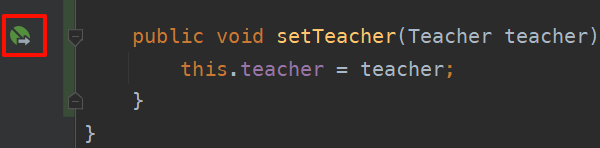
成员属性必须要有set方法,成功注入的话,set方法左侧会有Spring Bean Property的图标:
复杂类型
public class Address {
    private String address;

    public String getAddress() {
        return address;
    }

    public void setAddress(String address) {
        this.address = address;
    }
}

// =============================================================================
public class Student {
    private String name;

    private boolean isMale;

    private Address address;

    private String[] books;

    private List<String> hobbies;

    private Map<String, String> cards;

    private Set<String> games;

    private Properties info;

    //...

    @Override
    public String toString() {
        return "Student{" +
                "name='" + name + '\'' +
                ", isMale=" + isMale +
                ", address=" + address +
                ", books=" + Arrays.toString(books) +
                ", hobbies=" + hobbies +
                ", cards=" + cards +
                ", games=" + games +
                ", info=" + info +
                '}';
    }
}
beans.xml
<bean id="student" class="com.hunter.pojo.Student">
    <!-- 普通值注入,使用value -->
    <property name="name" value="黄铁"/>
</bean>
完善注入信息
<bean id="student" class="com.hunter.pojo.Student"> <!-- 注入普通值,使用value --> <property name="name" value="黄铁"/> <!-- 注入bean,使用ref --> <property name="address" ref="address"/> <!-- 注入数组,使用array --> <property name="books"> <array> <value>银河帝国</value> <value>灌篮高手</value> </array> </property> <!-- 注入List,使用list --> <property name="hobbies"> <list> <value>电影</value> <value>篮球</value> </list> </property> <!-- 注入Map,使用map --> <property name="cards"> <map> <entry key="身份证" value="3303000000000000000"/> <entry key="校园卡" value="3002092000002033"/> </map> </property> <!-- 注入Set,使用set --> <property name="games"> <set> <value>麻将</value> <value>斗地主</value> </set> </property> <!-- 注入null --> <property name="girlFriend"> <null/> </property> <!-- 注入Properties --> <property name="info"> <props> <prop key="driver">com.mysql.cj.jdbc.Driver</prop> <prop key="jdbc">jdbc:mysql://localhost:3306/mybatis?useSSL=true&useUnicode=true&characterEncoding=UTF-8</prop> </props> </property> </bean> <bean id="address" class="com.hunter.pojo.Address"/>
扩展方式
可以使用p命令空间和c命名空间进行注入。
<beans xmlns="http://www.springframework.org/schema/beans"
       xmlns:xsi="http://www.w3.org/2001/XMLSchema-instance"
       xmlns:p="http://www.springframework.org/schema/p"
       xmlns:c="http://www.springframework.org/schema/c"
       xsi:schemaLocation="http://www.springframework.org/schema/beans
        https://www.springframework.org/schema/beans/spring-beans.xsd">

    <!-- p命令空间注入,可以直接注入属性的值: property -->
    <bean id="user" class="com.hunter.pojo.User" p:name="hunter" p:age="30"/>

    <!-- c命令空间注入,通过构造器注入:constructor-arg -->
    <bean id="user2" class="com.hunter.pojo.User" c:name="hunter" c:age="30"/>

</beans>
Bean的自动装配
自动装配就是让IoC容器自己寻找需要填入的值,不需要显式地指定<property>,只需要提供set方法,以及<bean>标签页中添加autowire属性。
<bean name="student" class="com.hunter.entity.Student" autowire="byType" />autowire属性:
byType:根据类型寻找合适的BeanbyName:根据名字寻找合适的Beanconstructor:支持使用构造方法进行依赖注入的自动装配
自动装配虽然省事,但太过机械,有时候还可能遇到问题:

此时,由于autowire的规则为byType,存在两个候选Bean,但是我们其实希望ProgramTeacher这个Bean在任何情况下都不参与到自动装配中,此时就可以通过autowire-candidate=false将它的自动装配候选关闭:
<bean name="teacher" class="com.hunter.entity.ArtTeacher"/>
<bean name="teacher2" class="com.hunter.entity.ProgramTeacher" autowire-candidate="false"/>
<bean name="student" class="com.hunter.entity.Student" autowire="byType"/>除了这种方式,我们也可以设定primary属性,表示将Bean作为主要的Bean,当出现歧义时,也会优先选择:
<bean name="teacher" class="com.hunter.entity.ArtTeacher" primary="true"/>
<bean name="teacher2" class="com.hunter.entity.ProgramTeacher"/>
<bean name="student" class="com.hunter.entity.Student" autowire="byType"/>
生命周期与继承
除了修改构造方法,也可以通过init-method和destroy-method为Bean指定初始化方法和销毁方法,以便在对象创建和被销毁时执行一些其他的任务。
<bean name="student" class="com.hunter.entity.Student" init-method="init" destroy-method="destroy"/>初始化方法在对象构造完成后执行,销毁方法在容器关闭时会执行:
// 当容器创建时,默认情况下Bean都是单例的,那么都会在一开始就加载好,对象构造完成后,会执行init-method
ClassPathXmlApplicationContext context = new ClassPathXmlApplicationContext("test.xml");

// 调用close方法关闭容器,此时容器内存放的Bean也会被一起销毁,执行destroy-method
context.close();如果Bean不是单例模式,而是采用的原型模式prototype,那么就只会在获取时才创建,并调用init-method,而对应的销毁方法不会被调用(对于原型模式下的Bean,Spring无法顾及其完整生命周期)。
属性继承
Bean之间的继承关系不是类的继承,而是属性的继承。
<bean class="com.test.bean.SportStudent" parent="artStudent"/>这样,在ArtStudent Bean中配置的属性,会直接继承给SportStudent Bean(注意,所有配置的属性,在子Bean中必须也要存在,并且可以进行注入,否则会出现错误)当然,如果子类中某些属性比较特殊,也可以在继承的基础上单独配置:
<bean name="artStudent" class="com.test.bean.ArtStudent">
    <property name="name" value="小明"/>
    <property name="id" value="1"/>
</bean>
<bean class="com.test.bean.SportStudent" parent="artStudent">
    <property name="id" value="2"/>
</bean>如果只是希望某一个Bean仅作为一个配置模版供其他Bean继承使用,那么可以将其配置为abstract,这样,容器就不会创建这个Bean的对象了。
<bean name="artStudent" class="com.test.bean.ArtStudent" abstract="true">
    <property name="name" value="小明"/>
</bean>
<bean class="com.test.bean.SportStudent" parent="artStudent"/>如果我们希望整个上下文中所有的Bean都采用某种配置,可以在最外层的<beans>标签中进行默认配置:

Bean自己可以进行配置覆盖掉默认配置。
工厂模式和工厂Bean
默认情况下,IoC容器会调用Bean对应类型的构造方法进行对象创建。但是某些使时候,我们希望Spring不要直接利用反射机制创建对象,而是先找到对应的工厂类,再利用工厂类生产需要的Bean对象,可以通过factory-method属性进行指定。
public class Student {
    Student() {
        System.out.println("我被构造了");
    }
}


public class StudentFactory {
    public static Student getStudent(){
      	System.out.println("欢迎光临 创建学生工厂");
        return new Student();
    }
}<bean class="com.test.bean.StudentFactory" factory-method="getStudent"/>- Bean类型需要填写为工厂类
factory-method指定对应的工厂方法- 最后注册的其实是工厂方法的返回类型,即依然是Student的Bean。
某些工厂类的工厂方法不是静态方法,需要构造工厂类对象。可以将这种工厂类注册为工厂Bean,再使用factory-bean指定Bean的工厂Bean。在使用factory-bean之后,不需要再指定class属性。
public class StudentFactory {
    public Student getStudent(){
        System.out.println("欢迎光临电子厂");
        return new Student();
    }
}<bean name="studentFactory" class="com.test.bean.StudentFactory"/>
<bean factory-bean="studentFactory" factory-method="getStudnet"/>如果想获取工厂Bean生产的对象,可以直接输入工厂Bean的名称,这样不会得到工厂Bean的实例,而是工厂生产的对象。
Student stu = (Student) context.getBean("studentFactory");如果想获取工厂Bean的实例,需要在工厂Bean的名称前添加&符号:
StudentFactory stu = (StudentFactory) context.getBean("&studentFactory");使用注解开发
使用Spring配置文件进行配置,有种原始以及远离代码的脱节感,使用注解开发,就不需要Spring配置文件。
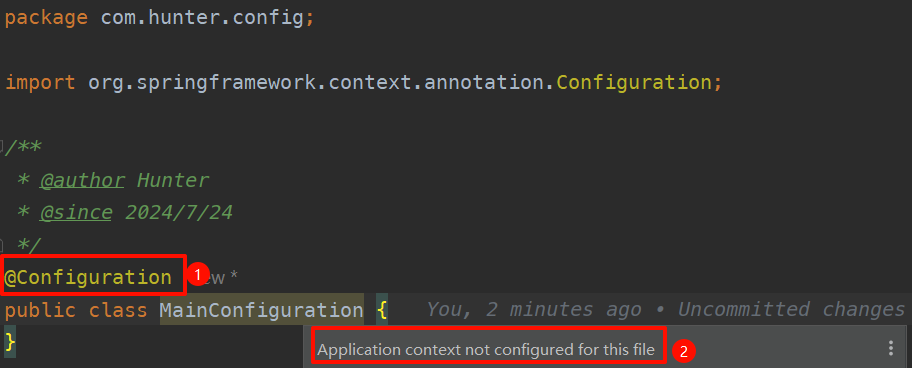
创建一个Spring配置类就能达到和Spring配置文件等价的效果,使用**@Configuration注解**表明这是一个Spring配置类。再将这个Spring配置类配置为应用程序上下文。
创建一个Main类,并创建一个代表IoC容器的应用程序上下文,负责实例化、配置和组装Bean。
public class Main {
    public static void main(String[] args) {
        // ApplicationContext是应用程序上下文的顶层接口
        // 使用Spring配置类,就使用AnnotationConfigApplicationContext实现类
        ApplicationContext context = new AnnotationConfigApplicationContext(MainConfiguration.class);
    }
}AnnotationConfigApplicationContext构造方法可以接收多个配置类:

使用@Bean配置Bean
@Configuration
public class MainConfiguration {

    @Bean("student")
    public Student student() {
        return new Student();
    }
}
等价于Spring配置文件:
<?xml version="1.0" encoding="UTF-8"?>
<beans xmlns="http://www.springframework.org/schema/beans"
       xmlns:xsi="http://www.w3.org/2001/XMLSchema-instance"
       xsi:schemaLocation="http://www.springframework.org/schema/beans http://www.springframework.org/schema/beans/spring-beans.xsd">

    <bean name="student" class="com.hunter.entity.Student"/>
</beans>如果@Bean不指定name属性,Spring会为其添加默认的name属性,值为对应的方法名称。
同样,可以通过@Import注解引入其他配置类:
@Configuration
@Import(MinorConfiguration.class)
public class MainConfiguration {
   // ...
}
其它Spring配置文件中的设置,在Spring配置类中的形式:
@Configuration
public class MainConfiguration {

    @Bean(name = "student", initMethod = "", destroyMethod = "", autowireCandidate = false) // autowireCandidate = false 自动装配候选 关闭
    @Lazy(true) // 懒加载
    @Scope("prototype") // 作用域
    @DependsOn("teacher") // 设置前置加载的bean
    public Student student() {
        return new Student();
    }
}需要引入其他的Bean进行的注入,可以直接将其作为形式参数放到方法中:
@Bean
public Teacher teacher() {
    return new Teacher();
}

@Bean
public Student student(Teacher teacher) {
    return new Student(teacher);
}还可以直接到Bean对应的类中使用自动装配:
public class Student {
    @Autowired
    private Teacher teacher;
}@Autowired并不是只能用于字段,它同样可以用于构造方法或是Setter:
public class Student {
    private Teacher teacher;

    @Autowired
    public void setTeacher(Teacher teacher) {
        this.teacher = teacher;
    }
}@Autowired默认采用byType的方式进行自动装配,要是出现了多个相同类型的Bean,可以配合@Qualifier注解显式指定名称:
public class Student {
    @Autowired
    @Qualifier("a")
    private Teacher teacher;
 }
随着Java版本的更新迭代,某些javax包下的包被逐渐弃用并移除。在JDK11版本以后,javax.annotation这个包被移除并且更名为jakarta.annotation,其中有一个非常重要的注解,叫做@Resource,它的作用与@Autowired时相同的,也可以实现自动装配。
在IDEA中并不推荐使用@Autowired注解对成员字段进行自动装配,而是推荐使用@Resource。如果需要使用@Resource,还需要额外导入包:
<!-- 支持@Resource注解 -->
<dependency>
    <groupId>jakarta.annotation</groupId>
    <artifactId>jakarta.annotation-api</artifactId>
    <version>3.0.0</version>
</dependency>
@Autowired和@Resource有些机制上的不同:
- @Resource默认ByName如果找不到则ByType,可以添加到set方法、字段上。
- @Autowired默认是byType,只会根据类型寻找,可以添加在构造方法、set方法、字段、方法参数上。
因为@Resource的匹配机制更加合理高效,因此IDEA并不推荐使用@Autowired字段注入。实际上Spring官方更推荐我们使用基于构造方法或是Setter的@Autowired注入,比如Setter 注入的一个好处是,Setter 方法使该类的对象能够在以后重新配置或重新注入。
还有@PostConstruct和@PreDestroy,它们效果和Spring配置类中的initMethod和destroyMethod一样:
@PostConstruct
public void init(){
    System.out.println("我是初始化方法");
}

@PreDestroy
public void destroy(){
    System.out.println("我是销毁方法");
}使用@Component配置Bean 【目前最常用】
使用@Bean注解来注册Bean,只是单纯地new一个对象出来,还需要在Spring配置类中写一个方法,不太方便。能不能让容器自己反射获取构造方法生成对象?
需要两个步骤:
- 在需要注册为Bean的类上添加
@Component注解,对其进行注册。 - 在Spring配置类添加一个自动扫描
@ComponentScan,告知Spring需要在哪些包中查找@Component声明的Bean。
package com.hunter.entity;

@Component("customName")   // 可以自己起名字
public class Student {
	// ...
}
@Configuration
@ComponentScan("com.hunter.entity")
public class MainConfiguration {
// ...
}Spring在扫描对应包下的所有类时,会自动将添加了@Component注解的类注册为Bean。只不过这种形式只适用于自己编写的类,如果是第三方包提供的类,只能使用@Bean来完成注册。
@Component形式注册的Bean,Spring会为其添加一个默认的name属性,值为类名并且转换为首字母小写的驼峰命名法:
@Component
public class Student {
}


Student student = (Student) context.getBean("student");对于使用@Component注册的Bean,如果构造方法不是默认的无参构造,就会默认对有参构造的每个参数进行自动注入:
@Component
public class Student {
    Teacher teacher;

    public Student(Teacher teacher){   // 如果有Teacher类型的Bean,参数会被自动注入
        this.teacher = teacher;
    }
}Spring还提供了FactoryBean接口用于实现工厂模式:
prototype模式
@Component
public class StudentFactory implements FactoryBean<Student> {
    /**
     * 获取工厂类生产的Bean对象
     * @return 生产的Bean对象
     */
    @Override
    public Student getObject() {
        return new Student();
    }

    /**
     * 获取生产的Bean的类型
     *
     * @return 生产的Bean的类型
     */
    @Override
    public Class<?> getObjectType() {
        return Student.class;
    }

    /**
     * 是否单例模式
     *
     * @return 是否单例模式
     */
    @Override
    public boolean isSingleton() {
        return false;
    }
}
singleton模式
@Component
public class StudentFactory implements FactoryBean<Student> {
    private final Student student = new Student();

    /**
     * 获取工厂类生产的Bean对象
     * @return 生产的Bean对象
     */
    @Override
    public Student getObject() {
        return student;
    }

    /**
     * 获取生产的Bean的类型
     *
     * @return 生产的Bean的类型
     */
    @Override
    public Class<?> getObjectType() {
        return Student.class;
    }

    /**
     * 是否单例模式
     *
     * @return 是否单例模式
     */
    @Override
    public boolean isSingleton() {
        return true;
    }
}
Spring高级特性
Bean Aware
Aware的中文含义是感知。简单来说,它就是一个标识,实现此接口的类会获得某些感知能力。Spring容器会在Bean被加载时,根据实现的感知接口,调用实现的对应感知方法。
例如BeanNameAware接口,能够获取BeanName:
@Component
public class Student implements BeanNameAware {

    @Override
    public void setBeanName(String name) {   // Bean在加载的时候,容器就会自动调用此方法,将Bean的名称给到我们
        System.out.println("我在加载阶段获得了Bean名字:"+name);
    }
}又比如BeanClassLoaderAware,它使得我们可以在Bean加载阶段就获取到当前Bean的类加载器:
@Component
public class Student implements BeanClassLoaderAware {

    @Override
    public void setBeanClassLoader(ClassLoader classLoader) {
        System.out.println(classLoader);
    }
}
任务调度
为了执行某些任务,我们可能希望使用多线程处理结果,或者执行一些定时任务。Spring框架提供了便捷的方式进行任务调度。
异步任务
首先需要Spring支持异步任务,在Spring配置类上添加
@EnableAsync注解。@Configuration @ComponentScan("com.hunter.entity") @EnableAsync public class MainConfiguration { }在需要异步执行的方法上,添加
@Async注解。当此方法被调用时,就会异步执行。@Component public class Student { public void syncTest() throws InterruptedException { System.out.println(Thread.currentThread().getName() + "同步执行的方法,开始..."); Thread.sleep(3000); System.out.println("同步方法执行结束"); } @Async public void asyncTest() throws InterruptedException { System.out.println(Thread.currentThread().getName() + "异步执行的方法,开始..."); Thread.sleep(3000); System.out.println("异步方法执行结束"); }public static void main(String[] args) throws InterruptedException { // ApplicationContext是应用程序上下文的顶层接口 // 使用Spring配置类,就使用AnnotationConfigApplicationContext实现类 ApplicationContext context = new AnnotationConfigApplicationContext(MainConfiguration.class); // 通过反射机制创建Student对象 Student student = (Student) context.getBean("student"); student.asyncTest(); student.syncTest(); }
很明显,异步执行的方法不是当前线程启动的。
但是要注意,添加@Async注解的方法的返回值只能是void或Future类型。
定时任务
Spring中的定时任务是全局性质的,当Spring程序启动后,定时任务也就跟着启动了。
首先需要Spring支持定时任务,在Spring配置类上添加
@EnableScheduling注解。@Configuration @ComponentScan("com.hunter.entity") @EnableAsync @EnableScheduling public class MainConfiguration { }可以直接在配置类里编写定时任务,并添加
@Scheduled注解。@Scheduled(cron = "*/3 * * * * ?") public void task() { System.out.println("定时任务" + Instant.now()); }
@Scheduled注解有很多参数,需要指定fixedDelay、fixedRate、cron其中之一,否则无法创建定时任务。
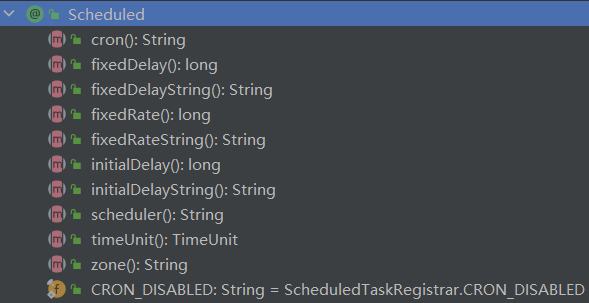
- fixedDelay:在上次定时任务执行完之后,间隔多久执行
- fixedRate:无论上一次任务是否执行完,两次任务之间的时间间隔
- cron表达式
cron表达式
cron表达式是一串字符串,被5个空格分成6个部分。以ABCDEF为例,标准格式为"A B C D E F"。
含义为"秒 分 时 日 月 星期"。
为什么没有年呢?其实星期后面就是年,但这个年可加可不加,加上就是 “A B C D E F G” 格式。
为什么通常不加年呢?你见过哪些程序会指定在哪一年跑的?或者每几年跑一次的?
所以,年的实用性不大,加上又为了书写方便,规则上就干脆省掉了。
举例:
cron="0 */5 * * * ?"*/5:每5分钟
每5分0秒执行一次。
cron="0 30 8,10,12 * * ?"每天8点30,10点30,12点30执行一次。
cron="0 0 9-18 * * MON-FRI"每周一到周五的9点到18点各个整点执行一次。
cron="0 0 14 L * ?"每个月最后一天的14点执行一次。
语法:
- 数字:具体时间
*:任意时间*/x:每x时间-:把时间连接成时间段- 星期的英文大写取前三个字母:星期;没有指定星期,用
?代替。 L:最后,只能用在日期和星期中
监听器
监听就是等待某个事件被触发,对应事件的监听器就会被通知。
让Bean继承ApplicationListener,并且将类型指定为对应的Event事件,这样,当某个事件发生时,就会被通知。
例如ContextRefreshedEvent,这个事件会在Spring容器初始化完成时触发一次。
@Component
public class TestListener implements ApplicationListener<ContextRefreshedEvent> {
    @Override
    public void onApplicationEvent(ContextRefreshedEvent event) {
        System.out.println(event.getApplicationContext());   //可以直接通过事件获取到事件相关的东西
    }
}如果监听器所在包的位置不在**Spring配置类的自动扫描@ComponentScan**中,要加进去。
自定义事件
自定义事件需要继承ApplicationEvent:
package com.hunter.listener;

public class TestEvent extends ApplicationEvent {
    public TestEvent(Object source) {
        super(source);
    }
}
使用监听器监听自定义事件:
@Component
public class TestListener implements ApplicationListener<TestEvent> {
    @Override
    public void onApplicationEvent(TestEvent event) {
        System.out.println("监听到了一次自定义事件");
    }
}比如希望在定时任务中,每秒钟发布一次该事件:
@Component
public class Student implements ApplicationEventPublisherAware {
	// 事件发布器
    private ApplicationEventPublisher publisher;

    @Scheduled(cron = "*/1 * * * * ?")
    public void task() {
        // 发布事件
        publisher.publishEvent(new TestEvent(this));
    }

    /**
     * 通过ApplicationEventPublisherAware,在Spring容器初始化时能拿到事件发布器。
     * 实际上拿到的是我们创建的ApplicationContext对象。
    */
    @Override
    public void setApplicationEventPublisher(ApplicationEventPublisher publisher) {
        this.publisher = publisher;
    }
}
发布事件的位置,可以跳转到对应的事件监听器。

SpringEL表达式
SPEL是一种强大又简洁的装配Bean的方式。它可以通过运行期间执行的表达式,将值装配到属性或构造方法中;可以调用JDK中提供的静态常量,获取外部Properties文件中的配置。
外部属性注入
以.properties结尾的配置文件为例:
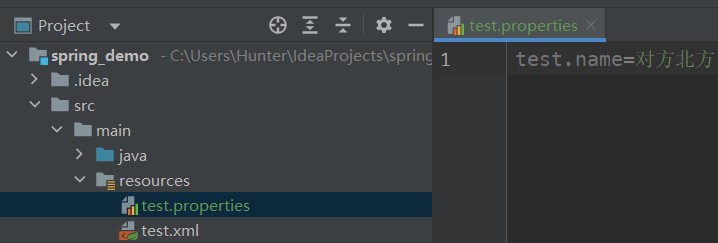
在Spring配置类上添加
@PropertySource注解,引入配置文件。@Configuration @ComponentScan("com.hunter") @EnableAsync @EnableScheduling @PropertySource("classpath:test.properties") public class MainConfiguration { }classpath:类路径类路径的组成:
- 编译后的类文件目录(通常是
/target/classes或/build/classes) - 项目依赖的 JAR 文件
为什么
test.properties文件会在所谓的类路径下呢?在 Maven 或 Gradle 等构建工具的标准项目结构中,
src/main/resources目录用于存放非 Java 文件的资源。**在构建过程中,这个目录的内容会被复制到输出目录(如/target/classes),这确保了资源文件和类文件位于同一目录结构中,便于访问。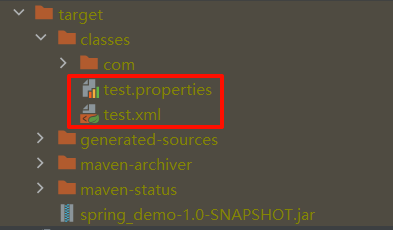
- 编译后的类文件目录(通常是
可以使用**
@Value注解将外部配置文件中的值注入到任何想要的位置**。@Component public class Student { @Value("${test.name}") // 这里需要在外层套上占位符 ${ } private String name; // String会被自动赋值为配置文件中对应属性的值 public void hello() { System.out.println("我的名字是:" + name); } }@Component public class Student { private final String name; // 构造方法中的参数除了被自动注入外,也可以选择使用@Value进行注入 public Student(@Value("${test.name}") String name) { this.name = name; } public void hello(){ System.out.println("我的名字是:"+name); } }
SpEL简单使用
Spring提供了一套非常高级的SpEL表达式,通过使用表达式,可以更加灵活地使用Spring框架。
创建一个SpEL表达式的例子:
ExpressionParser parser = new SpelExpressionParser();
Expression exp = parser.parseExpression("'Hello World'.toUpperCase()");  // 使用parseExpression方法来创建一个表达式
System.out.println(exp.getValue()); // 表达式最终的运算结果可以通过getValue()获取- 对于Getter方法,可以像访问属性一样去使用。
- 表达式可以多级调用。
Expression exp = parser.parseExpression("new String('Hello World').bytes.length");   // 执行getBytes()方法,再访问数组的length属性
System.out.println(exp.getValue());SpEL表达式部分后续再学习完善,参考:柏码知识库 | SSM笔记(一)Spring基础
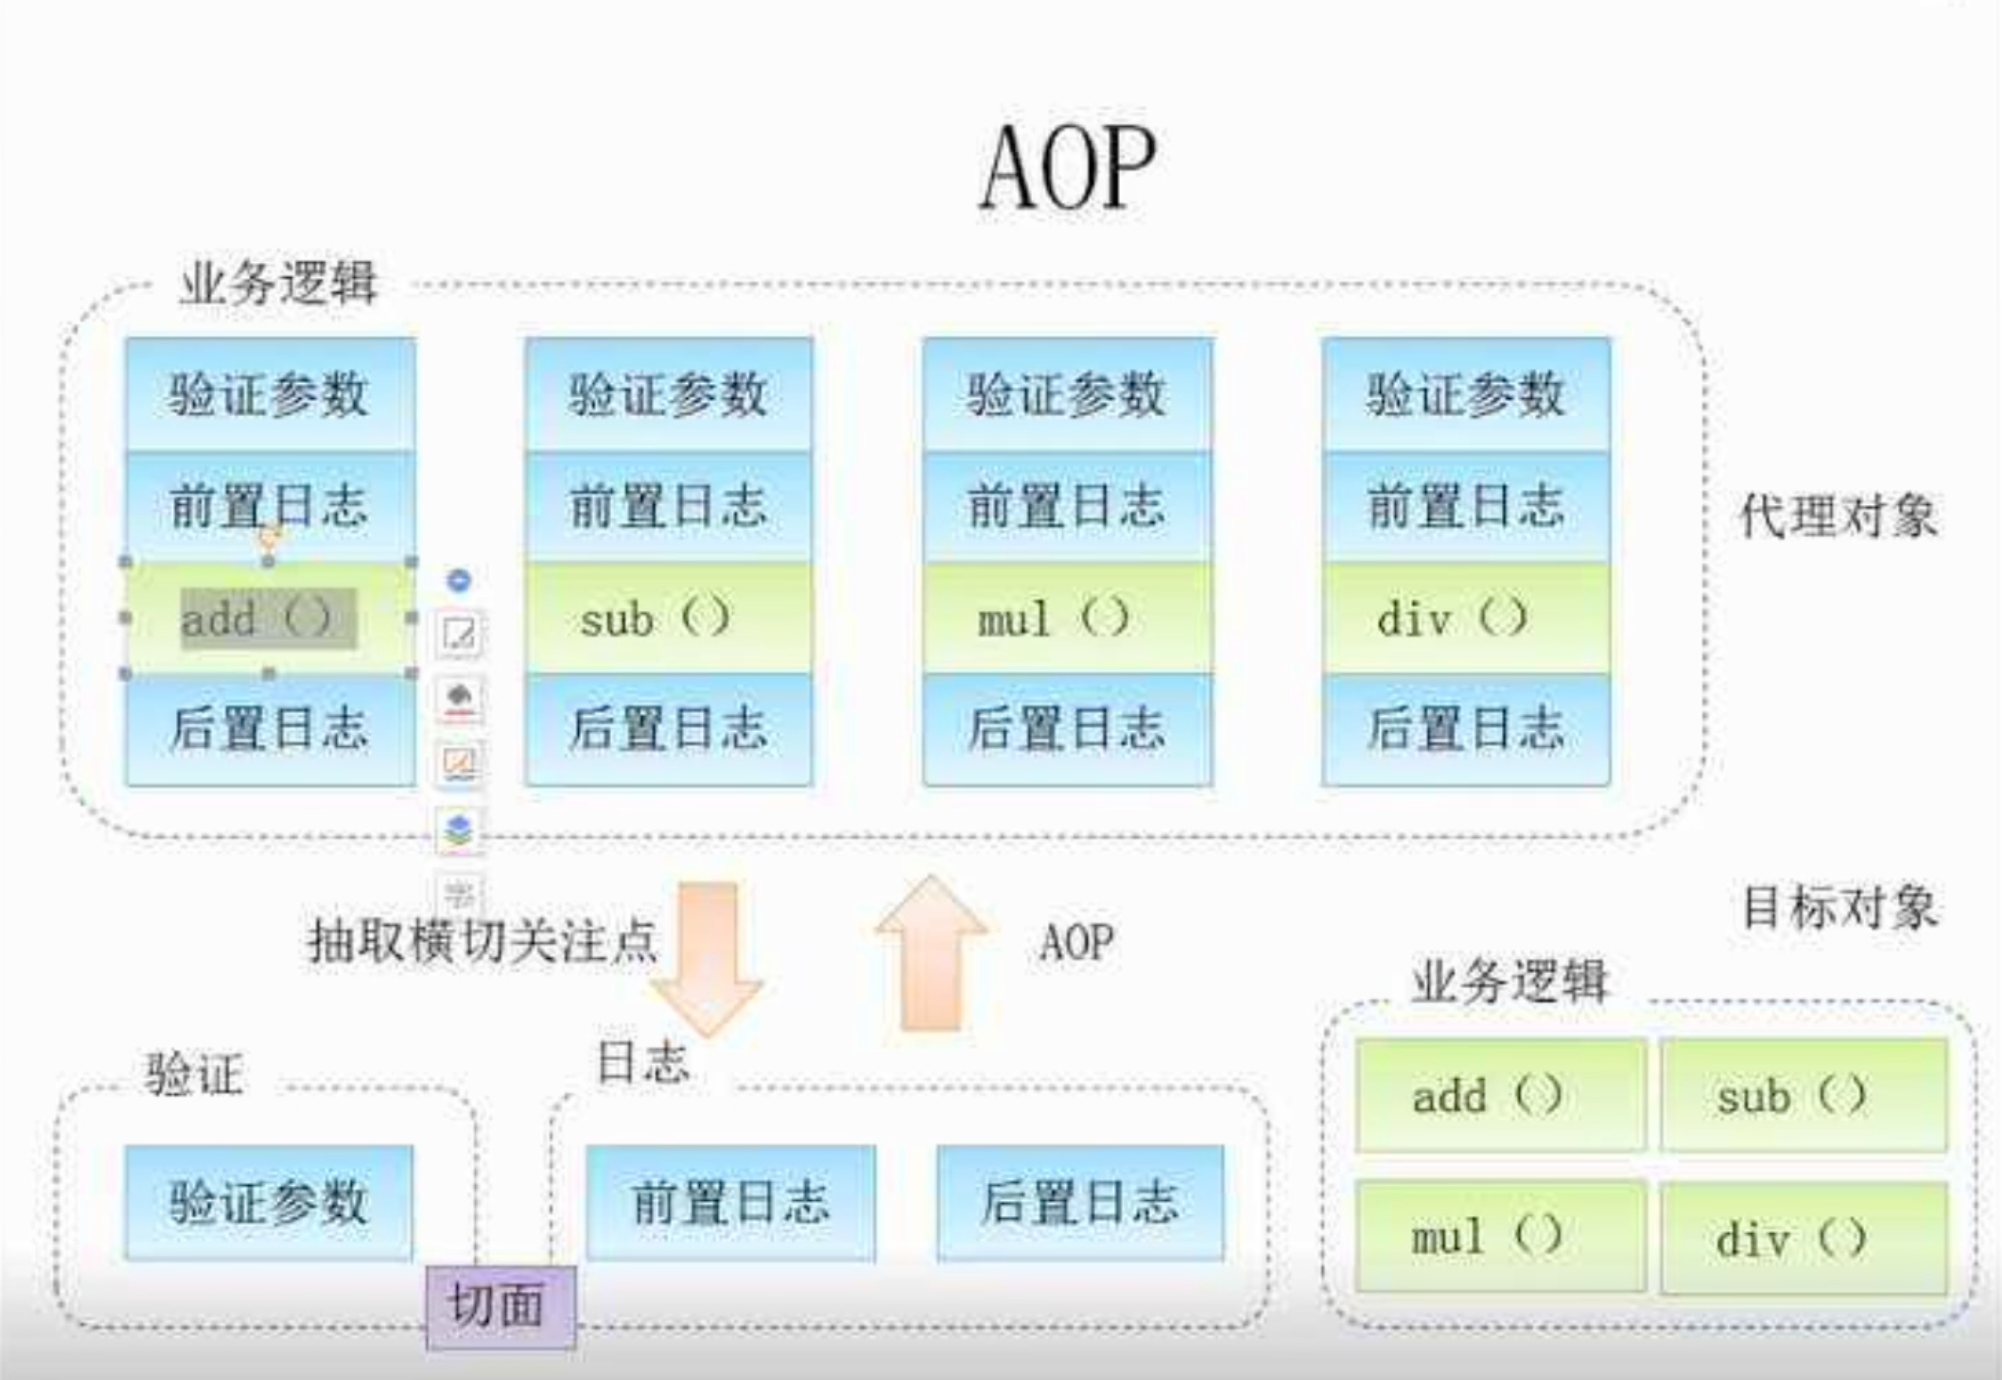
AOP 面向切片编程
AOP(Aspect-Oriented Programming:面向切面编程)实际上就是:在运行时,动态地将与业务本身无关的代码(例如事务处理、日志管理、权限控制等)封装起来,切入到指定的位置上,在不改变业务流程的基础上,进行了增强处理。便于减少系统的重复代码,降低模块间的耦合度,并有利于未来的可拓展性和可维护性。
Spring AOP 是基于动态代理的,相当于整个业务流程被直接斩断,并在切点位置插入内容:
要使用AOP,还需要再导入依赖:
<!--  使用AOP需要的依赖  -->
<dependency>
    <groupId>org.springframework</groupId>
    <artifactId>spring-aspects</artifactId>
    <version>6.1.11</version>
</dependency>
要实现AOP操作,需要知道以下内容:
- 需要切入的类,具体需要切入的方法
- 切入后需要执行的操作
- 在方法执行前切入还是执行后切入
- 如何告诉Spring需要进行切入
使用配置实现AOP
Spring配置文件添加AOP相关约束。
<?xml version="1.0" encoding="UTF-8"?>
<beans xmlns="http://www.springframework.org/schema/beans"
       xmlns:xsi="http://www.w3.org/2001/XMLSchema-instance"
       xmlns:aop="http://www.springframework.org/schema/aop"
       xsi:schemaLocation="http://www.springframework.org/schema/beans
                           http://www.springframework.org/schema/beans/spring-beans.xsd
                           http://www.springframework.org/schema/aop
                           http://www.springframework.org/schema/aop/spring-aop.xsd ">

</beans>
将
Student类的study()作为需要被切入的方法,创建一个AOP类,将要执行的操作写成一个方法。public class Student { public void study() { System.out.println("学习学习学习"); } }package com.hunter.entity; public class StudentAOP { public void afterStudy() { System.out.println("执行方法study()之后执行的方法"); } }在Spring配置文件中注册为Bean:
<bean name="student" class="com.hunter.entity.Student"/>
<bean name="studentAOP" class="com.hunter.entity.StudentAOP"/>
在Spring配置文件中使用
<aop:config>标签进行AOP配置,使用<aop:pointcut>标签定义要切入的方法。<aop:config> <!-- 定义切点,id自定义,通过 切点表达式execution 选择需要切入的方法 --> <aop:pointcut id="test" expression="execution(* com.hunter.entity.Student.study())"/> </aop:config>切点表达式
execution填写格式:修饰符 包名.类名.方法名(方法参数)- 修饰符:public、protected、private、包括返回值类型、static等(
*表示任意修饰符) - 包名:
*代表全部,例如com.* - 类名:使用
*也可以代表包下的所有类 - 方法名:使用
*代表全部方法 - 方法参数:填写对应的参数类型即可,例如
(String, boolean),也可以使用*代表任意1个参数,使用**..代表所有参数**。
- 修饰符:public、protected、private、包括返回值类型、static等(
使用
<aop:aspect>标签,添加切入后要执行的操作,再指定是在切入点执行前还是执行后执行操作。<aop:config> <!-- 定义切点,id自定义,通过execution表达式选择需要切入的方法 --> <aop:pointcut id="test" expression="execution(* com.hunter.entity.Student.study())"/> <aop:aspect ref="studentAOP"> <!-- method就是增强方法,pointcut-ref指向切点 --> <aop:after method="afterStudy" pointcut-ref="test"/> </aop:aspect> </aop:config>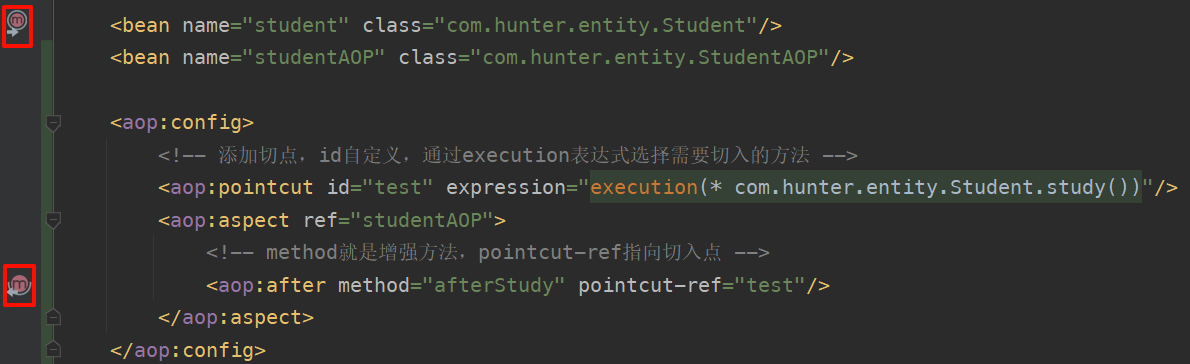
配置成功,Spring配置文件会出现可跳转的图标。(但如果被切入的类实现了一些Aware接口,图标就无法显示,但是功能仍然正常)
AOP是基于动态代理实现的,所以说我们如果直接获取Bean的类型,会发现不是原本的类型,而是被Spring通过CGLib生成的动态代理类:
// 通过反射机制创建Student对象
Student student = (Student) context.getBean("student");
System.out.println(student.getClass());
修改一下Student类中Study()方法,添加参数。
public class Student {
    public void study(String str) {
        System.out.println("都别学Java了,根本找不到工作,快去卷" + str);
    }
}如果希望在增强的方法中也拿到该参数,进行处理,需要在增强的方法中添加一个JoinPoint参数。
import org.aspectj.lang.JoinPoint;

public class StudentAOP {
    public void afterStudy(JoinPoint joinPoint) {
        // joinPoint.getArgs() 能获得参数组
        System.out.println(joinPoint.getArgs()[0] + "无止境,太深了");
    }
}
同时,Spring配置文件中被切入的方法需要更新:
<aop:pointcut id="test" expression="execution(* com.hunter.entity.Student.study(String))"/>环绕方法
如果需要切入的方法,希望在方法执行前和执行后都加入各种操作,一个一个切点添加太慢,如果想要一起写,就可以使用环绕方法,使用环绕方法需要在增强的方法中添加ProceedingJoinPoint参数。环绕方法相当于完全代理了需要切入的方法,需要手动调用proceed()方法才能执行代理的方法,并且可以直接获取更多的参数。
import org.aspectj.lang.ProceedingJoinPoint;

public class StudentAOP {
    // 如果被代理的方法存在返回值,环绕方法也需要有返回值
    public Object around(ProceedingJoinPoint joinPoint) throws Throwable {
        System.out.println("方法开始之前");
        Object result = null;

        // 调用process方法执行代理的方法,可以接收返回值
        // 该例子聚焦于环绕方法,就不对抛出的Throwable做处理了。
        result = joinPoint.proceed();
        System.out.println("方法执行后,结果为" + result);

        return result;
    }
}也可以修改参数之后调用proceed(Object[]),使用自定义的参数再去执行:
String arg = joinPoint.getArgs()[0] + "语言";
// 有参数的方法的调用
result = joinPoint.proceed(new Object[](arg));Spring配置文件也要添加环绕的标签<aop:around>:
<aop:around method="around" pointcut-ref="test"/>AOP领域术语
通知(Advice):AOP框架中的增强处理,通知描述了切面何时执行以及如何执行增强处理。
<aop:after><aop:around>
连接点(JoinPoint):连接点表示能够插入切面的1个点。
切点(PointCut):可以插入增强处理的连接点。
<aop:pointcut id="test" expression="execution(* com.hunter.entity.Student.study(String))"/>切面(Aspect):切面是通知和切点的结合。在Spring配置文件中定义的就是切面。
<aop:aspect ref="studentAOP"> <!-- method就是增强方法,pointcut-ref指向切点 --> <aop:after method="afterStudy" pointcut-ref="test"/> </aop:aspect>引入(Introduction):引入允许向现有的类添加新的方法或属性。
织入(weaving):将增强处理添加到目标对象中,并创建一个被增强的对象。(Spring通过动态代理实现)
使用接口实现AOP
比如在方法开始执行之前或执行之后去调用我们实现的接口。
将一个类实现
Advice接口。例如MethodBeforeAdvice,表示在方法执行之前的操作。import org.springframework.aop.MethodBeforeAdvice; public class StudentAOP implements MethodBeforeAdvice { @Override public void before(Method method, Object[] args, Object target) throws Throwable { System.out.println("通过Advice接口实现AOP"); } }args:方法执行前得到的实参列表target:执行方法的实例对象
依然需要配置Spring配置文件
<aop:config>
    <!-- 定义  切点,id自定义,通过execution表达式选择需要切入的方法 -->
    <aop:pointcut id="test" expression="execution(public void com.hunter.entity.Student.study())"/>
    <!-- advice-ref 指向实现Advice接口的类 -->
    <aop:advisor advice-ref="studentAOP" pointcut-ref="test"/>
</aop:config>
Advice接口:
MethodBeforeAdviceAfterReturningAdviceMethodInterceptor(方法拦截器) 可用于实现自定义增强。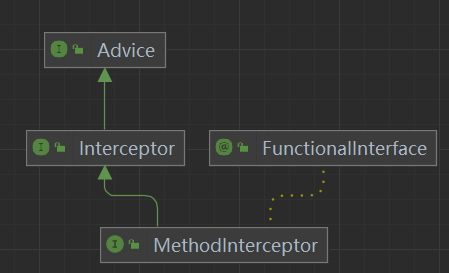
import org.aopalliance.intercept.MethodInterceptor;
import org.aopalliance.intercept.MethodInvocation;

/**
 * @author Hunter
 * @since 2024/7/25
 */
public class StudentAOP implements MethodInterceptor {

    @Override
    public Object invoke(MethodInvocation invocation) throws Throwable {
        // 获取方法参数
        Object[] arguments = invocation.getArguments();
        // 如果需要,可以修改参数
        // 例如:arguments[0] = someNewValue;

        // 需要手动调用原方法,可以直接使用上被修改过的参数
        Object result = invocation.proceed();

        return result;
    }
}
使用注解实现AOP
在Spring配置类添加
@EnableAspectJAutoProxy注解@Configuration @ComponentScan("com.hunter") @EnableAsync @EnableScheduling @PropertySource("classpath:test.properties") @EnableAspectJAutoProxy public class MainConfiguration { @Scheduled(cron = "*/3 * * * * ?") public void task() { System.out.println("定时任务" + Instant.now()); } }普通类上直接添加
@Component注解,快速注册为Bean。定义AOP增强的类上添加
@Aspect注解和@Component注解。import org.aspectj.lang.annotation.Aspect; import org.springframework.stereotype.Component; @Component @Aspect public class StudentAOP { }在AOP增强类中编写增强方法,并通过诸如
@Before注解,将此方法添加到一个切点中。也可以使用JoinPoint参数获取切入点信息。@Before("execution(* com.hunter.entity.Student.study())") public void before(JoinPoint joinPoint) { System.out.println("切入执行方法之前"); }在AOP增强类中还能使用命名绑定模式,快速得到原方法的参数
public class Student {

    public void study(String str) {

    }
}
// && args(str) 是参数匹配表达式,它将方法的参数绑定到增强方法的参数str上 // argNames = "str" 显式指定了增强方法参数的名称,可以省略,但增强了可读性 @Before(value = "execution(* com.hunter.entity.Student.study(String)) && args(str)", argNames = "str") public void before(String str) { // 可以快速得到传入的参数 System.out.println(str); }还有很多可以直接使用的注解:
@AfterReturning@AfterThrowingpublic class Student { public String study(String str) { return "有返回值的方法"; } }// && args(str) 是参数匹配表达式,它将方法的参数绑定到增强方法的参数str上; // argNames 指定了增强方法的参数名;returning 指定用于接收目标方法返回值的参数名。 @AfterReturning(value = "execution(* com.hunter.entity.Student.study(..)) && args(str)", argNames = "str,returnVal", returning = "returnVal") public void afterReturn(String str, Object returnVal) { System.out.println("参数:" + str); System.out.println("返回值:" + returnVal); }@Around环绕@Around("execution(* com.test.bean.Student.study(..))") public Object around(ProceedingJoinPoint point) throws Throwable { System.out.println("方法执行之前!"); Object val = point.proceed(); System.out.println("方法执行之后!"); return val; }
数据库框架MyBatis整合
学习了将类作为Bean交由IoC容器管理后,可以将MyBatis框架的SqlSessionFactory、Mapper交给Spring进行管理,并且可以通过注入的方式快速使用。
了解数据源 DataSource
MyBatis框架提供了SqlSessionFactory工具类,可以获取对应的SqlSession,通过会话对象去操作数据库。那么,它到底是怎么封装JDBC(Java连接数据库的接口)的呢?
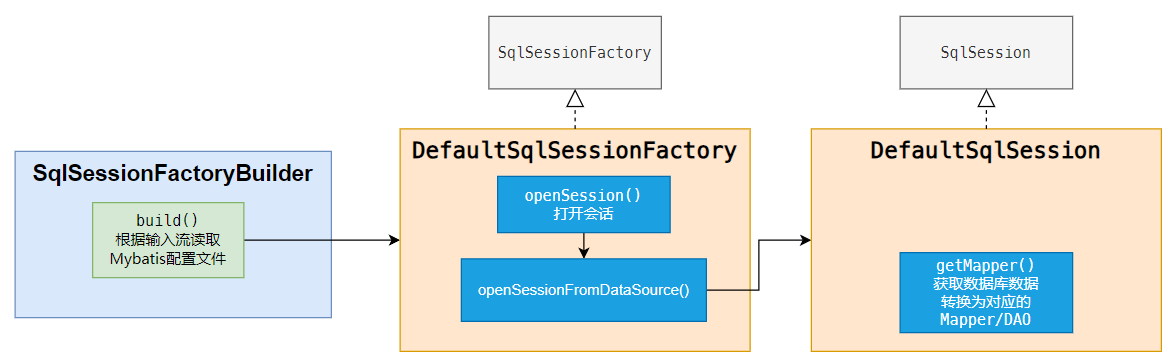
查看MyBatis 3.5.16 version的org.apache.ibatis.session.defaults.DefaultSqlSessionFactory源码:
public class DefaultSqlSessionFactory implements SqlSessionFactory {

    @Override
    public SqlSession openSession(boolean autoCommit) {
        return openSessionFromDataSource(configuration.getDefaultExecutorType(), null, autoCommit);
    }

    private SqlSession openSessionFromDataSource(ExecutorType execType, TransactionIsolationLevel level,
                                                 boolean autoCommit) {
        Transaction tx = null;
        try {
            // 获取当前环境(由配置文件映射的对象实体)
            final Environment environment = configuration.getEnvironment();
            // 事务工厂
            final TransactionFactory transactionFactory = getTransactionFactoryFromEnvironment(environment);
            // 生成事务,需要数据源信息
            tx = transactionFactory.newTransaction(environment.getDataSource(), level, autoCommit);
            // 执行器
            final Executor executor = configuration.newExecutor(tx, execType);
            // 封装为SqlSession对象
            return new DefaultSqlSession(configuration, executor, autoCommit);
        } catch (Exception e) {
            closeTransaction(tx); // may have fetched a connection so lets call close()
            throw ExceptionFactory.wrapException("Error opening session.  Cause: " + e, e);
        } finally {
            ErrorContext.instance().reset();
        }
}数据源配置信息存放在了Transaction对象中。数据源DataSource是什么呢?
package javax.sql;

public interface DataSource extends CommonDataSource, Wrapper {

    Connection getConnection() throws SQLException;

    Connection getConnection(String username, String password)
        throws SQLException;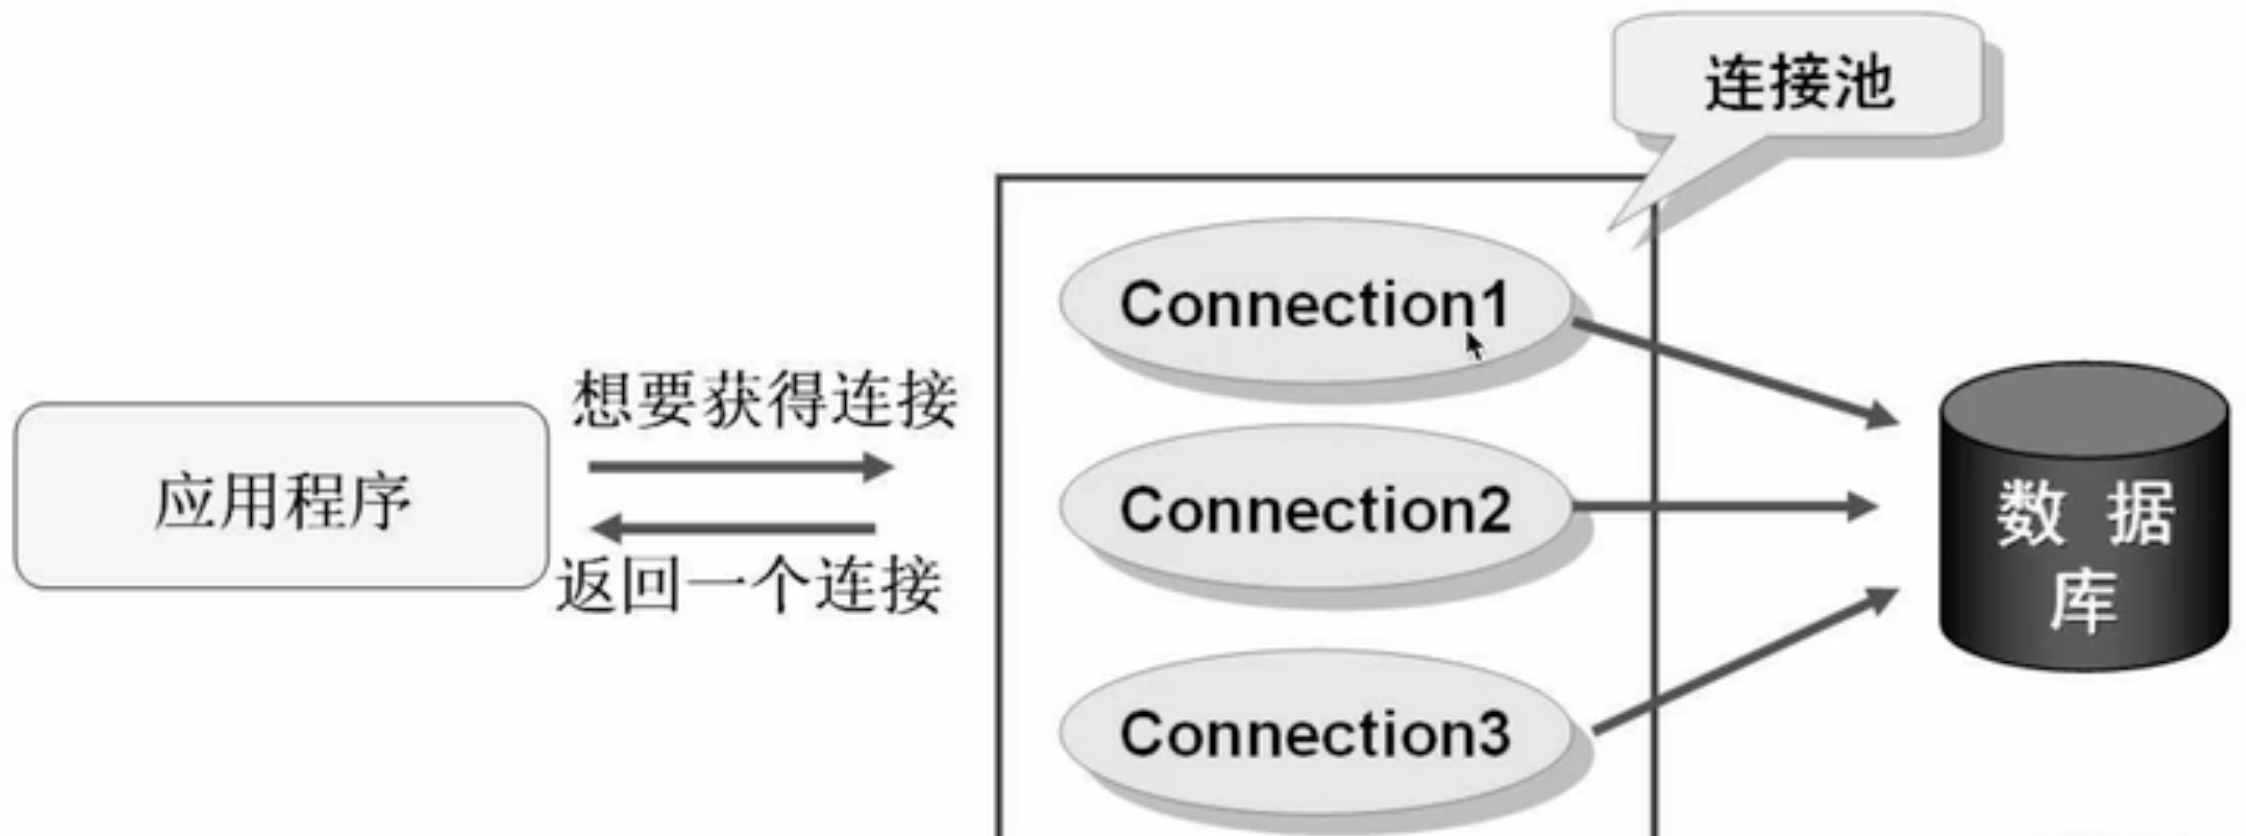
}DataSource是一个接口,其中有2个获取连接的方法。因此,MyBatis是使用DataSource来获取数据库连接的。
一般比较常用的DataSource实现都是采用池化技术,在一开始创建好与数据库的N个连接,之后直接使用现成的Connection对象进行数据库操作。
Mybatis官方的配置示例mybatis-config.xml,也是使用池化数据源POOLED:
<?xml version="1.0" encoding="UTF-8" ?>
<!DOCTYPE configuration
  PUBLIC "-//mybatis.org//DTD Config 3.0//EN"
  "https://mybatis.org/dtd/mybatis-3-config.dtd">
<configuration>
    <environments default="development">
        <environment id="development">
            <transactionManager type="JDBC"/>
            <dataSource type="POOLED">
                <property name="driver" value="${driver}"/>
                <property name="url" value="${url}"/>
                <property name="username" value="${username}"/>
                <property name="password" value="${password}"/>
            </dataSource>
        </environment>
    </environments>
</configuration>
MyBatis数据源实现
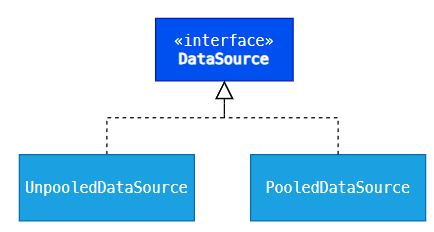
非池化数据源 UnpooledDataSource
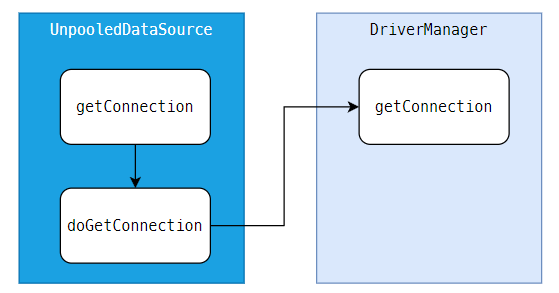
由源码可知,非池化数据源获取的数据源连接,是通过DriverManager创建的。也就是说,非池化数据源的实现使用的是传统的连接方式。
池化数据源 PooledDataSource
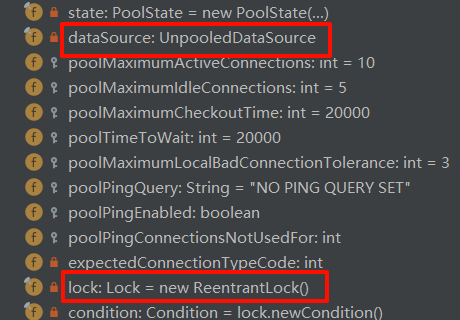
池化数据源内部维护了一个非池化数据源,还有用于并发控制的ReentrantLock。
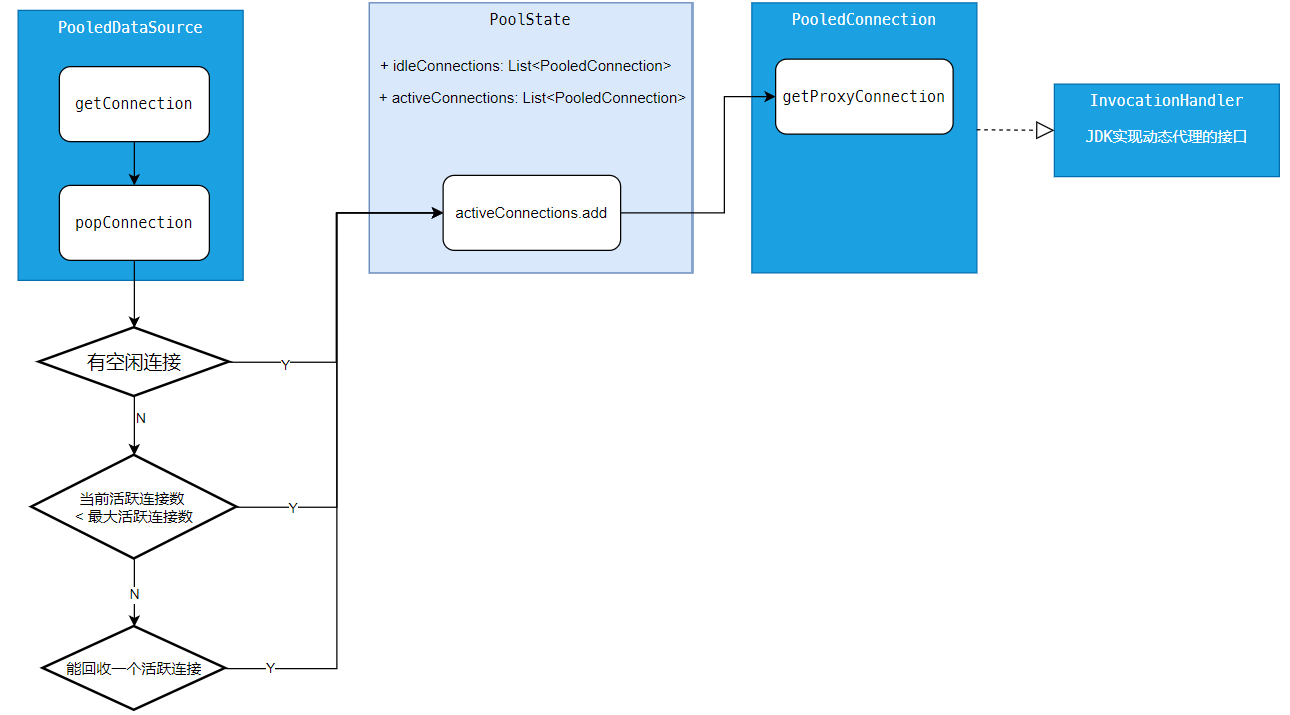
池化数据源调用popConnection()方法来获取连接对象,然后进行了一个动态代理。
JDK 动态代理机制
InvocationHandler接口和Proxy类是核心。
Proxy.newProxyInstance,该方法主要用来生成一个代理对象。通过Proxy类的newProxyInstance()方法创建的代理对象,在调用方法的时候,实际会调用到实现InvocationHandler接口的类的invoke()方法。可以在invoke()方法种自定义处理逻辑,比如在方法执行前后做什么事情。
通过阅读
popConnection()方法的源码,可知:如果最后得到了连接对象(从
PoolState的空闲列表idleConnections中获取,创建的新连接,经过回收得到的连接),连接一定会被放在PoolState的活跃列表activeConnections中。popConnection()方法返回后,接着会调用PooledConnection对象的getProxyConnection方法获取一个动态代理的连接对象。查看PooledConnection类的源码:动态代理对象在构造函数中创建:
class PooledConnection implements InvocationHandler {
    public PooledConnection(Connection connection, PooledDataSource dataSource) {
        this.realConnection = connection;
        this.dataSource = dataSource;
        this.proxyConnection = (Connection) Proxy.newProxyInstance(
            Connection.class.getClassLoader(), // 加载代理类的类加载器
            { Connection.class }, // 代理类需要实现的接口,即代理的对象
            this); // 调用处理器
    }
}
查看
invoke()方法,代理的连接对象在连接关闭的时候做了改动:@Override public Object invoke(Object proxy, Method method, Object[] args) throws Throwable { String methodName = method.getName(); // 调用的是"close"方法 if (CLOSE.equals(methodName)) { // 将连接改为空闲状态,体现了池化 dataSource.pushConnection(this); return null; } try { if (!Object.class.equals(method.getDeclaringClass())) { // issue #579 toString() should never fail // throw an SQLException instead of a Runtime checkConnection(); } // 正常执行原方法 return method.invoke(realConnection, args); } catch (Throwable t) { throw ExceptionUtil.unwrapThrowable(t); } }
整合MyBatis框架
MyBatis-Spring 可以将 MyBatis 代码无缝地整合到 Spring 中。由官网mybatis-spring可知对应的版本关系:
| MyBatis-Spring | MyBatis | Spring Framework | Java |
|---|---|---|---|
| 3.0 | 3.5+ | 6.0+ | Java 17+ |
| 2.1 | 3.5+ | 5.x | Java 8+ |
需要的依赖
<!-- 简化数据库操作的持久层框架 -->
<dependency>
    <groupId>org.mybatis</groupId>
    <artifactId>mybatis</artifactId>
    <version>3.5.16</version>
</dependency>

<!-- 连接mysql的驱动程序 -->
<dependency>
    <groupId>com.mysql</groupId>
    <artifactId>mysql-connector-j</artifactId>
    <version>8.3.0</version>
</dependency>

<!-- Mybatis针对于Spring专门编写的支持框架 -->
<dependency>
    <groupId>org.mybatis</groupId>
    <artifactId>mybatis-spring</artifactId>
    <version>3.0.3</version>
</dependency>

<!-- Spring的JDBC支持框架 -->
<dependency>
    <groupId>org.springframework</groupId>
    <artifactId>spring-jdbc</artifactId>
    <version>6.1.11</version>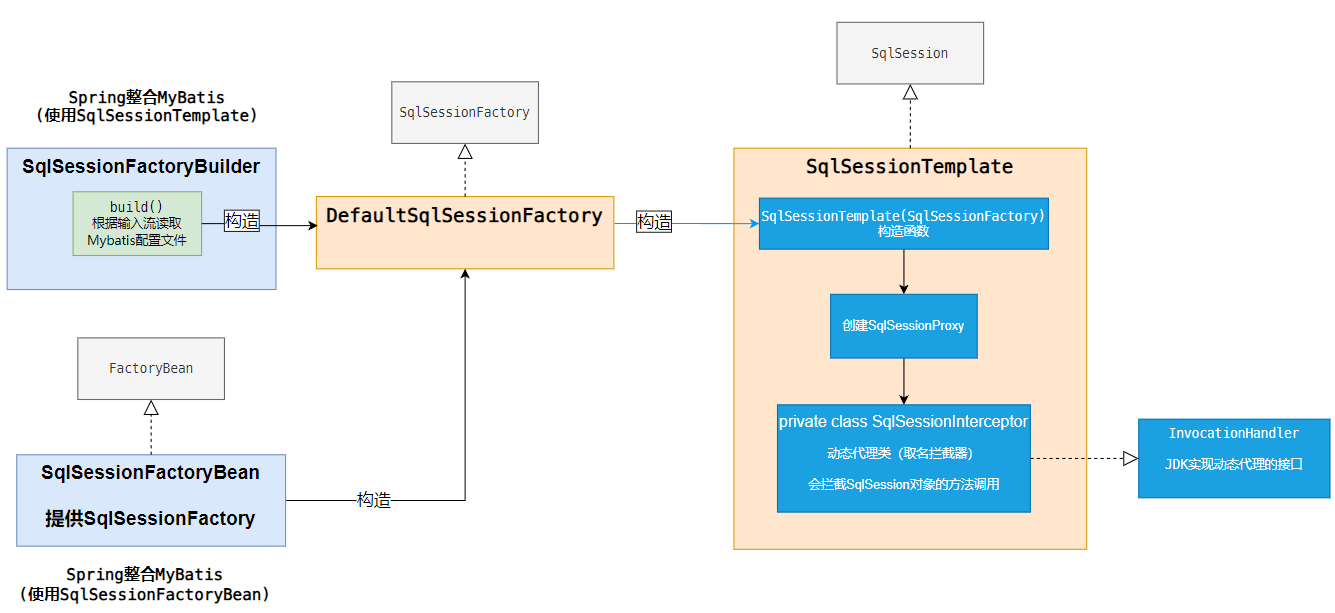
</dependency>SqlSessionTemplate类
在mybatis-spring依赖中,提供了**SqlSessionTemplate类,它就是官方封装的工具类。**
public class SqlSessionTemplate implements SqlSession, DisposableBean {
	// 包含sqlSessionFactory
    private final SqlSessionFactory sqlSessionFactory;

    // 代理了SqlSession
    private final SqlSession sqlSessionProxy;
}SqlSessionTemplate的构造方法中,创建了sqlSessionProxy:
this.sqlSessionProxy = (SqlSession) Proxy.newProxyInstance(
            SqlSessionFactory.class.getClassLoader(), // 加载代理类的类加载器,这里SqlSessionFactory和SqlSession的类加载器是相同的,都是AppClassLoader。而Sqlsession显然由SqlSessionFactory管理,且在同一个包下,适合使用同一个类加载器
            new Class[] { SqlSession.class },  // 代理类需要实现的接口,即代理的对象
new SqlSessionInterceptor()); // 调用处理器可以将其注册为Bean,就能向IoC容器索要对象,不再需要自己编写一个工具类。可以直接在Spring配置类中创建(第三方包提供的类,只能使用@Bean来完成注册):
@Configuration
@ComponentScan("com.hunter")
public class MainConfiguration {
    @Bean
    public SqlSessionTemplate getSqlSessionTemplate() throws IOException {
        SqlSessionFactory sqlSessionFactory = new SqlSessionFactoryBuilder().build(
            Resources.getResourceAsReader("mybatis-config.xml"));
        return new SqlSessionTemplate(sqlSessionFactory);
    }
}
与单独的MyBatis相同的操作
Mapper接口
@Component
@Data
public class Student {
    private int id;
    private String name;
    private String sex;
}
package com.hunter.mapper;
import com.hunter.entity.Student;
import org.apache.ibatis.annotations.Select;
public interface UserMapper {
@Select("SELECT * FROM student WHERE id = 1")
Student getStudent();
}Mybatis-config.xml
<?xml version="1.0" encoding="UTF-8" ?>
<!DOCTYPE configuration
    PUBLIC "-//mybatis.org//DTD Config 3.0//EN"
    "http://mybatis.org/dtd/mybatis-3-config.dtd">
<configuration>
    <environments default="development">
        <environment id="development">
            <transactionManager type="JDBC"/>
            <dataSource type="POOLED">
                <property name="driver" value="com.mysql.cj.jdbc.Driver"/>
                <property name="url" value="jdbc:mysql://localhost:3306/study"/>
                <property name="username" value="root"/>
                <property name="password" value="123456"/>
            </dataSource>
        </environment>
    </environments>
    <mappers>
        <mapper class="org.example.mapper.TestMapper"/>
    </mappers>
</configuration>
访问数据库:
public static void main(String[] args) throws InterruptedException {
    // ApplicationContext是应用程序上下文的顶层接口
    // 使用Spring配置类,就使用AnnotationConfigApplicationContext实现类
    ApplicationContext context = new AnnotationConfigApplicationContext(MainConfiguration.class);

    SqlSessionTemplate sessionTemplate = context.getBean(SqlSessionTemplate.class);
    UserMapper userMapper = sessionTemplate.getMapper(UserMapper.class);
    System.out.println(userMapper.getStudent());
}
但是这样的方式依然需要手动获取Mapper对象,能否直接得到对应的Mapper对象?
Spring管理Mapper对象
Spring配置类添加
MapperScan注解,告知Spring需要在哪些包中查找Mapper。import org.mybatis.spring.annotation.MapperScan; @Configuration @MapperScan("com.hunter.mapper") @ComponentScans({@ComponentScan("com.hunter.entity"), @ComponentScan("com.hunter.listener")}) public class MainConfiguration { @Bean public SqlSessionTemplate getSqlSessionTemplate() throws IOException { SqlSessionFactory sqlSessionFactory = new SqlSessionFactoryBuilder().build( Resources.getResourceAsReader("mybatis-config.xml")); return new SqlSessionTemplate(sqlSessionFactory); } }直接通过容器获取Mapper(没有显式调用SqlSessionTemplate,实际交给了Mybatis-Spring处理,所以仍然需要
@Bean来注册SqlSessionTemplate)public static void main(String[] args) throws InterruptedException { // ApplicationContext是应用程序上下文的顶层接口 // 使用Spring配置类,就使用AnnotationConfigApplicationContext实现类 ApplicationContext context = new AnnotationConfigApplicationContext(MainConfiguration.class); UserMapper userMapper = context.getBean(UserMapper.class); System.out.println(userMapper.getStudent()); }
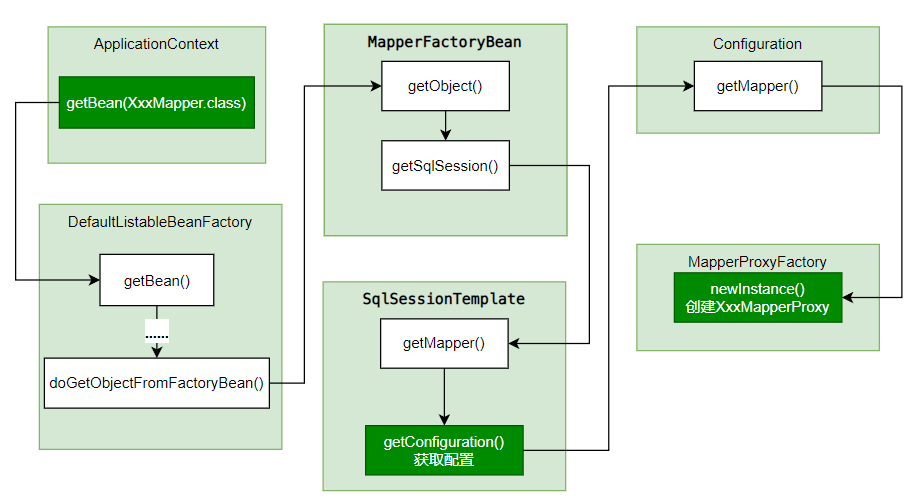
使用了MapperScan注解,在使用context.getBean获取Mapper时,Mybatis-Spring会自动为其创建一个代理对象,并将这个代理对象注册到IoC容器中,并且创建过程中需要SqlSessionTemplate:
全注解配置
如果希望直接去除mybatis-config.xml文件,实现全注解配置,需要使用SqlSessionFactoryBean类。
Spring还提供了
FactoryBean接口用于实现工厂模式
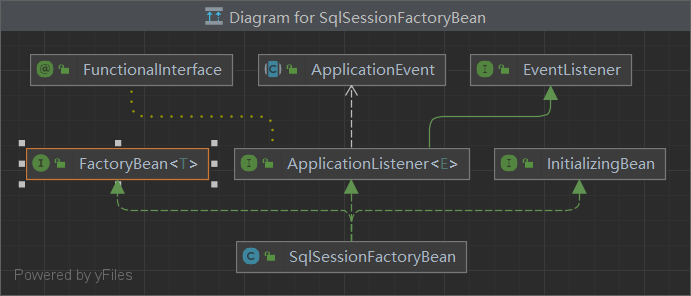
查看源码,SqlSessionFactoryBean实现了FactoryBean<SqlSessionFactory>接口:
public class SqlSessionFactoryBean
    implements FactoryBean<SqlSessionFactory>, InitializingBean, ApplicationListener<ContextRefreshedEvent> {
    // 数据源
    private DataSource dataSource;
    // SqlSessionFactory生成器
    private SqlSessionFactoryBuilder sqlSessionFactoryBuilder = new SqlSessionFactoryBuilder();

    private SqlSessionFactory sqlSessionFactory;

    // 这个工厂Bean生产 sqlSessionFactory对象(一般的工厂bean不会用来生成工厂,有点特别)
    @Override
    public SqlSessionFactory getObject() throws Exception {
        if (this.sqlSessionFactory == null) {
            afterPropertiesSet();
        }

        return this.sqlSessionFactory;
    }

    @Override
    public Class<? extends SqlSessionFactory> getObjectType() {...}

    // 采用单例模式的工厂
    @Override
    public boolean isSingleton() {
        return true;
    }

    // 设置数据源
    public void setDataSource(DataSource dataSource) {...}
}
Spring配置类相关配置变更为:
import org.mybatis.spring.SqlSessionFactoryBean;

@Configuration
@MapperScan("com.hunter.mapper")
@ComponentScans({@ComponentScan("com.hunter.entity"), @ComponentScan("com.hunter.listener")})
public class MainConfiguration {
    private static final String MYSQL_JDBC_DRIVER = "com.mysql.cj.jdbc.Driver";

    private static final String URL = "jdbc:mysql://localhost:3306/mybatis";

    private static final String USERNAME = "root";

    private static final String PASSWD = "123456";

    @Bean
    public DataSource dataSource() {
        return new PooledDataSource(MYSQL_JDBC_DRIVER, URL, USERNAME, PASSWD);
    }

    @Bean
    public SqlSessionFactoryBean sqlSessionFactoryBean(DataSource dataSource) {
        SqlSessionFactoryBean sessionFactoryBean = new SqlSessionFactoryBean();
        sessionFactoryBean.setDataSource(dataSource);
        return sessionFactoryBean;
    }

}SqlSessionFactoryBean类生产SqlSessionFactory对象,之后的流程和将SqlSessionTemplate类注册成Bean相同(只是SqlSessionTemplate的创建交给了Mybatis-Spring):
使用HikariCP连接池
MyBatis默认的数据源为池化数据源PooledDataSource,配置简单,但功能基础且性能一般。
HikariCP是由日本程序员开源的一个数据库连接池组件,代码非常轻量,并且速度非常的快。根据官方提供的数据,在酷睿i7开启32个线程32个连接(高并发场景)的情况下,进行随机数据库读写操作,HikariCP的速度是现在常用的C3P0数据库连接池的数百倍。在SpringBoot 3中,官方也是推荐使用HikariCP:
Supported Connection Pools
Spring Boot uses the following algorithm for choosing a specific implementation:
- We prefer HikariCP for its performance and concurrency. If HikariCP is available, we always choose it.
- Otherwise, if the Tomcat pooling
DataSourceis available, we use it.- …
<!-- 数据库连接池(数据源) -->
<dependency>
    <groupId>com.zaxxer</groupId>
    <artifactId>HikariCP</artifactId>
    <version>5.1.0</version>
</dependency>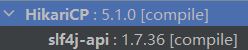
该数据库连接池的依赖包含了**slf4j-api日志门面接口,会打印HikariCP的启动日志**。但是当前没有日志实现(日志框架),暂时先用JUL(Java Util Logging)作为日志实现。
JUL ( Java Util Logging ) 是Java标准库(java.util.logging包)中的内置日志框架。
<!-- JUL日志框架 -->
<dependency>
    <groupId>org.slf4j</groupId>
    <artifactId>slf4j-jdk14</artifactId>
    <version>1.7.36</version>
</dependency>JUL版本和HikariCP包含的**slf4j-api日志门面接口**版本保持一致时,不会面临依赖冲突的问题。
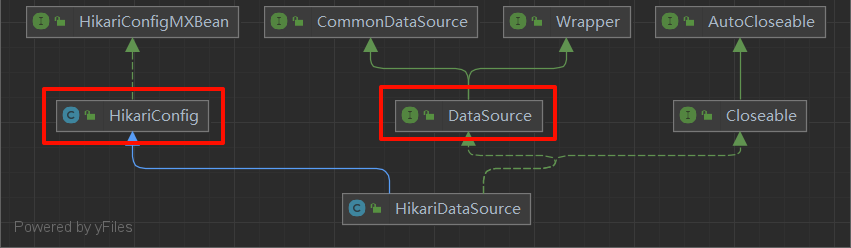
变更PooledDataSource为HikariDataSource:
@Bean
public DataSource dataSource() {
    HikariDataSource hikariDataSource = new HikariDataSource();
    hikariDataSource.setDriverClassName(MYSQL_JDBC_DRIVER);
    hikariDataSource.setJdbcUrl(URL);
    hikariDataSource.setUsername(USERNAME);
    hikariDataSource.setPassword(PASSWD);
    return hikariDataSource;
}
事务管理
MyBatis封装了一个事务接口Transaction:
package org.apache.ibatis.transaction;

public interface Transaction {

  Connection getConnection() throws SQLException;

  void commit() throws SQLException;

  void rollback() throws SQLException;

  void close() throws SQLException;

  Integer getTimeout() throws SQLException;

}
MyBatis的事务管理分为两种形式:
- 使用JDBC的事务管理机制:利用对应数据库的驱动生成的
Connection对象完成对事务的管理,对应的实现类为JdbcTransaction。 - 使用MANAGED的事务管理机制:让程序的容器(例如Spring)实现对事务的管理,对应的实现类为
ManagedTransaction。
Spring提供了编程式事务和声明式事务。声明式事务是基于AOP实现的。
只需要在Spring配置类上添加
@EnableTransactionManagement注解,就能开启Spring事务支持。@Configuration @MapperScan("com.hunter.mapper") @ComponentScans({@ComponentScan("com.hunter.entity"), @ComponentScan("com.hunter.service")}) @EnableTransactionManagement public class MainConfiguration { private static final String MYSQL_JDBC_DRIVER = "com.mysql.cj.jdbc.Driver"; private static final String URL = "jdbc:mysql://localhost:3306/mybatis"; private static final String USERNAME = "root"; private static final String PASSWD = "123456"; @Bean public DataSource dataSource() { HikariDataSource hikariDataSource = new HikariDataSource(); hikariDataSource.setDriverClassName(MYSQL_JDBC_DRIVER); hikariDataSource.setJdbcUrl(URL); hikariDataSource.setUsername(USERNAME); hikariDataSource.setPassword(PASSWD); return hikariDataSource; } @Bean public SqlSessionFactoryBean sqlSessionFactoryBean(DataSource dataSource) { SqlSessionFactoryBean sessionFactoryBean = new SqlSessionFactoryBean(); sessionFactoryBean.setDataSource(dataSource); return sessionFactoryBean; } @Bean public TransactionManager transactionManager(DataSource dataSource) { return new DataSourceTransactionManager(dataSource); } }将事务操作封装到Service层的一个方法中,并在方法上添加
@Transactional注解,就表示此方法执行的是事务操作。调用该方法,Spring会通过AOP机制为其进行增强,一旦发生异常,事务自动回滚。public interface UserMapper { @Select("SELECT * FROM student WHERE id = 1") Student getStudent(); @Insert("INSERT INTO student(name, sex) VALUES (#{name}, #{sex})") void insertStudent(Student student); }package com.hunter.service; /** * @author Hunter * @since 2024/7/28 */ public interface UserService { void insertStudent(); }package com.hunter.service.impl; @Component public class UserServiceImpl implements UserService { @Autowired UserMapper userMapper; @Transactional @Override public void insertStudent() { Student student = new Student(); student.setName("test"); student.setSex("男"); userMapper.insertStudent(student); if (true) { throw new RuntimeException("测试异常"); } userMapper.insertStudent(student); } }
@Transactional注解
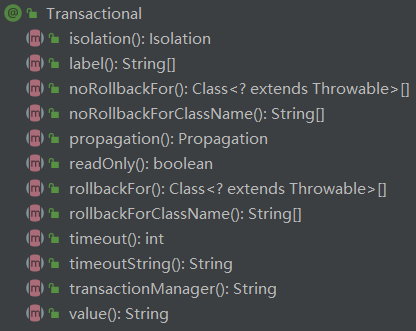
几个关键属性:
transactionManager:指定事务管理器。propagation:事务传播规则,一个事务可以包括N个子事务。isolation:事务隔离级别timeout:事务超时时间readOnly:是否为只读事务。不同的数据库会根据只读属性进行优化,比如MySQL一旦声明事务为只读,就不允许增删改操作。rollbackFor和noRollbackFor:发生指定异常时回滚或不回滚。默认发生任何异常都回滚。
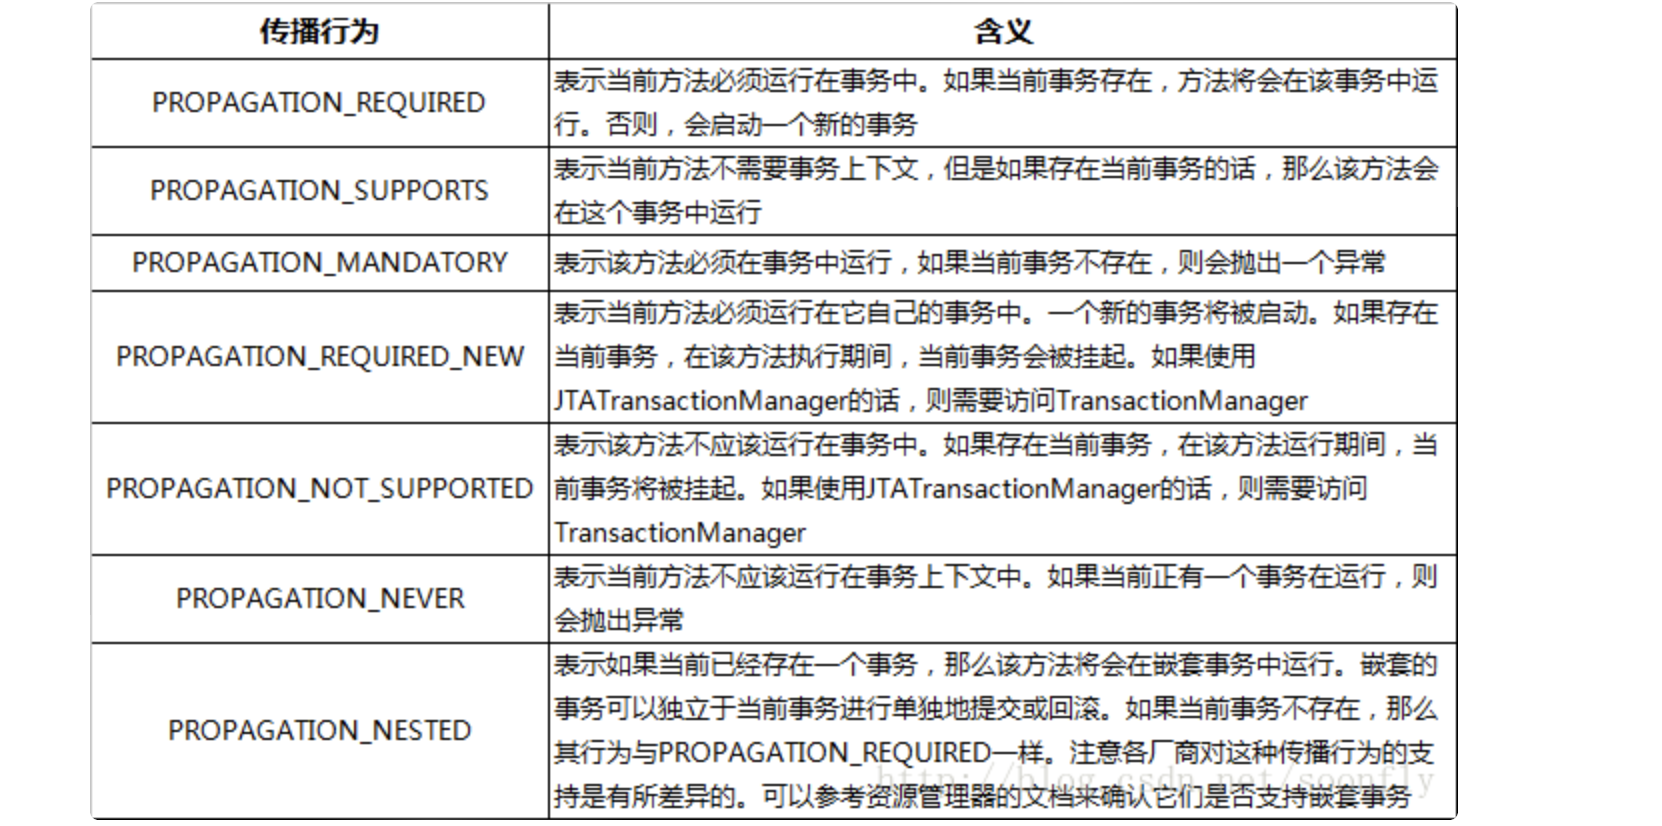
事务传播规则 propagation
事务传播有7种级别:
事务的事务传播有7种级别:
用例子感受一下,当前Service类中一共有两个事务,其中一个事务方法包含了另一个事务方法。
Spring默认的传播级别是
PROPAGATION_REQUIRED。如果执行test()方法,两个事务都会被回滚,相当于另一个事务直接加入到当前事务中。@Component public class TestServiceImpl implements TestService{ @Resource TestMapper mapper; @Transactional public void test() { test2(); //包含另一个事务 if (true) { throw new RuntimeException("我是测试异常!"); //发生异常时,会回滚另一个事务吗? } } @Transactional public void test2() { mapper.insertStudent(); } }将
test2()的事务传播级别设置为SUPPORTS,此时如果单独调用test2()方法,并不会以事务的方法执行。当发生异常时,虽然依然存在AOP增强,但不会进行回滚操作,调用test()方法,才会以事务的方式执行:@Transactional public void test() { test2(); } @Transactional(propagation = Propagation.SUPPORTS) public void test2() { mapper.insertStudent(); if(true) throw new RuntimeException("我是测试异常!"); }MANDATORY事务传播级别非常严格,如果当前方法test2()单独调用,没有在其他事务中进行,会直接出现异常:@Transactional public void test() { test2(); } @Transactional(propagation = Propagation.MANDATORY) public void test2() { mapper.insertStudent(); }Exception in thread "main" org.springframework.transaction.IllegalTransactionStateException: No existing transaction found for transaction marked with propagation 'mandatory'NESTED事务传播级别表示,如果存在外层事务,则此方法单独创建一个子事务,子事务的回滚只会影响该子事务。实际上就是创建Savepoint,然后回滚到此保存点实现的。REQUIRED_NEW和NOT SUPPORTED适用于同时操作多数据源情况下的分布式事务管理,暂不介绍。
事务隔离级别 isolation
集成JUnit测试
Spring提供了一个Test模块,它自动集成Junit进行测试。
<!-- 单元测试 -->
<dependency>
    <groupId>org.junit.jupiter</groupId>
    <artifactId>junit-jupiter</artifactId>
    <version>5.10.3</version>
    <scope>test</scope>
</dependency>
<dependency>
    <groupId>org.springframework</groupId>
    <artifactId>spring-test</artifactId>
    <version>6.1.11</version>
    <scope>test</scope>
</dependency>在测试类上添加ExtendWith和ContextConfiguration注解。
@ExtendWith是Junit 5提供的注解,用于指定测试运行器,等同于Junit 4的@RunWith注解。@ExtendWith(SpringExtension.class)是Junit 5环境中,进行Spring相关测试的基础,它为测试提供了完整的Spring支持。等价于@RunWith(SpringJUnit4ClassRunner.class)@ContextConfiguration是SpringTest模块提供的,用来加载Spring配置(xml配置文件或Spring配置类)。
@ExtendWith(SpringExtension.class)
@ContextConfiguration(classes = MainConfiguration.class)
public class MainTest {
    @Resource
    UserService userService;

    @Test
    public void should_success_when_insert_student() {
        userService.insertStudent();
    }
}