SpringMVC
MVC理论基础
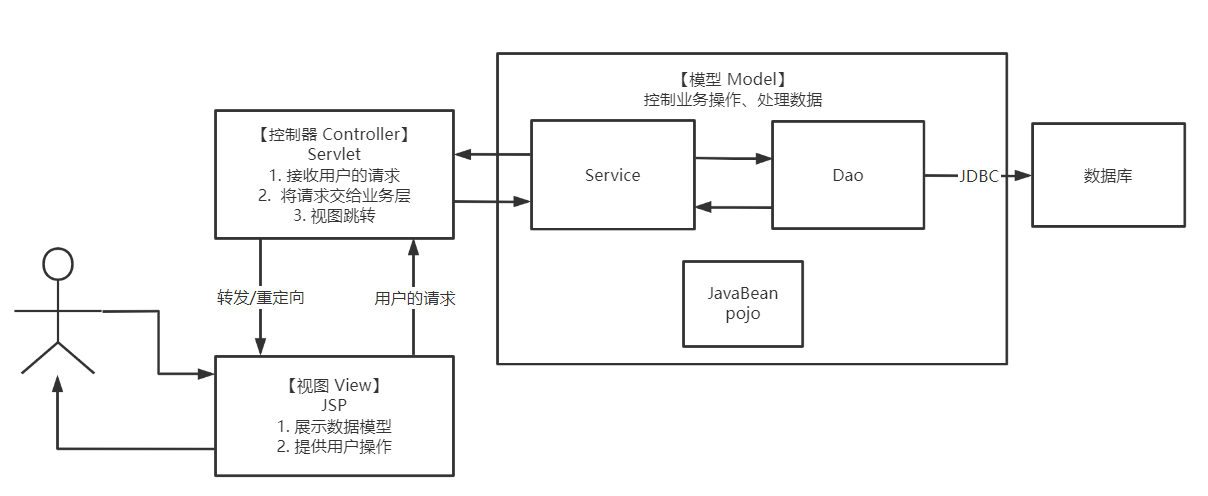
MVC架构:
三层架构:

- Model包括数据访问层和业务层
- View属于表示层
- Controllert通常被视为表示层的一部分,但也可能包含一些轻量级的业务逻辑
三层架构中,最关键的是表示层:
- 它直接与用户交互,所有的请求都经过表示层解析,再告知业务层处理。
- 所有页面的返回和数据的填充也靠表示层来完成。
SpringMVC就是一个优秀的表示层框架,将业务逻辑和表示逻辑解耦,更加精细地划分对应的职责,最后将View和Model进行渲染,得到最终的页面并返回给前端。
配置环境并搭建项目
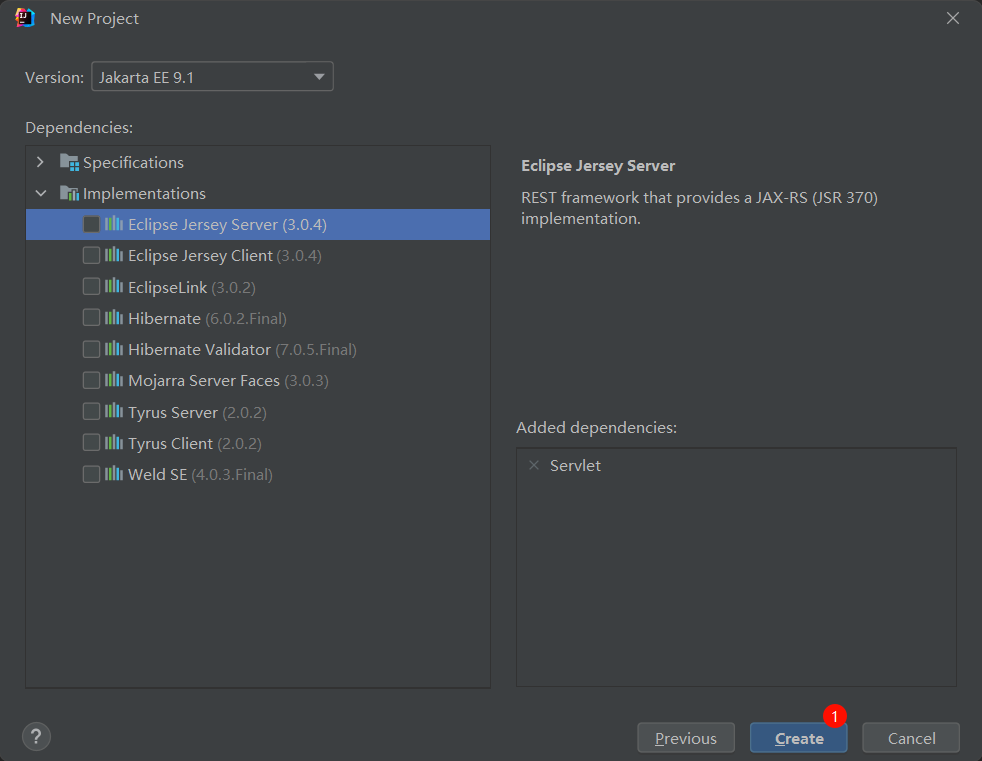
新建Jakarta EE项目,Template选择
Web application,Application server选择本地的Tomcat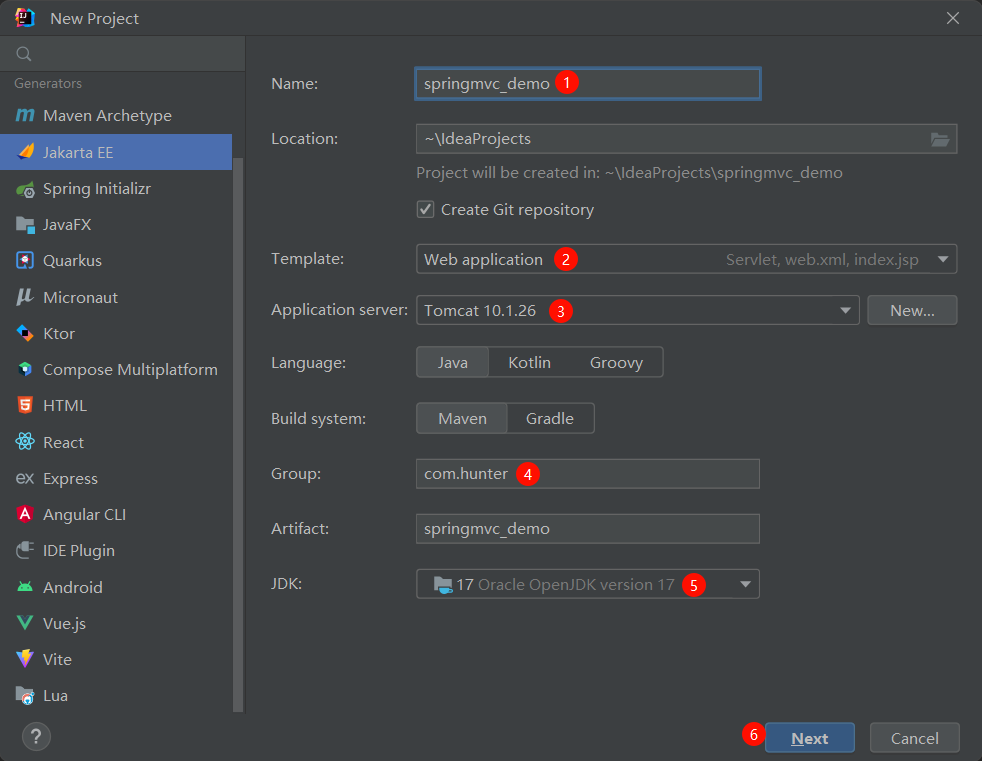
直接创建
编辑Tomcat Server的配置。
修改
Application context的默认名称,点击Apply之后,Server标签页中的URL也会同步变更(两者应保持一致)。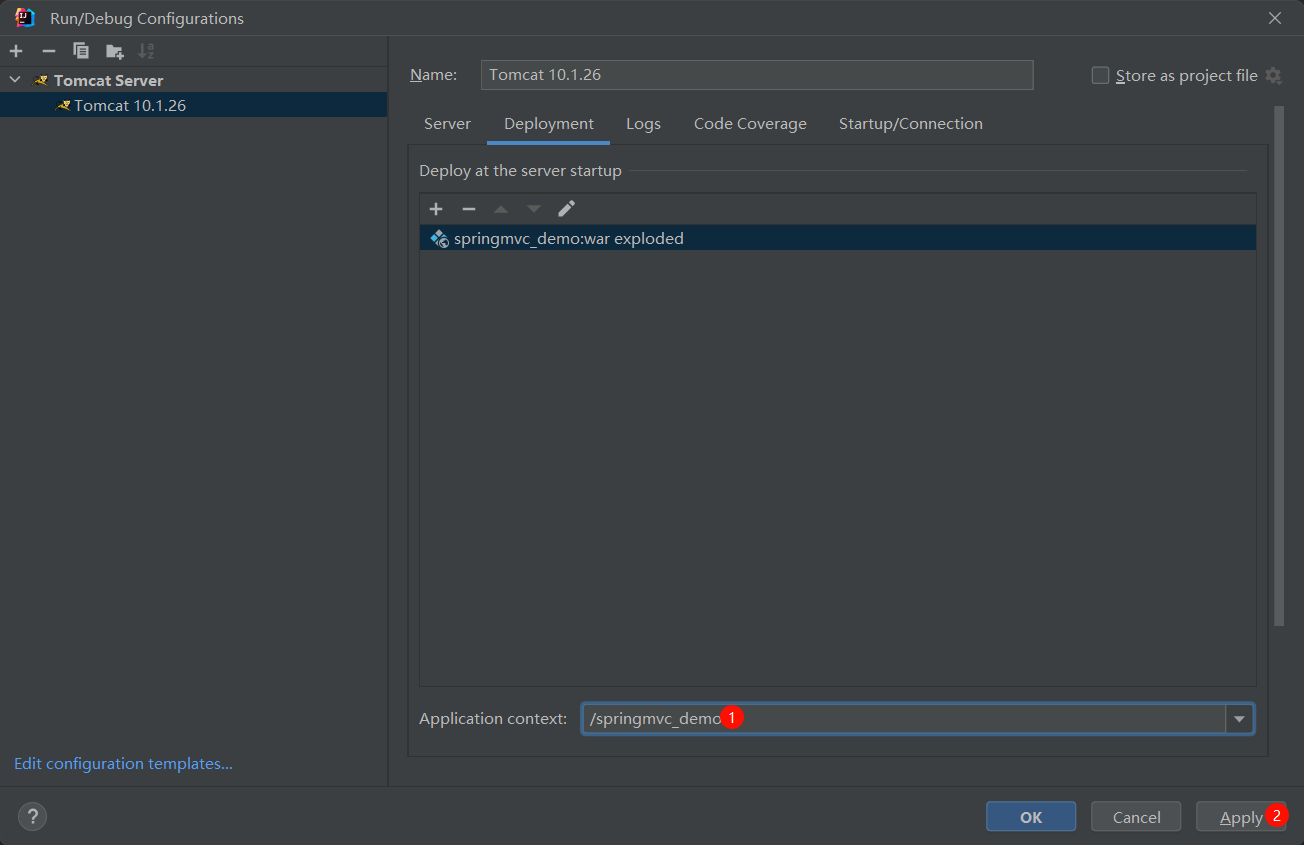
修改
On 'Update' action为Restart server。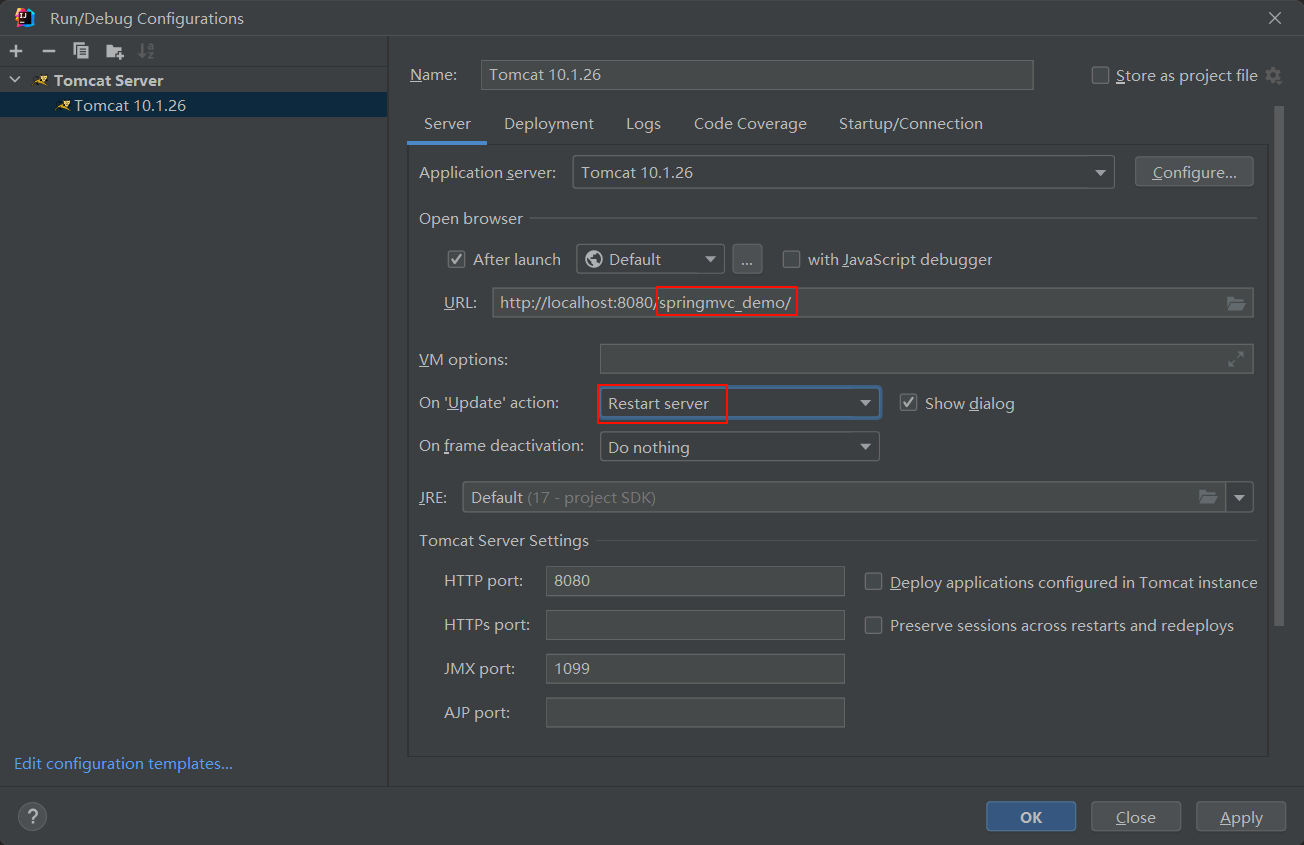
添加SpringMVC依赖
<dependency>
    <groupId>org.springframework</groupId>
    <artifactId>spring-webmvc</artifactId>
    <version>6.1.11</version>
</dependency>
传统XML配置形式
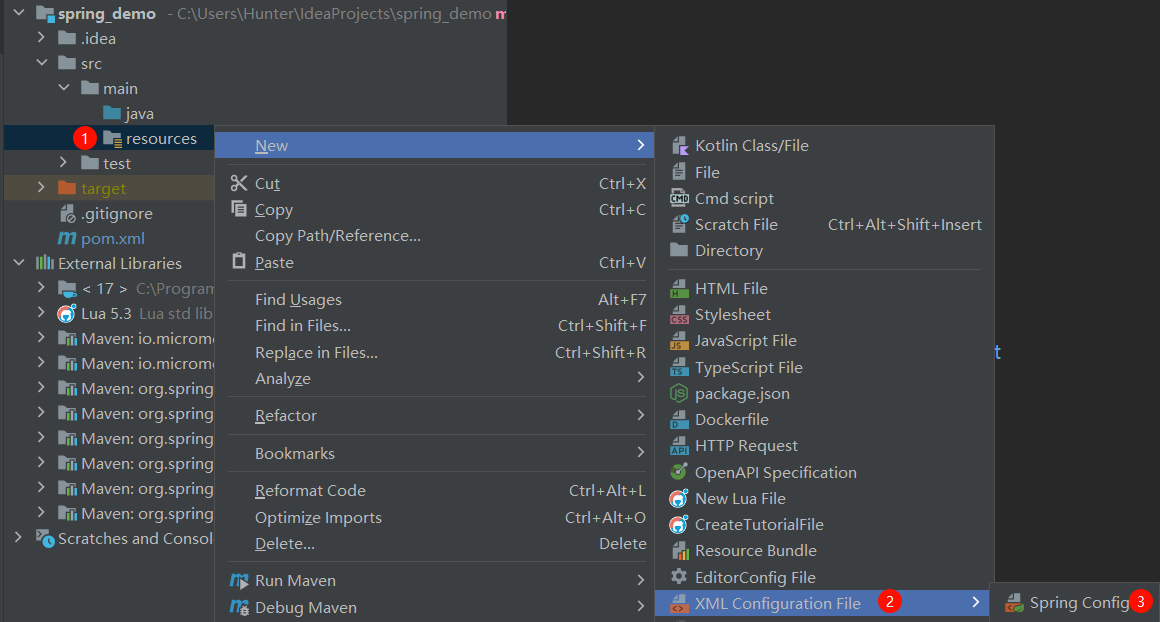
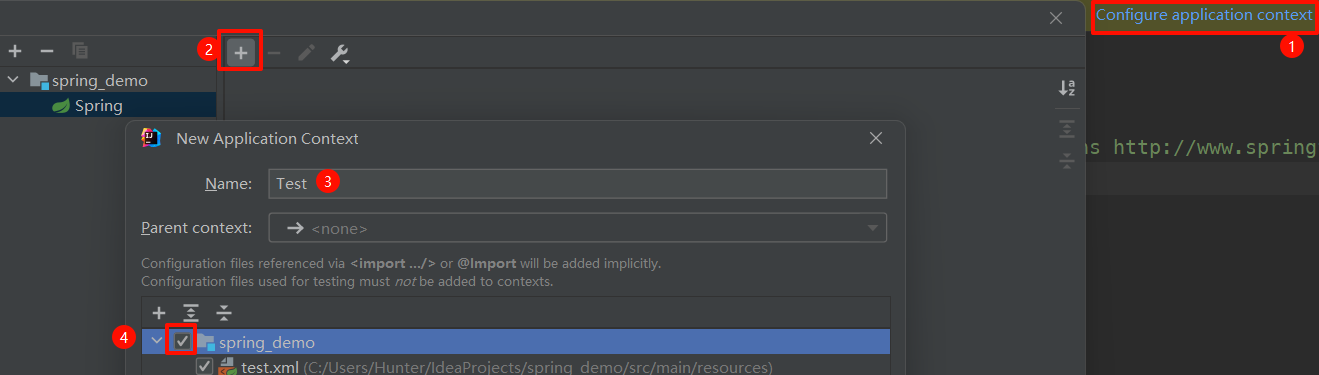
添加Spring配置文件,并配置为应用程序上下文(IoC容器)
使用DispatcherServlet替换Tomcat自带的Servlet,并指定Spring配置文件
web.xml(属于web应用程序的一部分,部署描述符),用于找到请求路径对应的Servlet
web.xml文件中添加:
<servlet>
    <servlet-name>mvc</servlet-name>
    <servlet-class>org.springframework.web.servlet.DispatcherServlet</servlet-class>
    <!-- Servlet初始化过程中,<init-param>参数将被封装到ServletConfig对象中 -->
    <init-param>
        <!-- 指定上一步创建的Spring配置文件 -->
        <param-name>contextConfigLocation</param-name>
        <param-value>classpath:spring-config.xml</param-value>
    </init-param>
</servlet>
<servlet-mapping>
    <servlet-name>mvc</servlet-name>
    <url-pattern>/</url-pattern>
</servlet-mapping>
删除项目自带的Servlet类和index.jsp,创建一个MVC中使用的Controller类,并注册为Bean
package com.hunter.springmvc_demo.controller;

@Controller
public class HelloController {

    @RequestMapping("/")
    @ResponseBody
    public String hello() {
        return "Hello World!";
    }
}
Spring配置文件配置包扫描,将HelloController注册为Bean:
<?xml version="1.0" encoding="UTF-8"?>
<beans xmlns="http://www.springframework.org/schema/beans"
       xmlns:xsi="http://www.w3.org/2001/XMLSchema-instance"
       xmlns:context="http://www.springframework.org/schema/context"
       xsi:schemaLocation="http://www.springframework.org/schema/beans
       http://www.springframework.org/schema/beans/spring-beans.xsd
       http://www.springframework.org/schema/context
       https://www.springframework.org/schema/context/spring-context.xsd">
    <!-- 输入context:component-scan,IDEA会自动引入context命名空间 -->
    <context:component-scan base-package="com.hunter"/>
</beans>可以看到该Spring配置文件上方显示File is included in 4 contexts,不是错误,不用理会。

启动tomcat,浏览器就能出现HelloController中返回的Hello World!。

全注解配置形式
创建Spring配置类
package com.hunter.springmvc_demo.config;

@Configuration
// 快速配置SpringMVC的注解,不添加此注解会导致后续无法通过实现WebMvcConfigurer接口进行自定义配置
@EnableWebMvc
@ComponentScan("com.hunter.springmvc_demo.controller")
public class WebConfiguration {
}
创建 注解配置DispatcherServlet初始化器,并指定Spring配置类
Tomcat会在类路径中查找实现了ServletContainerInitializer接口的类,如果发现的话,就用它来配置Servlet容器。
Spring内置了实现类SpringServletContainerInitializer,通过@HandlesTypes(WebApplicationInitializer.class)设置,这个类反过来会查找实现WebApplicationInitializer的类,并将配置的任务交给他们来完成。
因此,创建一个实现WebApplicationInitializer接口的类,就能管理Spring配置。

public class MainInitializer extends AbstractAnnotationConfigDispatcherServletInitializer {
    @Override
    protected Class<?>[] getRootConfigClasses() {
        // 自定义的Spring配置文件,一般用于业务层配置
        return new Class[]{WebConfiguration.class};
    }

    @Override
    protected Class<?>[] getServletConfigClasses() {
        // DispatcherServlet的配置类,主要用于Controller配置。教学part为了易懂,就不配置了,仅使用WebConfiguration.class
        return new Class[0];
    }

    @Override
    protected String[] getServletMappings() {
        // 映射路径
        return new String[]{"/"};
    }
}
Controller控制器
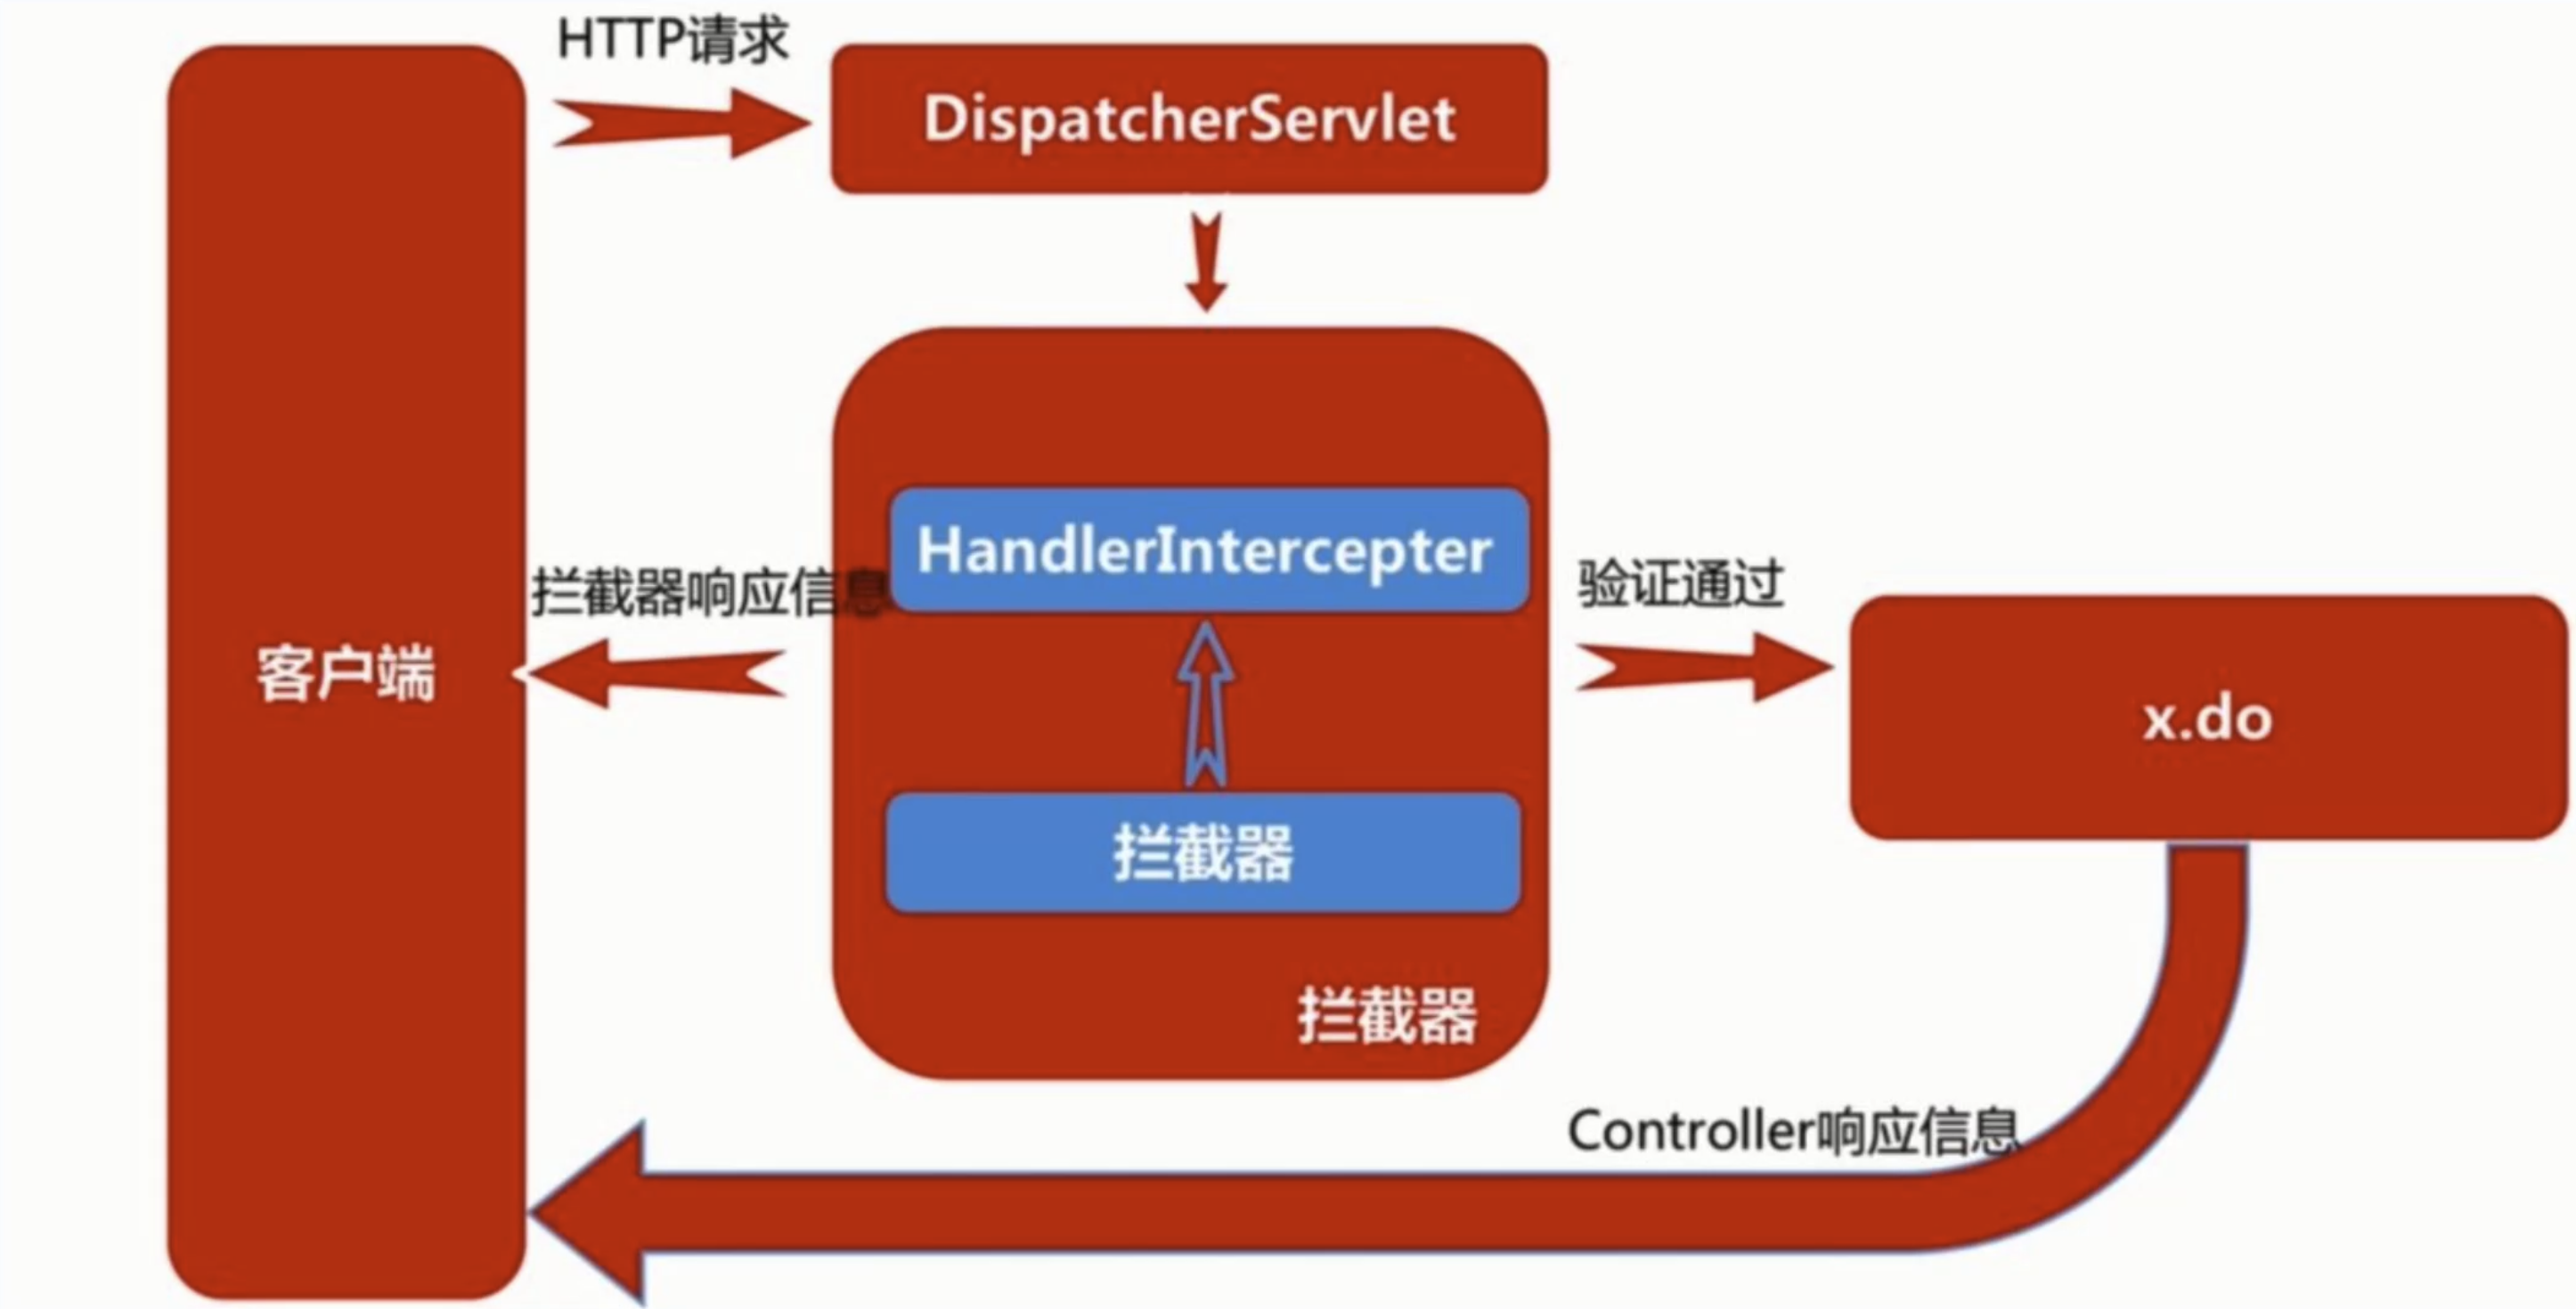
SpringMVC使用DispatcherServlet替代Tomcat提供的默认的静态资源Servlet,这样,所有的请求都会经过DispatcherServlet处理(jsp除外,tomcat还提供了jsp的servlet)。

请求到达Tomcat服务器之后,会交给当前的Web应用程序进行处理,SpringMVC采用DispatcherServlet作为统一的访问点,所有的请求交给它来调度。
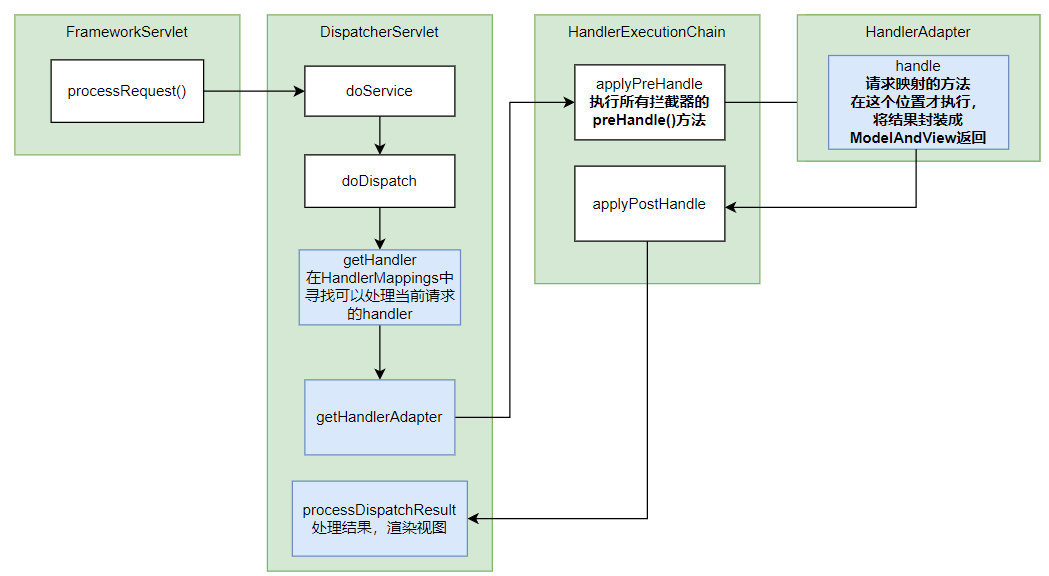
当一个请求经过
DispatcherServlet之后,会先走HandlerMapping,它会将请求映射为HandlerExecutionChain,依次经过HandlerInterceptor,然后再交给HandlerAdapter,根据请求的路径选择合适的控制器进行处理,控制器处理完成之后,会返回一个ModelAndView对象,包括数据模型和视图,通俗的讲就是页面中数据和页面本身(只包含视图名称即可)。返回ModelAndView之后,会交给ViewResolver(视图解析器)进行处理(SpringMVC自带了一些视图解析器,但是只适用于JSP页面,也可以使用Thymeleaf作为视图解析器,根据给定的视图名称,直接读取HTML编写的页面),解析为一个真正的View。解析完成后,就需要将页面中的数据全部渲染到View中,最后返回给DispatcherServlet一个包含所有数据的成形页面,再响应给浏览器,完成整个过程。
因此,实际上整个过程只需要编写对应请求路径的的Controller以及配置好我们需要的ViewResolver即可,之后还可以继续补充添加拦截器,而其他的流程已经由SpringMVC帮助我们完成了。
创建Controller只需要在一个类上添加@Controller注解,它会被Spring扫描并自动注册为Contrller类型的Bean,只需要在其中编写方法用于处理对应地址的请求即可。
配置视图解析器 ViewResolver
Thymeleaf(百里香叶)是一个既能实现模板,又能兼顾前后端分离的服务器端Java模板引擎,可以替代JSP作为视图层。
Note that Thymeleaf has integrations for both versions 5.x and 6.x of the Spring Framework, provided by two separate libraries called
thymeleaf-spring5andthymeleaf-spring6. These libraries are packaged in separate.jarfiles (thymeleaf-spring5-{version}.jarandthymeleaf-spring6-{version}.jar) and need to be added to your classpath in order to use Thymeleaf’s Spring integrations in your application.
<dependency>
    <groupId>org.thymeleaf</groupId>
    <artifactId>thymeleaf-spring6</artifactId>
    <version>3.1.2.RELEASE</version>
</dependency>
@Configuration
// 快速配置SpringMVC的注解,不添加此注解会导致后续无法通过实现WebMvcConfigurer接口进行自定义配置
@EnableWebMvc
@ComponentScan("com.hunter.springmvc_demo.controller")
public class WebConfiguration {
/**
* 配置模板解析器
*
* @return SpringResourceTemplateResolver
*/
@Bean
public SpringResourceTemplateResolver templateResolver() {
SpringResourceTemplateResolver templateResolver = new SpringResourceTemplateResolver();
// 需要解析的后缀名称
templateResolver.setSuffix(".html");
// 需要解析的HTML页面文件存放的位置,默认webapp目录下。如果是类路径下,需要添加 classpath: 前缀
templateResolver.setPrefix("classpath:");
// 设置模板文件的字符编码,避免中文乱码
templateResolver.setCharacterEncoding("StandardCharsets.UTF_8.name()");
return templateResolver;
}
/**
* 配置模板引擎
*
* @param templateResolver 模板解析器
* @return SpringTemplateEngine
*/
@Bean
public SpringTemplateEngine springTemplateEngine(ITemplateResolver templateResolver) {
SpringTemplateEngine templateEngine = new SpringTemplateEngine();
templateEngine.setTemplateResolver(templateResolver);
return templateEngine;
}
/**
* 使用ThymeleafViewResolver作为视图解析器,并解析HTML页面
*
* @param springTemplateEngine 模板引擎
* @return thymeleafViewResolver
*/
@Bean
public ThymeleafViewResolver thymeleafViewResolver(SpringTemplateEngine springTemplateEngine) {
ThymeleafViewResolver viewResolver = new ThymeleafViewResolver();
// 可以存在多个视图解析器,设定解析顺序
viewResolver.setOrder(1);
// 确保正确输出响应,避免中文乱码
viewResolver.setCharacterEncoding("StandardCharsets.UTF_8.name()");
// 设置模板引擎
viewResolver.setTemplateEngine(springTemplateEngine);
return viewResolver;
}
}Controller的返回类型
ModelAndView
@Controller
public class HelloController {

    @RequestMapping("/")
    @ResponseBody
    public String hello() {
        return "Hello World!";
    }

    @RequestMapping("/index")
    public ModelAndView index() {
        // 返回ModelAndView对象,填入视图名。返回后会经过视图解析器进行处理
        ModelAndView modelAndView = new ModelAndView("index");
        // 传值给Model
        modelAndView.getModel().put("name", "难受");
        return modelAndView;
    }
}创建一个简单的html文件src/main/resources/index.html,启动tomcat就能正常访问。
<!DOCTYPE html>
<html lang="en">
<head>
    <meta charset="UTF-8">
    <title>测试</title>
</head>
<body>
    <p>欢迎访问</p>
    <div th:text="${name}"></div>
</body>
</html>
String
为了简便,可以用String类型直接返回View的名称,SpringMVC会自动将其包装成ModelAndView对象。
@RequestMapping("/index2")
public String index2(Model model) {
    model.addAttribute("name", "难受");
    return "index";
}方法参数可以是Model、Map、ModelMap,SpringMVC通过依赖注入会自动传递对应的实例对象。
静态资源交给Tomcat提供的默认Servlet解析
页面中可能还会包含一些静态资源,比如js、css,让静态资源通过Tomcat提供的默认Servlet进行解析,需要让Spring配置类实现一下WebMvcConfigurer接口:
@Configuration
// 快速配置SpringMVC的注解,不添加此注解会导致后续无法通过实现WebMvcConfigurer接口进行自定义配置
@EnableWebMvc
@ComponentScan("com.hunter.springmvc_demo.controller")
public class WebConfiguration implements WebMvcConfigurer {

    @Override
    public void configureDefaultServletHandling(DefaultServletHandlerConfigurer configurer) {
        // 开启默认的Servlet
        configurer.enable();
    }

    @Override
    public void addResourceHandlers(ResourceHandlerRegistry registry) {
        // 配置静态资源的访问路径
        registry.addResourceHandler("/static/**").addResourceLocations("classpath:/static/");
    }
}创建src/main/resources/static/test.js:
window.alert("欢迎来到测试网站")修改src/main/resources/index.html为:
<!DOCTYPE html>
<html lang="en">
<head>
    <meta charset="UTF-8">
    <title>测试</title>
    <!-- 引用静态资源,这里使用Thymeleaf的网址链接表达式,Thymeleaf会自动添加web应用程序的名称到链接前面 -->
    <script th:src="@{/static/test.js}"></script>
</head>
<body>
    <p>欢迎访问</p>
    <div th:text="${name}"></div>
</body>
</html>
这样就能在页面加载时,显示一个弹窗。以上,就完成了最基本的页面配置。
@RequestMapping 详解

最关键的属性是
path(等价于value),它决定了当前方法处理的请求路径。路径必须全局唯一,任何一个路径只能由一个方法进行处理。也可以直接将
@RequestMapping添加到类名上,表示为此类中的所有请求映射添加一个路径前缀。路径还支持通配符进行匹配:
?:表示任意1个字符。@RequestMapping("/index/x?")可以匹配/index/xa、/index/xb等等。*:表示任意0-n个字符。@RequestMapping("/index/*")可以匹配/index、/index/yyds等。**:表示当前目录或基于当前目录的多级目录。比如@RequestMapping("/index/**")可以匹配/index、/index/xxx等。
method属性设置请求的方法类型。默认支持所有方法,浏览器默认使用GET方法获取页面。params用于指定请求必须携带的参数,未携带则无法访问。还支持表达式,
!表示请求不允许携带的参数。甚至可以直接设定值:params = {"username!=test", "password=123"}@RequestMapping(value = "/index", params = {"username", "!password"}) public ModelAndView index() { return new ModelAndView("index"); }headers用于指定请求头中携带的内容。同样,!表示请求不允许携带的属性。@RequestMapping(value = "/index", headers = "!Condition") public ModelAndView index() { return new ModelAndView("index"); }consumes指定处理请求的提交内容类型(Content-Type)。例如application/json,text/html。produces指定返回的内容类型,仅当request请求头中的(Accept)类型中包含该指定类型才返回。
@RequestParam 、@RequestHeader 和 @RequestBody
想要获取到请求中的参数,为方法添加一个形参,并在形参的类型之前添加@RequestParam即可。
@RequestMapping(value = "/index")
public ModelAndView index(@RequestParam("username") String username) {
    System.out.println("接受到请求参数:"+username);
    return new ModelAndView("index");
}我们需要在@RequestParam中填写请求中的参数名称,参数的值会自动传递给形式参数,可以直接在方法中使用。一旦添加@RequestParam,请求必须携带指定参数,也可以将require属性设定为false非必须,也能通过defaultValue设定一个默认值。
@RequestMapping(value = "/index")
public ModelAndView index(@RequestParam(value = "username", required = false, defaultValue = "测试") String username) {
    System.out.println("接受到请求参数:"+username);
    return new ModelAndView("index");
}如果需要使用Servlet原本的一些类,比如HttpServletReuqest、HttpServletResponse、HttpSession,直接将其添加为参数即可。
@RequestMapping(value = "/index")
public ModelAndView index(HttpServletRequest request, HttpSession session){
	System.out.println("接受到请求参数:"+request.getParameterMap().keySet());
    session.setAttribute("test", "鸡你太美");
    return new ModelAndView("index");
}还可以将请求参数传递给一个实体类。实体类必须携带set方法或者有包含所有参数的构造方法,请求参数会自动根据类中的字段名称进行匹配。
@Data
public class User {
    String username;
    String password;
}@RequestMapping(value = "/index")
public ModelAndView index(User user){
System.out.println("获取到cookie值为:"+user);
return new ModelAndView("index");
}@RequestHeader与@RequestParam用法一致,不过它是用于获取请求头参数的。
如果我们需要读取前端发送给我们的JSON格式数据,就需要添加@RequestBody注解:
@PostMapping(value = "/test", produces = "application/json")
@ResponseBody
public String hello(@RequestBody User user){
    return "hello" + user.getName();
}
@CookieValue 和 @SessionAttribute
通过使用@CookieValue注解,我们也可以快速获取请求携带的Cookie信息:
@RequestMapping(value = "/index")
public ModelAndView index(HttpServletResponse response,
                          @CookieValue(value = "test", required = false) String test) {
    System.out.println("获取到cookie值为:" + test);
    response.addCookie(new Cookie("test", "lbwnb"));
    return new ModelAndView("index");
}同样的,Session也能使用@SessionAttribute注解快速获取:
@RequestMapping(value = "/index")
public ModelAndView index(@SessionAttribute(value = "test", required = false) String test,
                          HttpSession session){
    System.out.println("获取到session值为:" + test);
    session.setAttribute("test", "xxxx");
    return new ModelAndView("index");
}
重定向 和 请求转发
重定向和请求转发非常简单,只需要在视图名称前面添加一个前缀即可。
重定向添加
redirect:前缀@RequestMapping("/index") public String index(){ return "redirect:home"; } @RequestMapping("/home") public String home(){ return "home"; }请求转发添加
forward:前缀@RequestMapping("/index") public String index(){ return "forward:home"; } @RequestMapping("/home") public String home(){ return "home"; }
@ResponseBody 和 @RestController
Controller默认返回的类型是视图。通过在方法上添加@ResponseBody注解,表示返回的是字符串数据,而不是视图名称,将不会经过ViewResolver解析。在类上添加@RestController表示此Controller默认返回的是字符串数据。
而且返回类型可以直接是对象类型,SpringMVC会自动转换成字符串。
@RequestMapping(value = "/data")
@ResponseBody
public String data(){
    Student student = new Student();
    student.setName("杰哥");
    return student.toString();
}
Bean的作用域
默认情况下,通过IoC容器进行管理的Bean都是单例模式。
在Bean默认的作用域singleton(单例)模式下,配置文件加载的时候,容器中管理的所有对象就已经完成了初始化。后续getBean的操作直接获取对象。
prototype(原型)模式下,只有在获取对象时才会被创建。
在SpringMVC中,Bean的作用域被继续细分:
@RequestScope:对于每次HTTP请求,使用request作用域定义的Bean都将产生一个新实例,请求结束后Bean也消失。@SessionScope:对于每一个会话,使用session作用域定义的Bean都将产生一个新实例,会话过期后Bean也消失。global session:不常用,不做讲解。
示例:
- 创建一个实体类,添加
@Component。 - 在Spring配置类中增加
@ComponentScan将其注册为Bean。 - 在实体类上增加
@SessionScope注解,限制其作用域为每次会话。 - 自动注入到Controller中。
package com.hunter.springmvc_demo.entity;

@Component
@SessionScope
public class User {
}
@Configuration
// 快速配置SpringMVC的注解,不添加此注解会导致后续无法通过实现WebMvcConfigurer接口进行自定义配置
@EnableWebMvc
@ComponentScans({
@ComponentScan("com.hunter.springmvc_demo.controller"),
@ComponentScan("com.hunter.springmvc_demo.entity")
})
public class WebConfiguration implements WebMvcConfigurer {
}@Controller
public class HelloController
// 此处仅作示例,正常的项目,实体类不应该自动装配到Controller中。这是不符合MVC架构的分层理念的。
@Resource
User user;
@RequestMapping("/index2")
@ResponseBody
public String index2() {
return user.toString();
}
}RestFul风格
中文释义为**“表现层状态转换”,它是一种设计风格**。它的主要作用是充分并正确利用HTTP协议的特性,规范资源获取的URI路径。通俗的讲,RESTful风格的设计允许将参数通过URL拼接传到服务端,让URL看起来更简洁实用,并且我们可以充分使用多种HTTP请求方式(POST/GET/PUT/DELETE),来执行相同请求地址的不同类型操作。
因此,这种风格的连接可以直接从请求路径中读取参数,比如http://localhost:8080/mvc/index/123456,可以直接将index的下一级路径作为请求参数进行处理。
请求路径可以手动添加类似占位符一样的信息,占位符位置的所有内容都会被作为请求参数,方法的形参列表中必须包括一个与占位符同名的并且添加了@PathVariable注解的参数,或是由@PathVariable注解指定为占位符名称:
@RequestMapping("/index/{str}")
public String index(@PathVariable String str) {
    System.out.println(str);
    return "index";
}
Interceptor 拦截器
拦截器是整个SpringMVC的一个重要内容。拦截器与过滤器类似,都是用于拦截一些非法请求,但是过滤器Filter是作用于Servlet之前,而拦截器在Servlet与RequestMapping之间,相当于DispatcherServlet在将请求交给对应Controller中的方法之前进行拦截处理,它只会拦截所有Controller中定义的请求映射对应的请求(不会拦截静态资源)。
创建拦截器
创建一个拦截器我们需要实现一个HandlerInterceptor接口:
package com.hunter.springmvc_demo.interceptor;

public class MainInterceptor implements HandlerInterceptor {
    @Override
    public boolean preHandle(HttpServletRequest request, HttpServletResponse response, Object handler) throws Exception {
        System.out.println("我是Controller处理之前!");
        // 只有返回true才会继续,否则直接结束
        return true;
    }

    @Override
    public void postHandle(HttpServletRequest request, HttpServletResponse response, Object handler,
                           ModelAndView modelAndView) throws Exception {
        System.out.println("我是Controller处理之后!");
    }

    @Override
    public void afterCompletion(HttpServletRequest request, HttpServletResponse response, Object handler,
                                Exception ex) throws Exception {
        System.out.println("我是DispatcherServlet完全处理完请求后!");
    }
}
在Spring配置类中进行注册:
@Configuration
// 快速配置SpringMVC的注解,不添加此注解会导致后续无法通过实现WebMvcConfigurer接口进行自定义配置
@EnableWebMvc
@ComponentScans({
        @ComponentScan("com.hunter.springmvc_demo.controller"),
        @ComponentScan("com.hunter.springmvc_demo.entity")
})
public class WebConfiguration implements WebMvcConfigurer {
    @Override
    public void addInterceptors(InterceptorRegistry registry) {
        registry.addInterceptor(new MainInterceptor())
                .addPathPatterns("/**") // 添加拦截器的匹配路径,通配符**表示多级路径
                .excludePathPatterns("/home"); // 拦截器不进行拦截的路径
    }
}如果在Controller处理过程中抛出异常,就不会执行拦截器的postHandle方法,但是会执行afterCompletion方法,可以在该方法中获取到抛出的异常。
多级拦截器
public class SubInterceptor implements HandlerInterceptor {
    @Override
    public boolean preHandle(HttpServletRequest request, HttpServletResponse response, Object handler) throws Exception {
        System.out.println("二号拦截器:我是Controller处理之前!");
        // 只有返回true才会继续,否则直接结束
        return true;
    }

    @Override
    public void postHandle(HttpServletRequest request, HttpServletResponse response, Object handler,
                           ModelAndView modelAndView) throws Exception {
        System.out.println("二号拦截器:我是Controller处理之后!");
    }

    @Override
    public void afterCompletion(HttpServletRequest request, HttpServletResponse response, Object handler,
                                Exception ex) throws Exception {
        System.out.println("二号拦截器:我是DispatcherServlet完全处理完请求后!");
    }
}在Spring配置类中进行注册,拦截器会根据注册顺序依次执行。
@Configuration
// 快速配置SpringMVC的注解,不添加此注解会导致后续无法通过实现WebMvcConfigurer接口进行自定义配置
@EnableWebMvc
@ComponentScans({
        @ComponentScan("com.hunter.springmvc_demo.controller"),
        @ComponentScan("com.hunter.springmvc_demo.entity")
})
public class WebConfiguration implements WebMvcConfigurer {
    @Override
    public void addInterceptors(InterceptorRegistry registry) {
        registry.addInterceptor(new MainInterceptor())
                .addPathPatterns("/**") // 添加拦截器的匹配路径,通配符**表示多级路径
                .excludePathPatterns("/home"); // 拦截器不进行拦截的路径
        registry.addInterceptor(new SubInterceptor())
                .addPathPatterns("/**"); // 添加拦截器的匹配路径
    }
}和多级Filter相同,在Controller处理之前,按照顺序从前向后进行拦截,但是Controller处理完成之后,就按照倒序执行处理后方法,DispatcherServlet完全处理完请求后也是以倒序方式执行。
异常处理
当请求映射方法中出现异常时,会直接展示在前端页面。这是因为SpringMVC为我们提供了默认的异常处理页面,请求会被直接转交给专门用于异常处理的控制器进行处理。
可以通过@ControllerAdvice和@ExceptionHandler注解自定义一个异常处理控制器,一旦出现指定异常,就会转接到此控制器执行:
@ControllerAdvice // 表明统一处理异常
public class ErrorController {
    @ExceptionHandler(Exception.class) // 希望捕获的异常
    public String error(Exception e, Model model){  // 可以直接添加形参来获取异常
        e.printStackTrace();
        model.addAttribute("e", e);
        return "error";
    }
}编写src/main/resources/error.html:
<!DOCTYPE html>
<html lang="en">
    <head>
        <meta charset="UTF-8">
        <title>报错</title>
    </head>
    <body>
        500 - 服务器出现了一个内部错误QAQ
        <div th:text="${e}"></div>
    </body>
</html>
JSON数据格式 与 Axios请求
JSON (JavaScript Object Notation, JS 对象标记) 是一种轻量级的数据交换格式。
现在推崇的是前后端分离的开发模式,而不是所有的内容全部交给后端渲染再发送给浏览器。也就是说,整个Web页面的内容在一开始就编写完成了,而其中的数据由前端执行JS代码来向服务器动态获取,再到前端进行渲染(填充),这样可以大幅度减少后端的压力。
JSON数据格式
JSON非常容易理解,并且与前端的兼容性极好,因此现在比较主流的数据传输方式是通过JSON格式承载的。
JSON格式的数据,以学生对象为例:
{"name": "杰哥", "age": 18}多个学生可以以数组的形式表示:
[{"name": "杰哥", "age": 18}, {"name": "阿伟", "age": 18}]嵌套关系可以表示为:
{"studentList": [{"name": "杰哥", "age": 18}, {"name": "阿伟", "age": 18}], "count": 2}JSON语法格式如下:
- 属性表示为键值对,键名在前,用双引号
""包裹,使用冒号:分隔,之后跟着对应的值。 - 花括号
{}保存对象 - 方括号
[]保存数组 - 数据之间由逗号分隔
JSON字符串到达前端后,可以直接转换为对象,以对象的形式进行操作和内容的读取,相当于以字符串形式表示了一个JS对象。
在浏览器的控制台操作:
let obj = JSON.parse('{"studentList": [{"name": "杰哥", "age": 18}, {"name": "阿伟", "age": 18}], "count": 2}')
//将JSON格式字符串转换为JS对象
obj.studentList[0].name   //直接访问第一个学生的名称
也可以将JS对象转换为JSON字符串:
JSON.stringify(obj)Jackson框架
JSON解析框架广为熟知的有Jackson、Gson、Fastjson。Fastjson,为了快而有很多bug,并且经常有安全漏洞,故不予考虑学习使用。
Jackson的依赖:
<!-- JSON解析 -->
<dependency>
    <groupId>com.fasterxml.jackson.core</groupId>
    <artifactId>jackson-databind</artifactId>
    <version>2.17.2</version>
</dependency>
ObjectMapper
ObjectMapper用于JSON字符串和Java对象的相互转换。
使用
writeValueAsString()方法和ObjectNode对象,将Java对象转为JSON字符串。// produces指定返回的内容类型,仅当request请求头中的(Accept)类型中包含该指定类型才返回。在其中指定编码类型,避免中文乱码 @RequestMapping(value = "/index2", produces = "application/json;charset=UTF-8") @ResponseBody public String index2() { ObjectMapper objectMapper = new ObjectMapper(); ObjectNode objectNode = objectMapper.createObjectNode(); objectNode.put("name", "测试"); objectNode.put("age", 18); try { return objectMapper.writeValueAsString(objectNode); } catch (JsonProcessingException e) { throw new RuntimeException(e); } }使用
writeValueAsString()方法、ObjectNode对象和ArrayNode对象,将Java对象数组转为JSON字符串。@RequestMapping(value = "/index3", produces = "application/json;charset=UTF-8") @ResponseBody public String index3() { ObjectMapper objectMapper = new ObjectMapper(); ArrayNode arrayNode = objectMapper.createArrayNode(); ObjectNode objectNode = objectMapper.createObjectNode(); objectNode.put("name", "测试"); objectNode.put("age", 18); arrayNode.add(objectNode); try { return objectMapper.writeValueAsString(arrayNode); } catch (JsonProcessingException e) { throw new RuntimeException(e); } }也可以直接将实体类转换为JSON字符串。
@Data @AllArgsConstructor public class User { private String username; private int age; }@RequestMapping(value = "/index2", produces = "application/json;charset=UTF-8") @ResponseBody public String index2() { User user = new User("测试", 18); ObjectMapper objectMapper = new ObjectMapper(); try { return objectMapper.writeValueAsString(user); } catch (JsonProcessingException e) { throw new RuntimeException(e); } }
Controller的返回类型
SpringMVC非常智能,Controller中的方法,搭配@ResponseBody,可以直接返回一个对象类型,它会被自动转换为JSON字符串。
@RequestMapping(value = "/index2", produces = "application/json;charset=UTF-8")
@ResponseBody
public User index2() {
    return new User("测试", 18);
}注解@JsonInclude(JsonInclude.Include.NON_NULL)
作用:序列化时,null值不参与序列化。
Axios异步请求
常见的前端异步请求方式包括使用XMLHttpRequest对象、Fetch API、以及使用jQuery库中的AJAX方法,以及目前最常用的Axios框架等。
前端页面src/main/resources/index.html:
<!DOCTYPE html>
<html lang="en">
<head>
    <meta charset="UTF-8">
    <title>测试</title>
    <!-- axios框架 -->
    <script src="https://unpkg.com/axios@1.1.2/dist/axios.min.js"></script>
</head>
<body>
<p>欢迎访问</p>
<p>用户名: <span id="username"></span></p>
<p>年龄: <span id="age"></span></p>
<button onclick="getInfo()">获取用户名和年龄</button>
</body>
</html>

<!-- axios框架,直接向后端请求json数据 -->
<script>
    function getInfo() {
        axios.get('/springmvc_demo/test').then(({data}) => {
            document.getElementById('username').innerText = data.username
            document.getElementById('age').innerText = data.age
        })
    }
</script>
后端Controller中编写处理请求的方法:
@Controller
public class HelloController {
    @RequestMapping("/")
    public String hello() {
        return "index";
    }

    @RequestMapping(value = "/test", method = RequestMethod.GET)
    @ResponseBody
    public User test() {
        return new User("test", 18);
    }
}
实现文件上传和下载
利用SpringMVC,可以轻松实现文件上传和下载,需要在继承了AbstractDispatcherServletInitializer的类上重写customizeRegistration()方法。
public class MainInitializer extends AbstractAnnotationConfigDispatcherServletInitializer {
    @Override
    protected void customizeRegistration(ServletRegistration.Dynamic registration) {
        // 直接通过registration配置Multipart相关配置
        // 必须配置上传路径
        // 也可以设置其他属性:maxFileSize, maxRequestSize, fileSizeThreshold
        registration.setMultipartConfig(new MultipartConfigElement("C:\\Users\\Hunter\\Downloads"));
    }

    @Override
    protected Class<?>[] getRootConfigClasses() {
        // 自定义的Spring配置文件,一般用于业务层配置
        return new Class[]{WebConfiguration.class};
    }

    @Override
    protected Class<?>[] getServletConfigClasses() {
        // DispatcherServlet的配置类,主要用于Controller配置。教学part为了易懂,就不配置了,仅使用WebConfiguration.class
        return new Class[0];
    }

    @Override
    protected String[] getServletMappings() {
        // 映射路径
        return new String[]{"/"};
    }
}
@Controller
public class HelloController {
@RequestMapping("/")
public String hello() {
return "index";
}
@RequestMapping(value = "/upload", method = RequestMethod.POST, produces = "application/json;charset=UTF-8")
@ResponseBody
public String upload(@RequestParam("file") MultipartFile file) throws IOException {
File fileObj = new File("test.png");
// 文件会被放到 MainInitializer中设置的上传路径下
file.transferTo(fileObj);
return "文件上传成功";
}
}前端页面src/main/resources/index.html:
<!DOCTYPE html>
<html lang="en">
<head>
    <meta charset="UTF-8">
    <title>测试</title>
</head>
<body>
<div>
    <form action="upload" method="post" enctype="multipart/form-data">
        <input type="file" name="file">
        <input type="submit">
    </form>
</div>
</body>
</html>下载使用HttpServletResponse,向输出流中传输数据即可。
需要依赖Commons IO
<!-- 包含实用程序类、流实现、文件过滤器、 文件比较器、字节序变换类 -->
<dependency>
    <groupId>commons-io</groupId>
    <artifactId>commons-io</artifactId>
    <version>2.16.1</version>
</dependency>@RequestMapping(value = "/download", method = RequestMethod.GET)
@ResponseBody
public void download(HttpServletResponse response) {
response.setContentType("multipart/form-data");
try(OutputStream stream = response.getOutputStream();
// 从指定路径下载文件
InputStream inputStream = new FileInputStream("test.png")){
IOUtils.copy(inputStream, stream);
}catch (IOException e){
e.printStackTrace();
}
}<a href="download" download="test.png">下载最新资源</a>DispatcherServlet源码解析
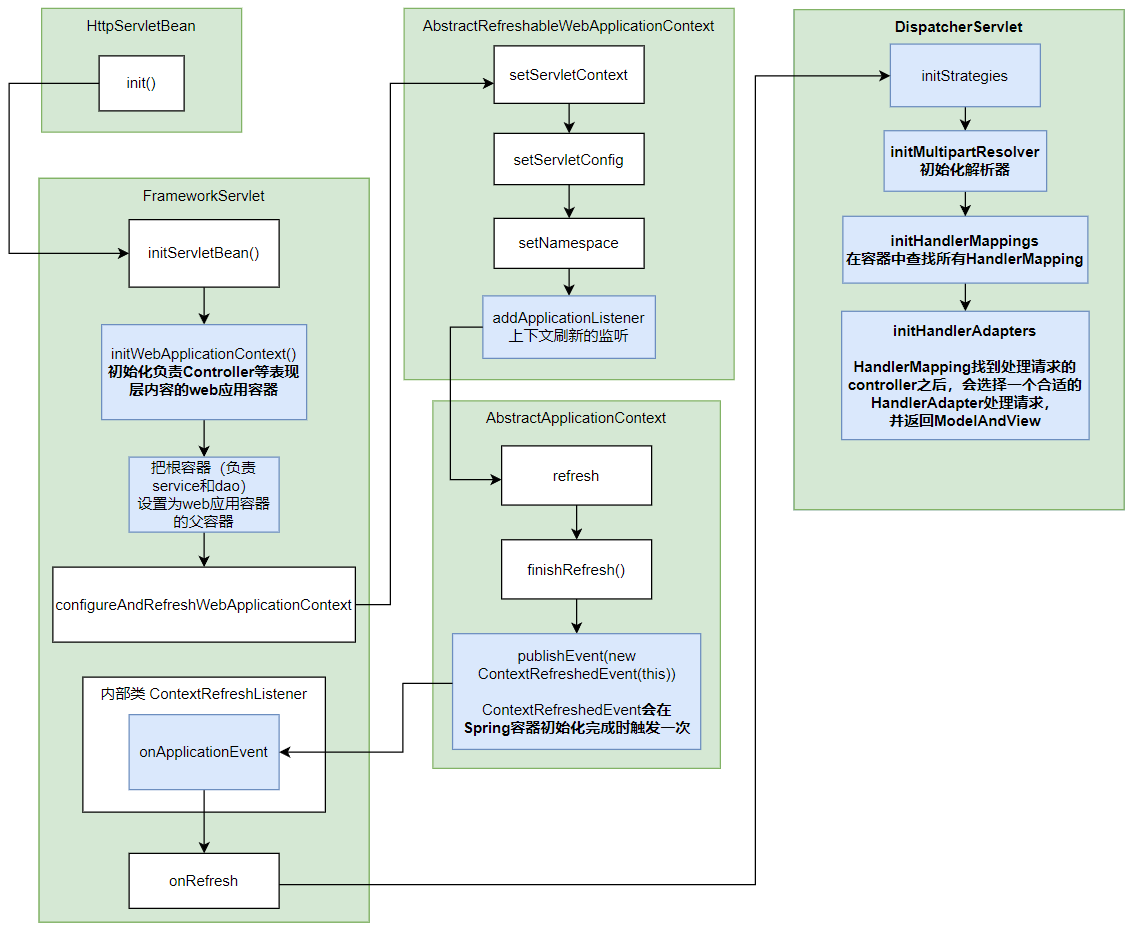
初始化
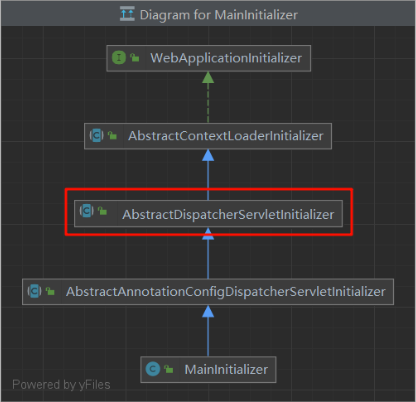
采用全注解配置形式使用SpringMVC,需要继承AbstractAnnotationConfigDispatcherServletInitializer,指定DispathcerServlet作为默认的Servlet是父类AbstractDispatcherServletInitializer指定的。
调度
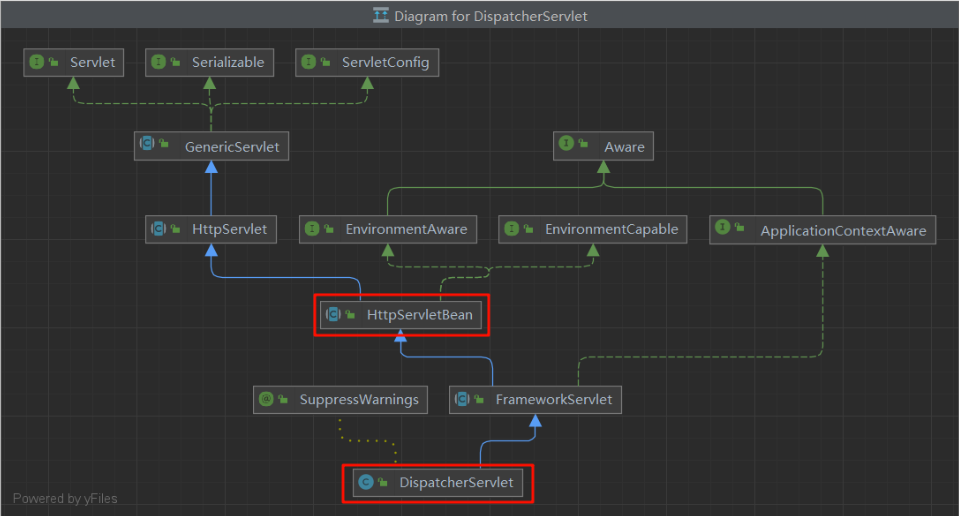
首先请求肯定会经过HttpServlet,交给对应的doGet、doPost方法进行处理,但**FrameworkServlet重写了这些方法,并使用processRequest方法进行处理**。
package org.springframework.web.servlet;

public abstract class FrameworkServlet extends HttpServletBean implements ApplicationContextAware {
    @Override
    protected final void doGet(HttpServletRequest request, HttpServletResponse response)
        throws ServletException, IOException {

        processRequest(request, response);
    }

    @Override
    protected final void doPost(HttpServletRequest request, HttpServletResponse response)
        throws ServletException, IOException {

        processRequest(request, response);
    }
}