SpringSecurity
概述
SpringSecurity是一个基于Spring开发的非常强大的权限验证框架,其核心功能包括:
- 认证 (用户登录)
- 授权 (此用户能够做哪些事情)
- 攻击防护 (防止伪造身份攻击)
常见的Web网站攻击方式
CSRF 跨站请求伪造攻击
Session和Cookie的机制,在一开始的时候,服务端会给浏览器一个名为JSESSIONID的Cookie信息作为会话的唯一凭据,只要用户携带此Cookie访问我们的网站,那么我们就可以认定此会话属于哪个浏览器用户。因此,只要此会话的用户执行了登录操作,那么就可以随意访问个人信息等内容。
比如不法分子搭建了一个恶意网站。此页面中有一个表单,但是表单中的输入框被隐藏了,我们看到的只有一个“挂羊头卖狗肉”的按钮,这时整个页面就非常有迷惑性。如果我们点击此按钮,整个表单的数据会以POST的形式发送给不法分子想要我们访问的服务端(如果此前访问过,就会携带对应的Cookie信息)。通过这样的方式,恶意网站就能成功地在我们毫不知情的情况下引导我们执行转账等操作,当你发现上当受骗时,钱已经被转走了。
这种构建恶意页面,引导用户访问隐藏的其他网站执行操作的攻击方式称为跨站请求伪造(CSRF, Cross Site Request Forgery)。
SpringSecurity能解决这个问题。除此之外,现在很多浏览器都有SameSite保护机制,当用户在两个不同域名的站点操作,默认情况下Cookie会被自动屏蔽。

HTTP Cookie - HTTP | MDN (mozilla.org)
SameSite 属性
SameSite属性允许服务器指定是否/何时通过跨站点请求发送。这提供了一些针对跨站点请求伪造攻击(CSRF)的保护。它采用三个可能的值:Strict、Lax和None,如果没有设置SameSite属性,则将 cookie 视为Lax。使用
Strict,cookie 仅发送到它来源的站点。
Lax与 Strict 相似,只是在用户导航到 cookie 的源站点时发送 cookie。例如,通过跟踪来自外部站点的链接。
None指定浏览器会在同站请求和跨站请求下继续发送 cookie,但仅在安全的上下文中(即,如果SameSite=None,且还必须设置Secure属性)。
SFA 会话固定攻击
会话固定攻击(Session fixation attack)是一种针对Web应用程序的安全漏洞攻击,攻击者利用这种漏洞,将一个有效的会话ID分配给用户,并诱使用户在该会话中进行操作,然后攻击者可以利用该会话ID获取用户的权限,或者通过此会话继续进行其他攻击。
简单来说,就是黑客把他的JSESSIONID直接给你,你一旦使用这个ID登录,那么在后端这个ID就被认定为已登录状态,那么也就等同于他直接进入了已登录状态,从而直接访问你账号的任意内容,执行任意操作。
攻击者通常使用以下几种方式进行会话固定攻击:
- 会话传递:攻击者通过URL参数、表单隐藏字段、cookie等方式将会话ID传递给用户。当用户使用该会话ID登录时,攻击者就能利用该会话ID获取用户的权限。
- 会话劫持:攻击者利用劫持用户与服务器之间的通信流量,获取到用户的会话ID,然后利用该会话ID冒充用户进行操作。
- 会话捆绑:攻击者事先访问目标网站获取到会话ID,并将其分配给用户,之后通过其他方式欺骗用户登录该会话。这样,攻击者就可以利用会话ID获取用户的权限。
现在的浏览器同样有着对应的保护机制,Tomcat发送的SESSIONID默认勾选了HttpOnly选项,一旦被设定是无法被随意修改的,当然前提是先得正常访问一次网站才行,否则仍然存在安全隐患。
HttpOnly是Cookie中一个属性,用于防止客户端脚本通过document.cookie属性访问Cookie,有助于保护Cookie不被跨站脚本攻击窃取或篡改。但是,HttpOnly的应用仍存在局限性,一些浏览器可以阻止客户端脚本对Cookie的读操作,但允许写操作;此外大多数浏览器仍允许通过XMLHTTP对象读取HTTP响应中的Set-Cookie头。
为了彻底杜绝这个问题,登录成功之后应该重新给用户分配一个新的JSESSIONID才行,SpringSecurity帮我们实现了。
XSS 跨站脚本攻击
XSS(跨站脚本攻击)是一种常见的网络安全漏洞,攻击者通过在合法网站中注入恶意脚本代码来攻击用户。当用户访问受到注入攻击的页面时,恶意代码会在用户的浏览器中执行,从而导致攻击者能够窃取用户的敏感信息、诱导用户操作、甚至控制用户的账号。
XSS攻击常见的方式有三种:
- 存储型XSS攻击:攻击者将恶意代码存储到目标网站的数据库中,当其他用户访问包含恶意代码的页面时,恶意代码会被执行。
- 反射型XSS攻击:攻击者将恶意代码嵌入到URL中,当用户点击包含恶意代码的URL时,恶意代码会被执行。
- DOM-based XSS攻击:攻击者利用前端JavaScript代码的漏洞,通过修改页面的DOM结构来执行恶意代码。
在一些社交网站上,用户可以自由发帖,而帖子是以富文本形式进行编辑和上传的,发送给后台的帖子往往是直接以HTML代码的形式,这个时候就会给黑客可乘之机了。
正常情况下,用户发帖会向后端上传以下内容,这些是经过转换得到的正常HTML代码,方便后续直接展示:
<div class="content ql-editor">
  <p>
    <strong>萨达睡觉了大数据</strong>
  </p>
  <p>撒大大撒大声地</p>
</div>而黑客不走常规的方式发帖,发送以下内容给服务端。可以看到p标签上添加了一段JS恶意脚本,黑客可以利用这种特性,获取用户的各种信息,甚至直接发送到他的后台,这样,我们的个人信息就从网站内部被泄露了。
<div class="content ql-editor">
  <p οnlοad="alert('xss')">
    <strong>萨达睡觉了大数据</strong>
  </p>
  <p>撒大大撒大声地</p>
</div>
开发环境配置
导入SpringSecurity相关依赖
<dependency> <groupId>org.springframework.security</groupId> <artifactId>spring-security-web</artifactId> <version>6.3.1</version> </dependency> <dependency> <groupId>org.springframework.security</groupId> <artifactId>spring-security-config</artifactId> <version>6.3.1</version> </dependency>配置安全web应用初始化器。
package com.hunter.springmvc_demo.config;


public class SecurityInitializer extends AbstractSecurityWebApplicationInitializer {
	// 不用重写任何内容
  	// 会自动注册一个Filter,SpringSecurity底层就是依靠N个过滤器实现的
}
创建SpringSecurity配置类
package com.hunter.springmvc_demo.config;

@Configuration
@EnableWebSecurity // 开启WebSecurity相关功能
public class SecurityConfiguration {

}
在继承初始化器
AnnotationConfigDispatcherServletInitializer的初始化器类的getRootConfigClasses方法中,添加此配置类。@Override protected Class<?>[] getRootConfigClasses() { // 自定义的Spring配置文件,一般用于业务层配置 return new Class[]{WebConfiguration.class, SecurityConfiguration.class}; }配置完成,再次运行项目。此时,无论访问哪个页面,都会进入SpringSecurity提供的默认登录页面。
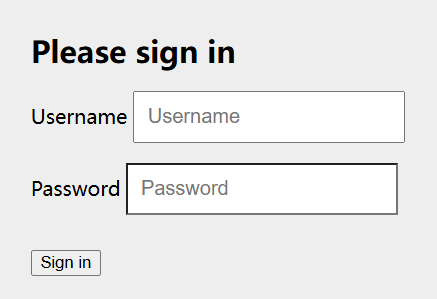
认证 Authentication
基于内存认证
基于内存验证的配置,就是直接以代码的形式配置网站的用户和密码。但是配置方式非常简单,只需要在Security配置类中注册一个UserDetailsService的Bean即可:
import org.springframework.security.core.userdetails.User;

@Configuration
@EnableWebSecurity // 开启WebSecurity相关功能
public class SecurityConfiguration {
    @Bean
    public UserDetailsService userDetailsService() {
        // 每一个UserDetails就代表一个用户信息,其中包含用户的用户名和密码以及角色
        UserDetails user = User.withDefaultPasswordEncoder()
                .username("test")
                .password("password")
                .roles("USER")
                .build();

        UserDetails admin = User.withDefaultPasswordEncoder()
                .username("admin")
                .password("password")
                .roles("ADMIN", "USER")
                .build();
        // 创建一个基于内存的用户信息管理器作为UserDetailsService
        return new InMemoryUserDetailsManager(user, admin);
    }
}由于User.withDefaultPasswordEncoder()方法采用直接与原文进行比较的密码校验,属于生产环境中的不安全操作,因此方法已被废弃,但对于演示和入门来说是可以接受的。
配置完成后,就能按配置的用户名和密码进行登录,之后就能正常访问预期的页面。

想要退出的时候,可以直接访问http://xxx:8080/xxx/logout地址,会得到一个SpringSecurity的退出登录界面:
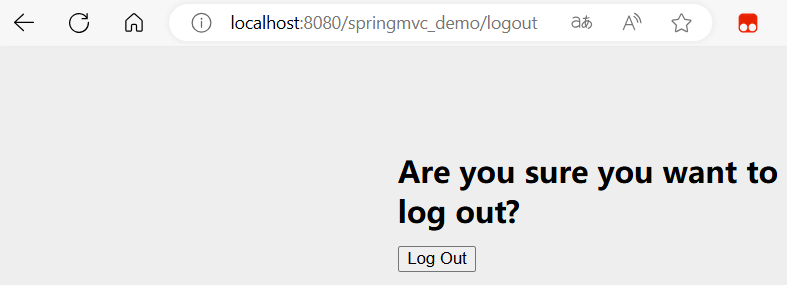
在有了SpringSecurity之后,网站的登录验证模块相当于直接被接管了,不需要再自己编写登录模块。
由于用户提供的密码属于隐私信息,直接明文存储不安全,需要一种既能隐藏用户密码也能完成认证的机制,hash处理是一种很好的解决方案。因此,在配置用户信息的时候,可以使用SpringSecurity提供的Bcrypt加密工具:
@Configuration
@EnableWebSecurity // 开启WebSecurity相关功能
@Slf4j
public class SecurityConfiguration {
    @Bean
    public PasswordEncoder passwordEncoder() {
        // 将BCryptPasswordEncoder直接注册为Bean,Security会自动处理密码对比
        return new BCryptPasswordEncoder();
    }

    @Bean
    public UserDetailsService userDetailsService(PasswordEncoder passwordEncoder) {
        // 每一个UserDetails就代表一个用户信息,其中包含用户的用户名和密码以及角色
        UserDetails user = User
                .withUsername("test")
                .password(passwordEncoder.encode("password")) // 将密码加密后存储
                .roles("USER")
                .build();
        // 观察一下加密后的密码,实际生产环境不应该以任何形式打印密码
        log.info("password: {}", passwordEncoder.encode("password"));
        UserDetails admin = User
                .withUsername("admin")
                .password(passwordEncoder.encode("password"))
                .roles("ADMIN", "USER")
                .build();
        // 创建一个基于内存的用户信息管理器作为UserDetailsService
        return new InMemoryUserDetailsManager(user, admin);
    }
}但此时,所有的POST请求会被403,这是SpringSecurity自带的CSRF防护机制引起的。需要在POST请求中携带页面中的csrfToken,否则一律进行拦截操作。
可以将csrfToken嵌入到页面中,并且在axios发起异步请求时,携带csrf,例如:
<body>
    <div>
        <label>
            转账账号:
            <input type="text" id="account"/>
            // csrfToken由SpringSecurity自动生成
            <input type="text" th:id="${_csrf.getParameterName()}" th:value="${_csrf.token}" hidden>
        </label>
        <button onclick="pay()">立即转账</button>
    </div>
</body>
</html>

<script>
    function pay() {
        const account = document.getElementById("account").value
        const csrf = document.getElementById("_csrf").value
        axios.post('/springmvc_demo/pay', {
            account: account,
            _csrf: csrf // 携带此信息,否则会被拦截
        }, {
            headers: {
                'Content-Type': 'application/x-www-form-urlencoded'
            }
        }).then(({data}) => {
            if (data.success)
                alert("转账成功")
            else
                alert("转账失败")
        })
    }
</script>
后续如果有form表单提交的情况,也可以直接放入表单:
<form action="/xxxx" method="post">
  	...
    <input type="text" th:name="${_csrf.getParameterName()}" th:value="${_csrf.token}" hidden>
  	...
</form>
从Spring Security 4.0开始,默认情况下会启用CSRF保护,以防止CSRF攻击应用程序,Spring Security CSRF会针对PATCH,POST,PUT和DELETE方法的请求(不仅仅只是登陆请求,是任何请求路径)进行防护,而这里的登陆表单正好是一个POST类型的请求。在默认配置下,无论是否登陆,页面中只要发起了PATCH,POST,PUT和DELETE请求一定会被拒绝,并返回403错误,需要在请求的时候加入csrfToken才行,如果提交的是表单类型的数据,那么表单中必须包含此Token字符串,键名称为”_csrf”;如果是JSON数据格式发送的,那么就需要在请求头中包含此Token字符串。
实际上现在的浏览器已经很安全了,不需要默认使用自带的CSRF防护,后续会说明如何通过配置关闭CSRF防护。
基于数据库认证
实际项目中往往都是将用户信息存储在数据库中,需要通过查询数据库中的用户信息来进行用户登录。
- MySQL中创建用户和权限表设计:
CREATE TABLE users
(
    username VARCHAR(50)  NOT NULL PRIMARY KEY,
    password VARCHAR(500) NOT NULL,
    enabled  BOOLEAN      NOT NULL
);
CREATE TABLE authorities
(
    username  VARCHAR(50) NOT NULL,
    authority VARCHAR(50) NOT NULL,
    CONSTRAINT fk_authorities_users FOREIGN KEY (username) REFERENCES users (username)
);
CREATE UNIQUE INDEX ix_auth_username ON authorities (username, authority);- 添加Mybatis和MySQL的相关依赖:
<!-- 简化数据库操作的持久层框架 -->
<dependency>
    <groupId>org.mybatis</groupId>
    <artifactId>mybatis</artifactId>
    <version>3.5.16</version>
</dependency>

<!-- 连接mysql的驱动程序 -->
<dependency>
    <groupId>com.mysql</groupId>
    <artifactId>mysql-connector-j</artifactId>
    <version>8.3.0</version>
</dependency>

<!-- Mybatis针对于Spring专门编写的支持框架 -->
<dependency>
    <groupId>org.mybatis</groupId>
    <artifactId>mybatis-spring</artifactId>
    <version>3.0.3</version>
</dependency>

<!-- Spring的JDBC支持框架 -->
<dependency>
    <groupId>org.springframework</groupId>
    <artifactId>spring-jdbc</artifactId>
    <version>6.1.11</version>
</dependency>
编写SpringSecurity配置类
@Configuration
@EnableWebSecurity // 开启WebSecurity相关功能
public class SecurityConfiguration {
    @Bean
    public PasswordEncoder passwordEncoder() {
        return new BCryptPasswordEncoder();
    }

    private static final String MYSQL_JDBC_DRIVER = "com.mysql.cj.jdbc.Driver";

    private static final String URL = "jdbc:mysql://app_mysql:3306/demo";

    private static final String USERNAME = "root";

    private static final String PASSWD = "123456.root";

    @Bean
    public DataSource dataSource() {
        return new PooledDataSource(MYSQL_JDBC_DRIVER, URL, USERNAME, PASSWD);
    }

    @Bean
    public UserDetailsService userDetailsService(DataSource dataSource, PasswordEncoder passwordEncoder) {
        // 创建一个基于数据库的用户信息管理器作为UserDetailsService
        JdbcUserDetailsManager userDetailsManager = new JdbcUserDetailsManager(dataSource);

        // 仅首次启动项目时创建一个测试用户,数据库中有数据后删除这行代码
        userDetailsManager.createUser(User
                .withUsername("test")
                .password(passwordEncoder.encode("password")) // 将密码加密后存储
                .roles("USER").build());

        return userDetailsManager;
    }
}
重新启动项目,数据库表中应该已经自动添加了对应的数据。就能使用对应的数据进行登录。

UserDetailsManager 接口
无论是InMemoryUserDetailsManager还是JdbcUserDetailsManager,他们都是实现自UserDetailsManager接口,这个接口中有着一套完整的增删改查操作,方便我们直接对用户进行处理。
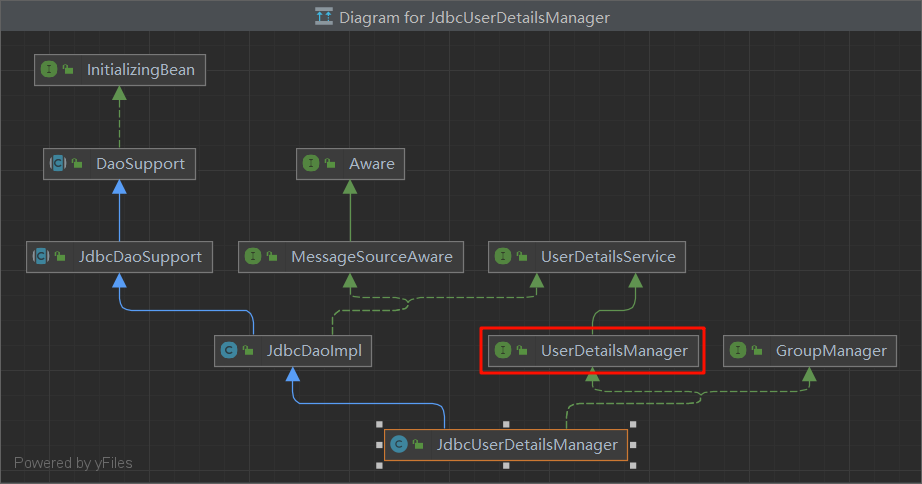
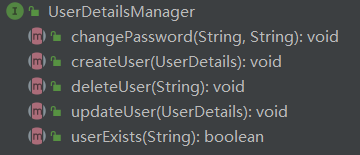
比如我们可以直接在网站上添加一个快速重置密码的接口,首先需要配置一下JdbcUserDetailsManager,为其添加一个AuthenticationManager用于原密码的校验:
@Configuration
@EnableWebSecurity
public class SecurityConfiguration {

    ...

    @Bean
    public UserDetailsManager userDetailsManager(DataSource dataSource,
                                                 PasswordEncoder passwordEncoder) throws Exception {
        // 创建一个基于数据库的用户信息管理器作为UserDetailsService
        JdbcUserDetailsManager userDetailsManager = new JdbcUserDetailsManager(dataSource);

        // 认证提供器
        DaoAuthenticationProvider authenticationProvider = new DaoAuthenticationProvider();
        // 需要设置用户信息管理器
        authenticationProvider.setUserDetailsService(userDetailsManager);
        authenticationProvider.setPasswordEncoder(passwordEncoder);
        // 创建认证管理器,处理密码校验
        AuthenticationManager authenticationManager = new ProviderManager(authenticationProvider);

        // 用户信息管理器又设置了认证管理器
        // 为UserDetailsManager设置AuthenticationManager即可开启重置密码的时的校验
        userDetailsManager.setAuthenticationManager(authenticationManager);

        return userDetailsManager;
    }
}
再在Controller中添加一个重置密码的接口:
@Controller
@Slf4j
public class HelloController {
    @Resource
    UserDetailsManager userDetailsManager;

    @Resource
    PasswordEncoder passwordEncoder;

    @RequestMapping(value = "/", method = RequestMethod.GET)
    public String index() {
        return "index";
    }

    @RequestMapping("/change_password")
    @ResponseBody
    public String changePassword(@RequestParam("oldPassword") String oldPassword,
                                 @RequestParam("newPassword") String newPassword) {
        userDetailsManager.changePassword(oldPassword, passwordEncoder.encode(newPassword));

        ObjectMapper objectMapper = new ObjectMapper();
        ObjectNode objectNode = objectMapper.createObjectNode();
        objectNode.put("success", true);
        try {
            return objectMapper.writeValueAsString(objectNode);
        } catch (JsonProcessingException e) {
            throw new RuntimeException(e);
        }
    }
}在主页index.html添加一个重置密码的操作:
<!DOCTYPE html>
<html lang="en">
<head>
    <meta charset="UTF-8">
    <title>柏码银行 - 首页</title>
    <!-- axios框架 -->
    <script src="https://unpkg.com/axios@1.1.2/dist/axios.min.js"></script>
</head>
<body>
<div>
    <label>
        修改密码:
        <input type="text" id="oldPassword" placeholder="旧密码"/>
        <input type="text" id="newPassword" placeholder="新密码"/>
    </label>
    <button onclick="change()">修改密码</button>
</div>
</body>
</html>

<script>
    function change() {
        const oldPassword = document.getElementById("oldPassword").value
        const newPassword = document.getElementById("newPassword").value
        const csrf = document.getElementById("_csrf").value
        axios.post('/mvc/change-password', {
            oldPassword: oldPassword,
            newPassword: newPassword,
            _csrf: csrf
        }, {
            headers: {
                'Content-Type': 'application/x-www-form-urlencoded'
            }
        }).then(({data}) => {
            alert(data.success ? "密码修改成功" : "密码修改失败,请检查原密码是否正确")
        })
    }
</script>
自定义认证
上述基于数据库的权限校验虽然能够直接使用数据库,但是存在一定的局限性,只适合快速搭建Demo使用,不适合实际生产环境下编写。很多时候,实际使用的数据库是不会采用SpringSecurity默认的结构设计的,而是自定义的表结构。这种情况下,就需要编写自定义验证,来应对各种情况。
既然需要自定义,那么我们就需要自行实现UserDetailsService或UserDetailsManager接口。

- 创建一个自定义的用户表。提前插入一个默认用户。密码是通过
new BCryptPasswordEncoder().encode("password")编码得到的。
CREATE TABLE users
(
    id       INT          NOT NULL PRIMARY KEY,
    username VARCHAR(255) NOT NULL,
    password VARCHAR(255) NOT NULL
);

INSERT INTO users
VALUES (1, 'test', '$2a$10$i/ugUOtVJF3rFXM5jbMkHuFH4RXrJ9MjAeDTRaH1q/2buMX0Y35Tu');- 创建User类
@Data
@AllArgsConstructor
public class User {
    private int id;
    private String username;
    private String password;
}- 创建Mapper类,在Spring配置类上添加
MapperScan
public interface UserMapper {

    @Select("SELECT * FROM users WHERE username = #{username}")
    User findUserByName(String username);
}
@Configuration
// 快速配置SpringMVC的注解,不添加此注解会导致后续无法通过实现WebMvcConfigurer接口进行自定义配置
@EnableWebMvc
@ComponentScans({
@ComponentScan("com.hunter.springmvc_demo.controller"),
@ComponentScan("com.hunter.springmvc_demo.service")
})
@MapperScan("com.hunter.springmvc_demo.mapper")
public class WebConfiguration implements WebMvcConfigurer {
...
}- 这里为了简单,选择实现
UserDetailsService接口:
package com.hunter.springmvc_demo.service.impl;

@Service
@Slf4j
public class AuthorizeService implements UserDetailsService {
    @Resource
    UserMapper userMapper;

    @Override
    public UserDetails loadUserByUsername(String username) throws UsernameNotFoundException {
        User user = userMapper.findUserByName(username);
        if (user == null) {
            log.error("用户不存在");
            throw new UsernameNotFoundException("用户不存在");
        }

        return org.springframework.security.core.userdetails.User
            .withUsername(username)
            .password(user.getPassword())
            .build();
    }
}
这样就通过了自定义的方式实现了数据库信息查询,并完成用户登录操作。
自定义登录界面
虽然SpringSecurity为我们提供了一个默认的登录界面,但是很多情况下往往都是我们使用自定义的登录界面,这个时候就需要进行更多的配置。
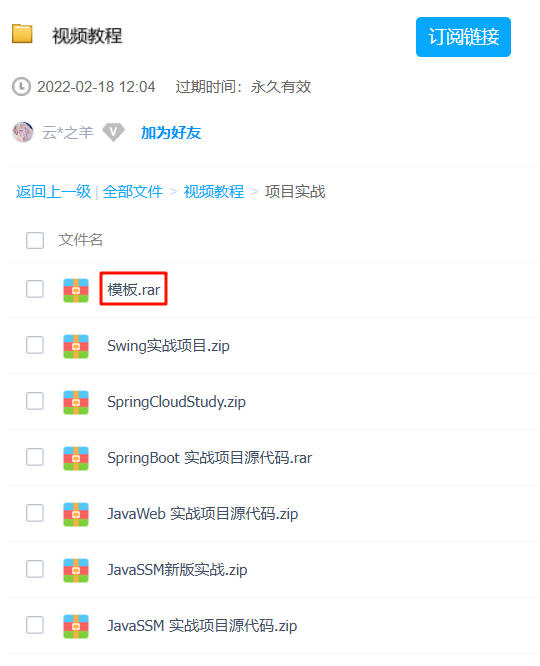
从柏码资源库 - 应用和资源 (itbaima.cn)下载对应的前端页面和资源:

下载解压
模板.rar后,将两个html文件index.html和login.html以及static文件夹放到项目的resources目录下。Controller中配置对应的接口
@Controller
public class HelloController {

    @RequestMapping(value = "/", method = RequestMethod.GET)
    public String index() {
        return "index";
    }

    @RequestMapping(value = "/login", method = RequestMethod.GET)
    public String login() {
        return "login";
    }
}
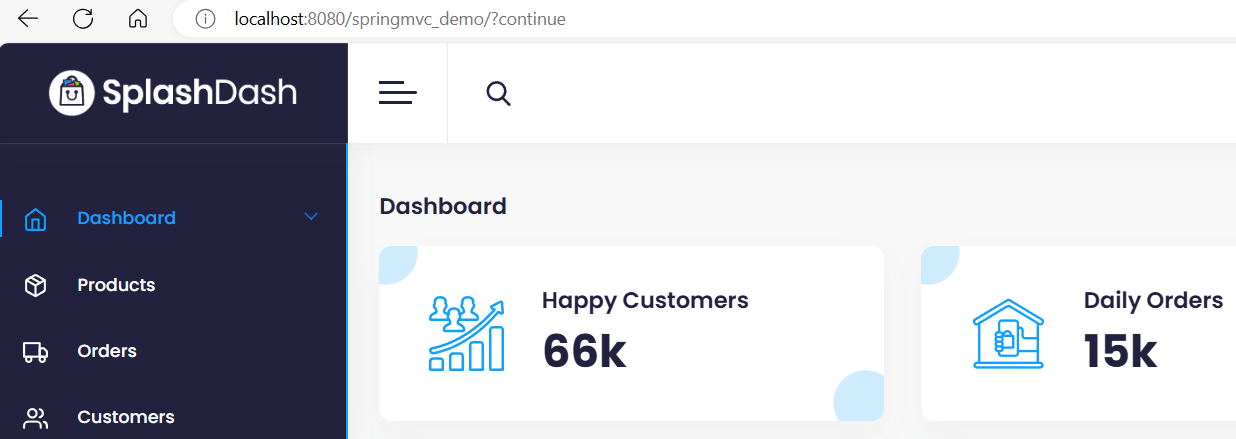
这样在登录之后就能展示前端模板页面:
登录 配置
在SpringSecurity配置类中,设置SecurityFilterChain,进行登录配置:
@Bean
public SecurityFilterChain securityFilterChain(HttpSecurity httpSecurity) throws Exception {
    return httpSecurity
        // 授权Http请求相关配置
        .authorizeHttpRequests(auth -> auth
                               .requestMatchers("/static/**").permitAll() // 静态资源请求全部允许
                               .anyRequest().authenticated()) // 其余任何请求都需要认证
        // 表单登录相关配置
        .formLogin(httpSecurityFormLoginConfigurer -> {
            httpSecurityFormLoginConfigurer
                .loginPage("/login") // 指定登录页面,若不指定,使用SpringSecurity的默认登录页面
                .usernameParameter("username") // 用户名和密码的表单字段名称,可以不配置
                .passwordParameter("password")
                .loginProcessingUrl("/doLogin") // 登录表单提交的地址,由SpringSecurity负责处理
                .defaultSuccessUrl("/", true) // 登录成功后跳转的页面
                .permitAll(); // 将登录相关的地址放行
        })
        // HttpSecurity实现了SecurityBuilder<DefaultSecurityFilterChain>接口,build返回的是DefaultSecurityFilterChain
        .build();
}
再访问项目网站,可以看到正常显示的登录页面:
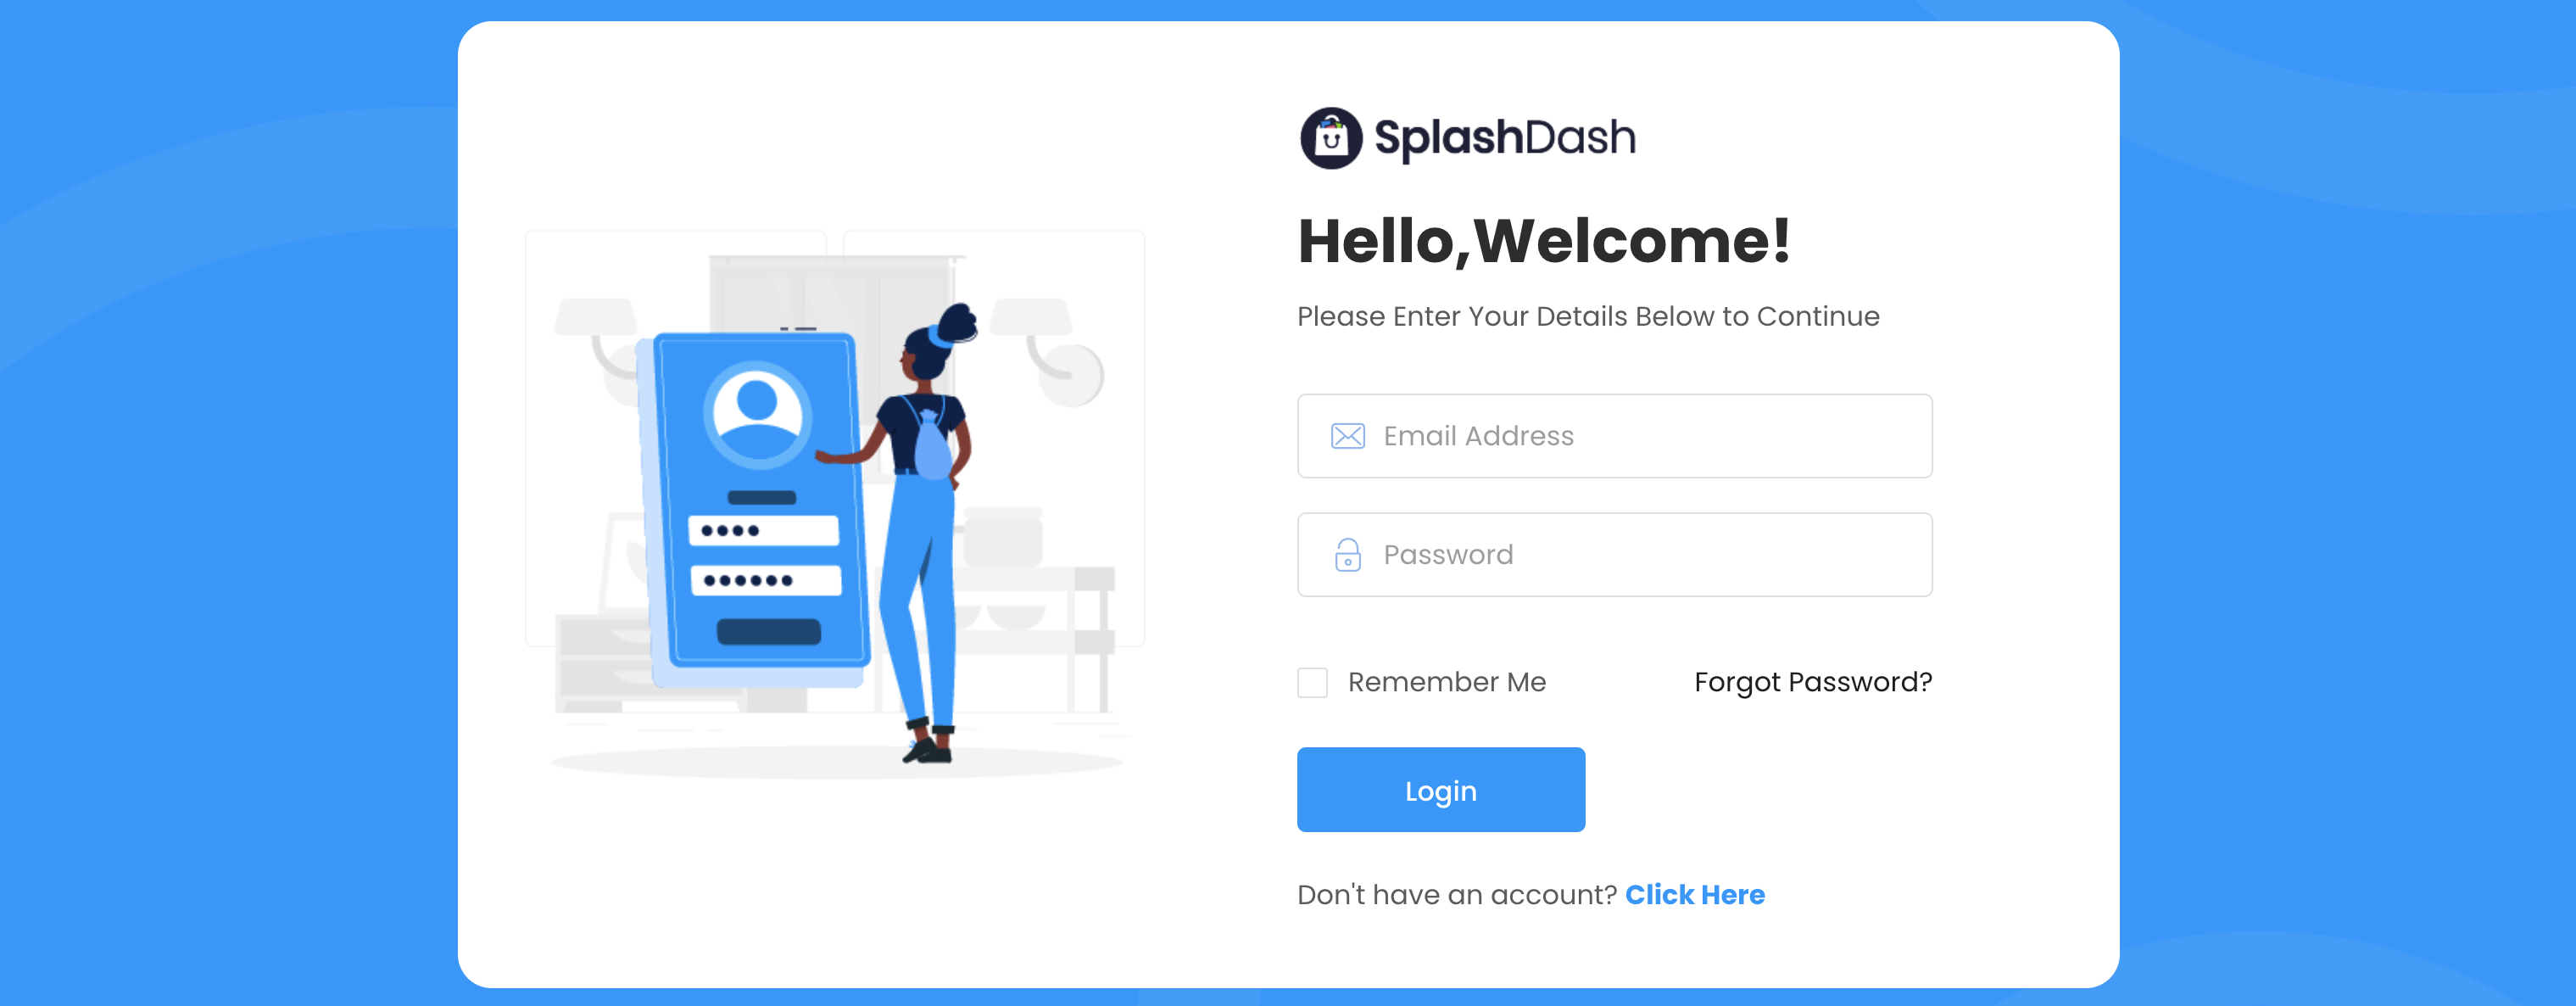
但是login.html中的表单还需要改动,以符合实际需要:
<form action="doLogin" method="post">
    ...
    <!-- 添加name,并将placeholder的值"Email Address"改为usernsme -->
    <input type="text" name="username" placeholder="username" class="ad-input">

    ...
    <!-- 添加name -->
    <input type="password" name="password" placeholder="Password" class="ad-input">
    ...
    <!-- csrfToken由SpringSecurity自动生成 -->
    <input type="text" th:name="${_csrf.getParameterName()}" th:value="${_csrf.token}" hidden>
    <div class="ad-auth-btn">
        <!-- 替换<div class="ad-auth-btn">包裹的内容如下 -->
        <button type="submit" class="ad-btn ad-login-member">Login</button>
    </div>
    ...
</form>
注销 配置
SpringSecurity配置类添加注销相关配置:
@Bean
public SecurityFilterChain securityFilterChain(HttpSecurity httpSecurity) throws Exception {
    return httpSecurity
        // 授权Http请求相关配置
        .authorizeHttpRequests(auth -> auth
                               .requestMatchers("/static/**").permitAll() // 静态资源请求全部允许
                               .anyRequest().authenticated()) // 其余任何请求都需要认证
        // 表单登录相关配置
        .formLogin(httpSecurityFormLoginConfigurer -> {
            httpSecurityFormLoginConfigurer
                .loginPage("/login") // 指定登录页面,若不指定,使用SpringSecurity的默认登录页面
                .usernameParameter("username") // 用户名和密码的表单字段名称,可以不配置
                .passwordParameter("password")
                .loginProcessingUrl("/doLogin") // 登录表单提交的地址,由SpringSecurity负责处理
                .defaultSuccessUrl("/", true) // 登录成功后跳转的页面
                .permitAll(); // 将上述地址放行
        })
        .logout(httpSecurityLogoutConfigurer ->
                httpSecurityLogoutConfigurer
                .logoutUrl("/doLogout") // 退出登录的地址,由SpringSecurity负责处理
                .logoutSuccessUrl("/login")
                .permitAll())
        // HttpSecurity实现了SecurityBuilder<DefaultSecurityFilterChain>接口,build返回的是DefaultSecurityFilterChain
        .build();
}index.html的logout标签变更:
<!-- 原标签 -->
<a href="login.html">
    <i class="fas fa-sign-out-alt"></i> logout
</a>

<!-- 改为如下内容 -->
<form action="doLogout" method="post">
    <!-- csrfToken由SpringSecurity自动生成 -->
    <input type="text" th:name="${_csrf.getParameterName()}" th:value="${_csrf.token}" hidden>
    <button type="submit">
        <i class="fas fa-sign-out-alt"></i> logout
    </button>
</form>
关闭CSRF校验
实际上现在浏览器已经很安全,没必要无论提交什么请求都进行CSRF校验,可以直接在SpringSecurity配置中关闭CSRF校验:
@Bean
public SecurityFilterChain securityFilterChain(HttpSecurity httpSecurity) throws Exception {
    return httpSecurity
        // 授权Http请求相关配置
        .authorizeHttpRequests(auth -> auth
                               .requestMatchers("/static/**").permitAll() // 静态资源请求全部允许
                               .anyRequest().authenticated()) // 其余任何请求都需要认证
        // 表单登录相关配置
        .formLogin(httpSecurityFormLoginConfigurer -> {
            httpSecurityFormLoginConfigurer
                .loginPage("/login") // 指定登录页面,若不指定,使用SpringSecurity的默认登录页面
                .usernameParameter("username") // 用户名和密码的表单字段名称,可以不配置
                .passwordParameter("password")
                .loginProcessingUrl("/doLogin") // 登录表单提交的地址,由SpringSecurity负责处理
                .defaultSuccessUrl("/", true) // 登录成功后跳转的页面
                .permitAll(); // 将上述地址放行
        })
        .logout(httpSecurityLogoutConfigurer ->
                httpSecurityLogoutConfigurer
                .logoutUrl("/doLogout") // 退出登录的地址,由SpringSecurity负责处理
                .logoutSuccessUrl("/login")
                .permitAll())
        .csrf(httpSecurityCsrfConfigurer -> {
            httpSecurityCsrfConfigurer.disable(); // 关闭全部CSRF校验
            httpSecurityCsrfConfigurer.ignoringRequestMatchers("/xxx/**"); // 忽略指定请求路径的CSRF校验
        })
        // HttpSecurity实现了SecurityBuilder<DefaultSecurityFilterChain>接口,build返回的是DefaultSecurityFilterChain
        .build();
}
这样,就不用在编写前端页面时嵌入CSRF相关的输入框,至此就完成了简单的自定义登录界面配置。
记住我 功能
“记住我”就是可以在登陆之后的一段时间内,无需再次输入账号和密码进行登陆,相当于服务端已经记住当前用户,再次访问时就可以免登陆进入。
SpringSecurity为每个已经登录的浏览器分配一个携带Token的Cookie,并且该Cookie默认被保留14天。只要不清理浏览器的Cookie,那就能继续使用之前登陆的身份。同样在SpringSecurity配置类中进行简单配置,即可开启记住我功能:
@Bean
public SecurityFilterChain securityFilterChain(HttpSecurity httpSecurity) throws Exception {
    return httpSecurity
        // 授权Http请求相关配置
        .authorizeHttpRequests(auth -> auth
                               .requestMatchers("/static/**").permitAll() // 静态资源请求全部允许
                               .anyRequest().authenticated()) // 其余任何请求都需要认证
        // 表单登录相关配置
        .formLogin(httpSecurityFormLoginConfigurer -> {
            httpSecurityFormLoginConfigurer
                .loginPage("/login") // 指定登录页面,若不指定,使用SpringSecurity的默认登录页面
                .usernameParameter("username") // 用户名和密码的表单字段名称,可以不配置
                .passwordParameter("password")
                .loginProcessingUrl("/doLogin") // 登录表单提交的地址,由SpringSecurity负责处理
                .defaultSuccessUrl("/", true) // 登录成功后跳转的页面
                .permitAll(); // 将上述地址放行
        })
        .logout(httpSecurityLogoutConfigurer ->
                httpSecurityLogoutConfigurer
                .logoutUrl("/doLogout") // 退出登录的地址,由SpringSecurity负责处理
                .logoutSuccessUrl("/login")
                .permitAll())
        .csrf(httpSecurityCsrfConfigurer -> {
            httpSecurityCsrfConfigurer.disable(); // 关闭全部CSRF校验
            httpSecurityCsrfConfigurer.ignoringRequestMatchers("/xxx/**"); // 忽略指定请求路径的CSRF校验
        })
        .rememberMe(httpSecurityRememberMeConfigurer -> {
            httpSecurityRememberMeConfigurer
                .alwaysRemember(false) // 交给用户自己选择 是否开启记住我
                // .rememberMeCookieName("remember-me"); // Cookie名,默认是"remember-me"
                .rememberMeParameter("remember-me"); // 表单字段,默认是"remember-me"
        })
        // HttpSecurity实现了SecurityBuilder<DefaultSecurityFilterChain>接口,build返回的是DefaultSecurityFilterChain
        .build();
}前端登录页面login.html:
<div class="ad-checkbox">
    <label>
        <input type="checkbox" name="remember-me" class="ad-checkbox">
        <span>Remember Me</span>
    </label>
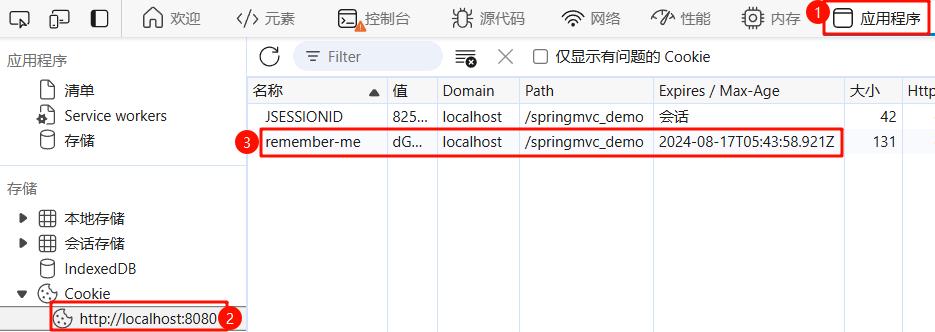
</div>登录时勾选记住我,登录成功后,可以在浏览器看到存储了一个有效期为14天的名为remember-me的cookie。这样,下次再访问网站时,就无需登录操作。
但是,当前记住我的信息是放在内存中的,我们需要保证服务器一直处于运行状态,如果关闭服务器的话,记住我信息会全部丢失。因此,如果希望记住我信息持久化保存,就需要进一步进行配置。创建一个基于JDBC的TokenRepository实现,将rememberMe进行持久化存储。
@Configuration
@EnableWebSecurity // 开启WebSecurity相关功能
@Slf4j
public class SecurityConfiguration {

    ...

        @Bean
        public PersistentTokenRepository persistentTokenRepository(DataSource dataSource) {
        JdbcTokenRepositoryImpl tokenRepository = new JdbcTokenRepositoryImpl();
        // 项目启动时,自动在数据库中创建存储记住我信息的表,仅第一次需要
        tokenRepository.setCreateTableOnStartup(true);
        tokenRepository.setDataSource(dataSource);
        return tokenRepository;
    }

    @Bean
    public SecurityFilterChain securityFilterChain(HttpSecurity httpSecurity,
                                                   PersistentTokenRepository tokenRepository) throws Exception {
        return httpSecurity
            // 授权Http请求相关配置
            .authorizeHttpRequests(auth -> auth
                                   .requestMatchers("/static/**").permitAll() // 静态资源请求全部允许
                                   .anyRequest().authenticated()) // 其余任何请求都需要认证
            // 表单登录相关配置
            .formLogin(httpSecurityFormLoginConfigurer -> {
                httpSecurityFormLoginConfigurer
                    .loginPage("/login") // 指定登录页面,若不指定,使用SpringSecurity的默认登录页面
                    .usernameParameter("username") // 用户名和密码的表单字段名称,可以不配置
                    .passwordParameter("password")
                    .loginProcessingUrl("/doLogin") // 登录表单提交的地址,由SpringSecurity负责处理
                    .defaultSuccessUrl("/", true) // 登录成功后跳转的页面
                    .permitAll(); // 将上述地址放行
            })
            .logout(httpSecurityLogoutConfigurer ->
                    httpSecurityLogoutConfigurer
                    .logoutUrl("/doLogout") // 退出登录的地址,由SpringSecurity负责处理
                    .logoutSuccessUrl("/login")
                    .permitAll())
            .csrf(httpSecurityCsrfConfigurer -> {
                httpSecurityCsrfConfigurer.disable(); // 关闭全部CSRF校验
                // httpSecurityCsrfConfigurer.ignoringRequestMatchers("/xxx/**"); // 忽略指定请求路径的CSRF校验
            })
            .rememberMe(httpSecurityRememberMeConfigurer -> {
                httpSecurityRememberMeConfigurer
                    .alwaysRemember(false) // 交给用户自己选择 是否开启记住我
                    // .rememberMeCookieName("remember-me"); // Cookie名,默认是"remember-me"
                    .rememberMeParameter("remember-me") // 表单字段,默认是"remember-me"
                    .tokenRepository(tokenRepository) // 持久化存储
                    .tokenValiditySeconds(60 * 60 * 24 * 7); // 设置有效期为7天
            })
            // HttpSecurity实现了SecurityBuilder<DefaultSecurityFilterChain>接口,build返回的是DefaultSecurityFilterChain
            .build();
    }
}这样,我们就成功配置了数据库持久化存储记住我信息,即使我们重启服务器也不会导致数据丢失。当我们登录之后,数据库中会自动记录相关的信息:

授权 authorization
用户的一个操作实际上就是在访问我们提供的接口(编写的对应访问路径的Servlet)。比如登陆,就需要调用/login接口,退出登陆就要调用/logout接口。从开发者的角度来说,决定用户能否使用某个功能,只需要决定用户是否能够访问对应的Servlet即可。也就是说,我们需要做的就是指定哪些请求可以由哪些用户发起。
SpringSecurity提供了两种授权方式:
- 基于权限授权:只要拥有某权限的用户,就可以访问某个路径
- 基于角色授权:根据用户属于哪个角色来决定是否可以访问某个路径。
两者只是概念上的不同,实际上使用起来效果差不多。
RBAC概念
RBAC(Role Based Access Control,基于角色的访问控制)一般分为用户(user), 角色(role),权限(permission)三个实体。角色和权限是多对多的关系,用户和角色也是多对多的关系。用户和权限之间没有直接的关系,都是通过角色作为代理,才能获取到用户拥有的权限。一般情况下, 使用5张表就够了,3个实体表,2个关系表(角色-权限关联表,用户-角色关联表)。
基于角色授权
现在我们希望创建两个角色,普通用户和管理员,普通用户只能访问index页面,管理员可以访问任何页面。
修改数据库中的角色表,添加用户角色字段,并创建一个新的用户admin,test用户的角色为user,admin用户的角色为admin。
ALTER TABLE demo.users ADD `role` VARCHAR(255) NOT NULL;

UPDATE demo.users t SET t.role = 'user' WHERE t.id = 1;

INSERT INTO demo.users (id, username, password, role) VALUES (2, 'admin', '$2a$10$i/ugUOtVJF3rFXM5jbMkHuFH4RXrJ9MjAeDTRaH1q/2buMX0Y35Tu', 'admin');
同步更新实体类字段,加载用户时,添加对应的角色。
@Data
@AllArgsConstructor
public class User {
    private int id;
    private String username;
    private String password;
    private String role;
}
@Override public UserDetails loadUserByUsername(String username) throws UsernameNotFoundException { Account account = mapper.findUserByName(username); if(account == null) throw new UsernameNotFoundException("用户名或密码错误"); return User .withUsername(username) .password(account.getPassword()) .roles(account.getRole()) //添加角色,一个用户可以有多个角色 .build(); }编写SpringSecurity配置类,配置角色授权。
@Bean
public SecurityFilterChain securityFilterChain(HttpSecurity httpSecurity,
                                               PersistentTokenRepository tokenRepository) throws Exception {
    return httpSecurity
        // 授权Http请求相关配置
        .authorizeHttpRequests(auth -> auth
                               .requestMatchers("/static/**").permitAll() // 静态资源请求全部允许
                               .requestMatchers("/").hasAnyRole("user", "admin") // "/"路径只有user和admin角色能访问
                               .anyRequest().hasRole("admin")) // 其余路径必须是admin角色才能访问
        //.anyRequest().authenticated()) // 其余任何请求都需要认证
        .build();
}
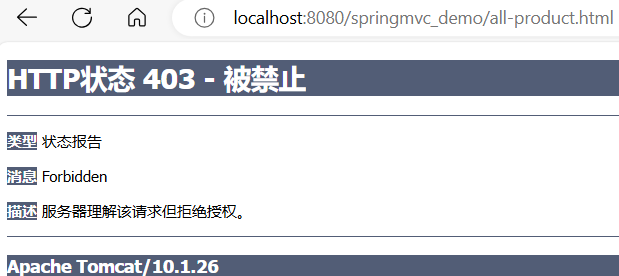
重新部署好项目后,test用户可以正常登录,但是访问其他页面就会被拦截,返回403。
基于权限授权
基于权限的授权与角色类似,需要在SpringSecurity的配置类中,以hasAnyAuthority或hasAuthority进行判断:
@Bean
public SecurityFilterChain securityFilterChain(HttpSecurity httpSecurity,
                                               PersistentTokenRepository tokenRepository) throws Exception {
    return httpSecurity
        // 授权Http请求相关配置
        .authorizeHttpRequests(auth -> auth
                               .requestMatchers("/static/**").permitAll() // 静态资源请求全部允许

                               .anyRequest().hasAnyAuthority("page:index")
        //.anyRequest().authenticated()) // 其余任何请求都需要认证
        .build();
}
hasRole 的处理逻辑和 hasAuthority 似乎一模一样,不同的是,hasRole 会自动给传入的字符串加上 ROLE_ 前缀,所以在数据库中的权限字符串需要加上 ROLE_ 前缀。即数据库中存储的用户角色如果是 ROLE_admin,这里就是 admin。
hasRole 和 hasAuthority的区别
hasAnyRole 在调用 hasAnyAuthorityName 方法时设置了 ROLE_ 前缀,hasAnyAuthority 在调用 hasAnyAuthorityName 方法时没有设置前缀。
- 从源码角度来看,
hasRole和hasAuthority这两个功能似乎一模一样,除了前缀之外就没什么区别了。Spring Security 的RoleVoter负责处理角色相关的权限检查,即使数据库中存储的角色名没有ROLE_前缀,RoleVoter也会自动添加ROLE_前缀,因此可以找到匹配的角色。 - 设计理念上,角色是权限的集合。
参考:Spring Security 中的 hasRole 和 hasAuthority 有区别吗?-腾讯云开发者社区-腾讯云 (tencent.com)
使用注解进行权限判断
首先在SpringSecurity配置类上开启方法安全校验。
@Configuration @EnableWebSecurity @EnableMethodSecurity // 开启方法安全校验 public class SecurityConfiguration { ... }在Controller层,对想要进行权限校验的方法上添加注解。
@RequestMapping(value = "/", method = RequestMethod.GET)
@PreAuthorize("hasRole('user')") // SpEL表达式,直接用hasRole方法判断是否包含某个角色
public String index() {
    return "index";
}
所有可以进行权限判断的方法在
SecurityExpressionRoot类中都有定义。@PostAuthorize方法执行后再拦截
除了Controller之外,只要是由Spring管理的Bean都可以使用注解形式来控制权限。只要不具备表达式中指定的访问权限,就会无法执行方法并返回403。
还可以使用
@PreFilter和PostFilter对集合类型的参数或返回值进行过滤。当有多个集合时,需要使用filterTarget进行指定。@PreFilter(value = "filterObject.equals('lbwnb')", filterTarget = "list2") // filterObject代表集合中每个元素,只有满足条件的元素才会留下 public void test(List<String> list, List<String> list2){ System.out.println("成功执行" + list2); }
SpringSecurity内部机制
使用SpringSecurity,第一步是配置继承AbstractSecurityWebApplicationInitializer的安全web应用初始化器类。
待续…
柏码知识库 | SSM笔记(三)SpringSecurity基础 (itbaima.cn)
SpringSecurity中默认的过滤器顺序
package org.springframework.security.config.annotation.web.builders;

public final class HttpSecurity extends AbstractConfiguredSecurityBuilder<DefaultSecurityFilterChain, HttpSecurity>
		implements SecurityBuilder<DefaultSecurityFilterChain>, HttpSecurityBuilder<HttpSecurity> {
    ...
        // Spring Security 自带的排序后的过滤器
    private FilterOrderRegistration filterOrders = new FilterOrderRegistration();

    ...
}

final class FilterOrderRegistration {
	...

	FilterOrderRegistration() {
		Step order = new Step(INITIAL_ORDER, ORDER_STEP);
		put(DisableEncodeUrlFilter.class, order.next());
		put(ForceEagerSessionCreationFilter.class, order.next());
		put(ChannelProcessingFilter.class, order.next());
		order.next(); // gh-8105
		put(WebAsyncManagerIntegrationFilter.class, order.next());
		put(SecurityContextHolderFilter.class, order.next());
		put(SecurityContextPersistenceFilter.class, order.next());
		put(HeaderWriterFilter.class, order.next());
		put(CorsFilter.class, order.next());
		put(CsrfFilter.class, order.next());
		put(LogoutFilter.class, order.next());
		this.filterToOrder.put(
				"org.springframework.security.oauth2.client.web.OAuth2AuthorizationRequestRedirectFilter",
				order.next());
		this.filterToOrder.put(
				"org.springframework.security.saml2.provider.service.web.Saml2WebSsoAuthenticationRequestFilter",
				order.next());
		put(GenerateOneTimeTokenFilter.class, order.next());
		put(X509AuthenticationFilter.class, order.next());
		put(AbstractPreAuthenticatedProcessingFilter.class, order.next());
		this.filterToOrder.put("org.springframework.security.cas.web.CasAuthenticationFilter", order.next());
		this.filterToOrder.put("org.springframework.security.oauth2.client.web.OAuth2LoginAuthenticationFilter",
				order.next());
		this.filterToOrder.put(
				"org.springframework.security.saml2.provider.service.web.authentication.Saml2WebSsoAuthenticationFilter",
				order.next());
		put(UsernamePasswordAuthenticationFilter.class, order.next());
		order.next(); // gh-8105
		put(DefaultResourcesFilter.class, order.next());
		put(DefaultLoginPageGeneratingFilter.class, order.next());
		put(DefaultLogoutPageGeneratingFilter.class, order.next());
		put(DefaultOneTimeTokenSubmitPageGeneratingFilter.class, order.next());
		put(ConcurrentSessionFilter.class, order.next());
		put(DigestAuthenticationFilter.class, order.next());
		this.filterToOrder.put(
				"org.springframework.security.oauth2.server.resource.web.authentication.BearerTokenAuthenticationFilter",
				order.next());
		put(BasicAuthenticationFilter.class, order.next());
		put(AuthenticationFilter.class, order.next());
		put(RequestCacheAwareFilter.class, order.next());
		put(SecurityContextHolderAwareRequestFilter.class, order.next());
		put(JaasApiIntegrationFilter.class, order.next());
		put(RememberMeAuthenticationFilter.class, order.next());
		put(AnonymousAuthenticationFilter.class, order.next());
		this.filterToOrder.put("org.springframework.security.oauth2.client.web.OAuth2AuthorizationCodeGrantFilter",
				order.next());
		put(SessionManagementFilter.class, order.next());
		put(ExceptionTranslationFilter.class, order.next());
		put(FilterSecurityInterceptor.class, order.next());
		put(AuthorizationFilter.class, order.next());
		put(SwitchUserFilter.class, order.next());
	}
    ...
}
添加顺序:
- HttpSecurityConfiguration#httpSecurity –> add WebAsyncManagerlntegrationFilter
- SecurityConfig类中自定义添加的filter
…