Github Action实现自动部署Hexo博客
需求
前言:Windows下通过GitHub+Hexo搭建个人博客的步骤
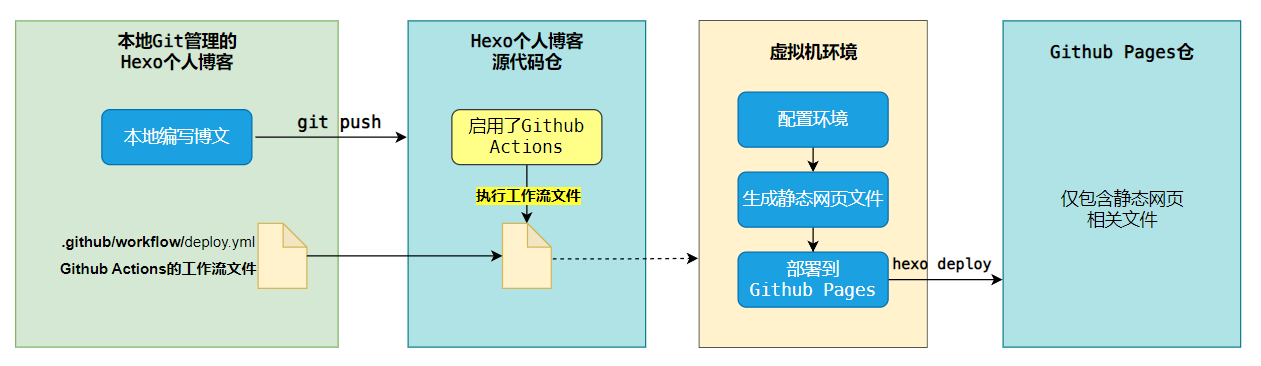
传统利用Hexo发布博文,需要:
- 执行
hexo new "文章标题"命令,编写博文 - 执行
hexo generate命令,生成静态网页文件 - 执行
hexo deploy命令,将静态网页文件部署到Github Pages
- 问题1:
如果想用git进行版本控制,每部署一次,也要git add、git commit、git push三连。版本控制与博客的部署操作是割裂的,很难一次性完成。 - 问题2:
随着文章越来越多,编译的时间也越来越长,每次执行hexo generate命令都需要花费大量时间,这对个人博客来说是不划算的。 - 问题3:
可能会遇到本地安装的Node.js 版本升级后,与 Hexo 不兼容的问题。
那么有没有什么方法,可以搞定这些痛点,自动部署Hexo博客呢?
Github Actions是一个白嫖的好答案。它是Github推出的持续集成服务,可以自动化地执行各种任务,比如编译、测试、打包、发布等等。
最终效果:
设置Github Actions
首先,Github Pages只能是公开仓库,而博客源文件中可能会存放一些敏感信息、不会生成静态网页文件的个人文件和数据等(某些人会把整个Hexo个人博客看作个人文档,譬如在下),不适合放在公开仓库。类似前后端分离的思想,可以将博客源代码存放于一个私有仓库,再利用Github Actions部署到Github Pages仓库。
设置SSH密钥
可以在本地随意熟悉位置执行如下命令:
ssh-keygen -t rsa -b 4096 -C "$(git config user.email)" -f hexo-deploy-key一路回车,就生成了两个文件:
- 私钥
hexo-deploy-key - 公钥
hexo-deploy-key.pub
存放博客源码的私有仓库 hexo_blog
进入存放博客源码的 hexo_blog 仓库,选择 Settings -> Secrets and variables -> Actions -> New repository secret,Name 为 HEXO_DEPLOY_KEY,Secrets 填 HEXO_DEPLOY_KEY 文件中的全部内容。
存放静态网页文件的Github Pages仓库
进入存放静态网页文件的 Github Pages仓库,选择 Settings -> Deploy keys -> Add deploy key,Title 为 public key of HEXO_DEPLOY_KEY,Key 填 hexo-deploy-key.pub 文件的内容。
Settings > Pages 选择gh-page分支作为站点。

创建 Github Actions 工作流文件
工作流文件需要在Hexo个人博客源码的.github/workflows/目录下(没有该目录就新建),任意名称的yml文件都会被执行。我以deploy.yml命名,结合Hexo和Next官方提供的模板(Hexo官网的东西真是一言难尽…),以及网上各博文(踩坑无数…),最终内容如下:
name: Deploy Hexo to Github Pages

# 触发条件,当有代码推送到指定分支时,触发流程
on:
  push:
    branches:
      - gh-pages

# Sets permissions of the GITHUB_TOKEN to allow deployment to GitHub Pages
permissions:
  contents: read
  pages: write
  id-token: write

# Allow only one concurrent deployment, skipping runs queued between the run in-progress and latest queued.
# However, do NOT cancel in-progress runs as we want to allow these production deployments to complete.
concurrency:
  group: "pages"
  cancel-in-progress: false

jobs:
  # 子任务
  build:
    # 指定运行所需要的虚拟机环境
    runs-on: ubuntu-latest

    steps:
      # Checkout 当前仓库到容器。
      - name: Checkout
        uses:
          actions/checkout@v4
        with:
          fetch-depth: 0

      # 设置node环境
      - name: Use Node.js
        uses: actions/setup-node@v4
        with:
          node-version: "20.18.3"

      # 缓存依赖项
      - name: Cache NPM dependencies
        uses: actions/cache@v4
        with:
          path: node_modules
          key: ${{ runner.OS }}-npm-cache
          restore-keys: |
            ${{ runner.OS }}-npm-cache

      # 安装依赖
      - name: Install Dependencies
        run: npm install

        # 设置文件时间戳为最后一次提交的时间戳
      - name: Set file timestamps to last commit time
        run: git ls-files -z | while read -d '' path; do touch -d "$(git log -1 --format="@%ct" "$path")" "$path"; done

      - name: Build
        run: |
          npm run clean # 实际为hexo clean
          npm run build # 实际为hexo generate

      - name: prepare git
        env:
          HEXO_DEPLOY_KEY: ${{ secrets.HEXO_DEPLOY_KEY }}
        run: |
          sudo timedatectl set-timezone "Asia/Shanghai"
          mkdir -p ~/.ssh/
          echo "$HEXO_DEPLOY_KEY" | tr -d '\r' > ~/.ssh/id_rsa
          chmod 600 ~/.ssh/id_rsa
          ssh-keyscan github.com >> ~/.ssh/known_hosts
          git config --global user.name Hunter
          git config --global user.email hspecial@163.com
          git config --global core.quotepath false

      - name: Deploy to GitHub Pages
        run:
          npm run deploy # 实际为hexo deploy
_config.yml做相应调整
# Deployment
## Docs: https://hexo.io/docs/one-command-deployment
deploy:
  type: git
  repository: git@github.com:Hunter1023/Hunter1023.github.io.git
  branch: gh-pages # 作为站点的分支
参考
部署完成后,遇到hexo自动更新文章修改时间问题
最优解:Hexo GitHub Action CI配置(解决文章修改时间问题) | Calvin Cui,本文已按照该博文配置。
次解:hexo自动更新文章修改时间 - yyyz - 博客园
可以利用
scripts目录下的脚本会被自动执行的特点,添加如下内容:/* 批量更新修改时间 博客自动更新文章的修改时间 */ // 监听 hexo 的 generate 事件 hexo.on("generateBefore", function (data) { console.log("博客自动更新文章的修改时间 脚本开始运行.."); var fs = require("fs"); //请求文件系统 var RegExp = /(updated:\s*)((\d{2}(([02468][048])|([13579][26]))[\-\/\s]?((((0?[13578])|(1[02]))[\-\/\s]?((0?[1-9])|([1-2][0-9])|(3[01])))|(((0?[469])|(11))[\-\/\s]?((0?[1-9])|([1-2][0-9])|(30)))|(0?2[\-\/\s]?((0?[1-9])|([1-2][0-9])))))|(\d{2}(([02468][1235679])|([13579][01345789]))[\-\/\s]?((((0?[13578])|(1[02]))[\-\/\s]?((0?[1-9])|([1-2][0-9])|(3[01])))|(((0?[469])|(11))[\-\/\s]?((0?[1-9])|([1-2][0-9])|(30)))|(0?2[\-\/\s]?((0?[1-9])|(1[0-9])|(2[0-8]))))))(\s((([0-1][0-9])|(2?[0-3]))\:([0-5]?[0-9])((\s)|(\:([0-5]?[0-9])))))/g; fs.readdir("./source/_posts/", function (err, files) { var len = files.length; var file = null; for (var i = 0; i < len; i++) { file = files[i]; console.log("读取文件:", file); if (file.indexOf(".md") > -1) { console.log("正在处理文件:", file); writeFileTime("./source/_posts/" + file, fs); } } }); /* file:读取时间的文件以及写入内容的文件 fs: 文件系统 */ function writeFileTime(file, fs) { fs.readFile(file, "utf8", function (err, data) { //读取文件内容 console.log("读取文件内容:", file); if (err) return console.log("读取文件内容错误:", err); //console.log("文件"+file+"的内容:",data); if (RegExp.test(data)) { //如果匹配到`updated`字段 fs.stat(file, function (err, stats) { //读取文件信息,创建时间等 if (err) return console.log("读取文件信息错误:", err); var updateds = data.match(RegExp); //console.log("updated数组:",updateds); if (updateds.length > 1) console.log("文件" + file + "匹配到多处update字段"); var updated = updateds[0].replace("updated: ", "").replace(/-/g, "/"); //时间格式化为2018/01/29 21:33:30 //console.log("updated:",updated); // 修改时间和 文章内updated时间差 > 5分钟,触发更新 if ( new Date(stats.mtime).getTime() - new Date(Date.parse(updated)) > 1000 * 60 * 5 ) { //替换更新时间 var result = data.replace( RegExp, "updated: " + getFormatDate(stats.mtime) ); //写入新的文件内容 console.log("修改更新时间的文件:", file); fs.writeFile(file, result, "utf8", function (err) { if (err) return console.log("写文件错误:", err); fs.utimes( file, new Date(stats.atime), new Date(stats.mtime), function (err) { //还原访问时间和修改时间 if (err) return console.log("修改时间失败:", err); console.log(file, "成功更新时间"); } ); }); } }); } }); } /* timeStr:时间,格式可为:"September 16,2016 14:15:05、 "September 16,2016"、"2016/09/16 14:15:05"、"2016/09/16"、 '2014-04-23T18:55:49'和毫秒 dateSeparator:年、月、日之间的分隔符,默认为"-", timeSeparator:时、分、秒之间的分隔符,默认为":" */ function getFormatDate(timeStr, dateSeparator, timeSeparator) { dateSeparator = dateSeparator ? dateSeparator : "-"; timeSeparator = timeSeparator ? timeSeparator : ":"; var date = new Date(timeStr), year = date.getFullYear(), // 获取完整的年份(4位,1970) month = date.getMonth(), // 获取月份(0-11,0代表1月,用的时候记得加上1) day = date.getDate(), // 获取日(1-31) hour = date.getHours(), // 获取小时数(0-23) minute = date.getMinutes(), // 获取分钟数(0-59) seconds = date.getSeconds(), // 获取秒数(0-59) Y = year + dateSeparator, M = (month + 1 > 9 ? month + 1 : "0" + (month + 1)) + dateSeparator, D = (day > 9 ? day : "0" + day) + " ", h = (hour > 9 ? hour : "0" + hour) + timeSeparator, m = (minute > 9 ? minute : "0" + minute) + timeSeparator, s = seconds > 9 ? seconds : "0" + seconds, formatDate = Y + M + D + h + m + s; return formatDate; } });