刷机
小米6
安装twrp:【教程】以小米6为例,教你如何刷机_哔哩哔哩_bilibili
MIUI下载:小米各机型 MIUI 历史版本分类索引 MIUISTORE 下载
改包:【MIUI12.5降级】手把手教你如何从MIUI12.5降级到旧版本<2>_哔哩哔哩_bilibili
MiFlash:MiFlash 线刷工具下载合集 – MIUI历史版本
Magisk获取Root:
问题背景:卡刷9.9.3开发版ROM总是会无限重启,无法正常进入。使用MiFlash线刷,又会一直无法完成。
通过对有线刷包版本的MIUI进行改包的方式,成功安装(虽然MiFlash线刷会报错,但实际能成功安装)。
安装开发版后,可能是小米已经停止维护root权限的开放,开启小米官方的root权限流程会出现下载失败,转而通过Magisk来获取Root权限。
小番茄
缓苗
收到番茄苗后:
- 室内阴凉通风处缓苗。
- 对根部进行适量喷水保湿。
- 摘除已经发黄或枯萎的叶子。
移栽定植
- 保持原土团的完整,避免损伤根系。
- 将番茄苗放入新盆中(直径15cm以上),填充土壤并轻轻压实,确保植株稳定。
- 盆土浇透水,放到散射光通风处。
- 1-2天后,放到阳台能让阳光直晒的位置。
日常养护
- 光照:喜光,有助于积累养分。
- 温度:15 - 25 ℃。夏季需要遮荫降温,避免晒伤。
- 土壤:疏松、排水性好。PH 6.0 - 7.0。
- 浇水:保持土壤湿润,不要过湿。
- 施肥:薄肥勤施。30天追肥1次,花期、结果期15天1次。施肥不要太靠近根部,避免烧苗。
- 花多多1号(通用型水溶肥)
- 1周1次。多余的肥水可以喷洒叶面。第一花序开花前,番茄需水量不是很大,正好大概1周浇1次水,顺手直接施肥。
- 磷酸二氢钾。
- 在开第一朵花后使用,2周1次(此时和通用型水溶肥错开,1周磷酸二氢钾、一周花多多1号)
- 小番茄接近转色(大约结果30天后),增加施肥频率至1周1次。通用性水溶肥改为2-4周1次。
- 花多多1号(通用型水溶肥)
搭架吊蔓
什么时候进行这步操作?
- 沿番茄苗主干插入支架,避免损伤根部。
- 用绳子将植株固定在支架上,增强空气流通,改善光照、促进番茄的成熟。
开花授粉
- 开花后,用棉签轻轻蘸取雄蕊上的花粉,将其均匀涂抹在雌蕊上以及花朵内侧。
- 授粉后避免淋雨。
收获
从开花到果实成熟,一般需要1个月左右时间。当果实呈现出品种应有的色泽即可收获。
mysqldump
简介
mysqldump 是 MySQL 自带的逻辑备份工具。
它的备份原理是通过协议连接到 MySQL 数据库,将需要备份的数据查询出来,将查询出的数据转换成对应的insert 语句,当我们需要还原这些数据时,只要执行这些 insert 语句,即可将对应的数据还原。
备份命令
mysqldump [选项] 数据库名 [表名] > 脚本名

mysqldump [选项] --all-databases [选项]  > 脚本名
选项
| 参数名 | 缩写 | 含义 |
|---|---|---|
| –host | -h | 服务器IP地址 |
| –port | -P | 服务器端口号 |
| –user | -u | MySQL 用户名 |
| –pasword | -p | MySQL 密码 |
| –databases | 指定要备份的数据库 | |
| –all-databases | 备份mysql服务器上的所有数据库 | |
| –compact | 压缩模式,产生更少的输出 | |
| –comments | 添加注释信息 | |
| –complete-insert | 输出完成的插入语句 | |
| –lock-tables | 备份前,锁定所有数据库表 | |
| –no-create-db/–no-create-info | 禁止生成创建数据库语句 | |
| –force | 当出现错误时仍然继续备份操作 | |
| –default-character-set | 指定默认字符集 | |
| –add-locks | 备份数据库表时锁定数据库表 |
示例
备份所有数据库:
mysqldump -uroot -p --all-databases > /backup/mysqldump/all.db备份指定数据库:
# 显式添加--databases参数,才会自动添加如下语句
# CREATE DATABASE /*!32312 IF NOT EXISTS*/ `test`
# USE `test`;
mysqldump -uroot -p --databases test > /backup/mysqldump/test.db
备份指定数据库指定表(多个表以空格间隔)
mysqldump -uroot -p mysql db event > /backup/mysqldump/2table.db备份指定数据库排除某些表
mysqldump -uroot -p test --ignore-table=test.t1 --ignore-table=test.t2 > /backup/mysqldump/test2.db如果是使用mysql的docker容器,在命令前添加如下内容即可:
docker exec MYSQL_CONTAINER_NAME还原命令
# 在导入备份数据库前,如果没有db_name,需要创建; 而且与db_name.db中数据库名一样才可以导入。
mysqladmin -uroot -p create db_name
mysql -uroot -p  db_name < /backup/mysqldump/db_name.db
参考
Github Action实现自动部署Hexo博客
需求
前言:Windows下通过GitHub+Hexo搭建个人博客的步骤
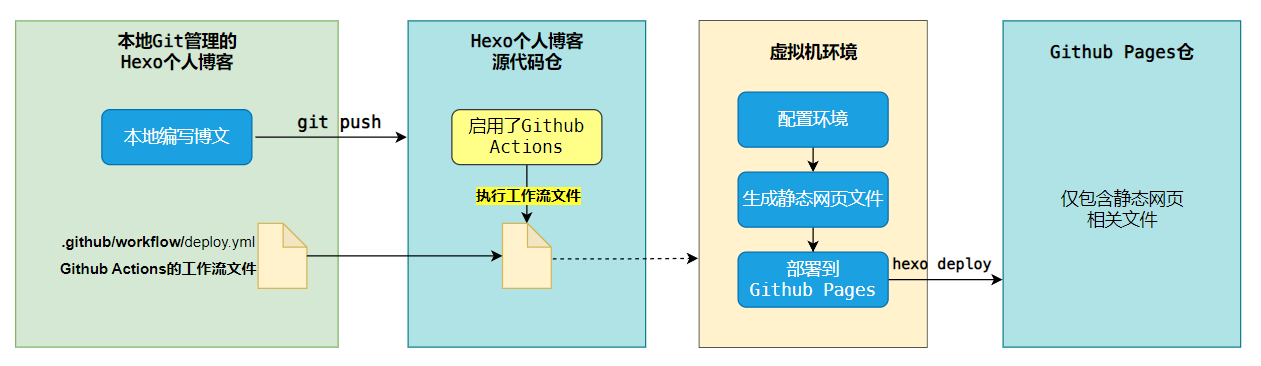
传统利用Hexo发布博文,需要:
- 执行
hexo new "文章标题"命令,编写博文 - 执行
hexo generate命令,生成静态网页文件 - 执行
hexo deploy命令,将静态网页文件部署到Github Pages
- 问题1:
如果想用git进行版本控制,每部署一次,也要git add、git commit、git push三连。版本控制与博客的部署操作是割裂的,很难一次性完成。 - 问题2:
随着文章越来越多,编译的时间也越来越长,每次执行hexo generate命令都需要花费大量时间,这对个人博客来说是不划算的。 - 问题3:
可能会遇到本地安装的Node.js 版本升级后,与 Hexo 不兼容的问题。
那么有没有什么方法,可以搞定这些痛点,自动部署Hexo博客呢?
Github Actions是一个白嫖的好答案。它是Github推出的持续集成服务,可以自动化地执行各种任务,比如编译、测试、打包、发布等等。
最终效果: